GB
45
– Slowly guide the tool arm upwards.
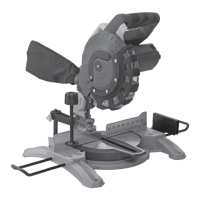
P. 4, item 4
– Push the length stop (5) onto the exten-
sion bar as shown and secure using the
screw (14).
– Push the extension handles (7) into the
holes provided as far as they will go and
screw down with bolts (15).
P. 4, item 5
– Push the clamping fixture (8) into one of
the holes provided and screw down with
bolts (16).
Mount the device onto the workbench
P. 5, item 6
– Insert suitable screws through the drilled
mounting holes (17).
– Firmly screw the product to the bench sur-
face.
Attaching the collecting sack
P. 5, item 7
– Push clamp (18) together.
– Attach the collecting sack (1) to the swarf
remover or connect a swarf extractor.
Set the adjustable stop
P. 5, item 8
– Undo the screw (19).
– Slide the moving part (20) of the work-
piece stop.
– Tighten the screw (19) back up again.
Operation
Check before switching on!
Check the safe condition of the product:
– Check whether there are any visible
defects.
– Check whether all parts of the product are
firmly attached.
– Check that the product is stable.
– Check that the safety devices are in fault-
less condition.
– Check whether the incline setting locking
screw is firmly tightened.
Setting the mitre angle
The mitre angle can be set steplessly
between -45° to 45°.
P. 5, item 9
– Loosen the locking screw (12).
– Rotate the saw bench (6) stop into the
required position.
The set mitre angle can be read from the
scale (21).
– Re-tighten the locking screw (12).
Setting the incline angle
The incline angle can be set steplessly
between 0° to 45°.
P. 6, item 10
– Loosen the locking screw (11).
– Incline the tool arm into the required posi-
tion.
The set angle of inclination can be read from
the scale (22).
– Re-tighten the locking screw (11).
Notes about sawing
• The workpiece must be in firm contact
along its entire length. When sawing long
workpieces, always use the table exten-
sion.
• Never saw workpieces set on end, lay
them flat on the saw table and clamp
firmly.
• Secure round workpieces to prevent twist-
ing.
Note: The use of a swarf extractor is
recommended when processing
larger volumes.
Note: On both sides of the workpiece
stop there must be a gap of precisely
8 mm to the saw blade.
DANGER! Risk of injury! The prod-
uct must only be put into operation if
no defects are found. Ensure that any
defective parts are replaced before
the product is used again.
WARNING! Risk of injury! Always
tighten the workpiece stop locking
screw before sawing.
WARNING! Risk of injury! Always
tighten the incline setting locking
screw before sawing.
WARNING! Risk of injury! Firmly
hold the workpiece only on the right-
hand side for inclined cuts.
 Loading...