Do you have a question about the Coaster 600174 and is the answer not in the manual?
Provides essential tips for preparation and important safety warnings for product usage.
Lists and identifies all necessary furniture parts and hardware components for assembly.
Instruction to assemble the front and back stretchers to the leg frames using bolts and nuts.
Instruction to attach the leg frames to the wooden seat using bolts and washers.
Instruction to fasten the chair back to the wooden seat using bolts and washers.
Instructions for attaching arm rests to both the seat and chair back, with specific tightening guidelines.
Final step indicating the completion of the rocking chair assembly.
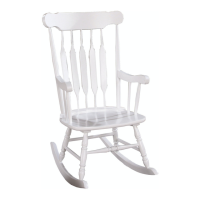
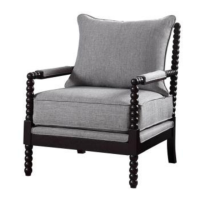
This document outlines the assembly instructions for the Coaster Fine Furniture rocking chair, model number 600174. The manual is designed to guide users through the process of putting together the rocking chair, ensuring a fast and easy assembly. It emphasizes the importance of checking all parts and hardware before starting and following the steps in the specified sequence.
The rocking chair is intended for home use and is not designed for commercial establishments. Users are cautioned against attempting to repair or modify any broken or defective parts and are advised to contact the store immediately if such issues arise.
The assembly process is broken down into several steps, each with clear visual aids and corresponding hardware. The chair consists of various components, including a chair back, wooden seat, left and right arm rests, left and right leg frames, a back stretcher, and a front stretcher. The hardware required for assembly includes long bolts, short bolts, lock washers, big flat washers, small flat washers, barrel nuts, an Allen wrench, and wood plugs.
The initial step involves connecting the front and back stretchers to the left and right leg frames. This is achieved using barrel nuts, long bolts, lock washers, and small flat washers. The connections are then tightened with an Allen wrench. Once these components are securely fastened, wood plugs are inserted into the open holes of the leg frames to provide a finished look and conceal the hardware. This step forms the base structure of the rocking chair, ensuring stability and proper alignment of the rocking mechanism.
Next, the wooden seat is prepared for attachment. It is recommended to place the wooden seat upside down on a soft surface to prevent scratches or damage during this stage. The left and right leg frames, which were assembled in Step 1, are then aligned with the wooden seat. Short bolts, lock washers, and small flat washers are used to secure the leg frames to the seat. The connections are tightened with the Allen wrench, ensuring a firm and stable attachment between the rocking base and the seat.
The chair back is then aligned with the wooden seat. Short bolts, lock washers, and small flat washers are used to fasten the chair back to the seat. The connections are tightened with the Allen wrench. After tightening, wood plugs are inserted into the open holes of the chair back brace. This step integrates the back support of the chair, contributing to its ergonomic design and overall structure.
This step involves two parts and requires careful attention to the tightening sequence.
Upon successful completion of all the preceding steps, the rocking chair assembly is complete. The chair should now be fully functional and ready for use.
The Coaster Fine Furniture rocking chair is designed to provide a comfortable and relaxing seating experience. Its primary function is to offer a gentle rocking motion, which can be soothing and calming. The chair's design incorporates a sturdy wooden frame, ensuring durability and stability during use. The arm rests provide additional comfort and support, making it an ideal piece of furniture for various settings within the home, such as living rooms, nurseries, or reading nooks. The use of wood plugs to conceal hardware contributes to a clean and aesthetically pleasing finish, enhancing the overall appearance of the chair.
While the manual does not explicitly detail maintenance features, the construction materials and design suggest standard care practices for wooden furniture. Regular dusting with a soft, dry cloth is recommended to keep the chair clean. For spills or stains, a damp cloth with a mild wood cleaner can be used, followed by immediate drying to prevent moisture damage. Avoiding harsh chemicals or abrasive cleaners will help preserve the finish of the wood. Periodically checking and retightening any loose bolts can help maintain the chair's stability and extend its lifespan. The use of wood plugs not only enhances aesthetics but also protects the bolt heads from dust and minor impacts, contributing to the longevity of the hardware. The robust construction with various types of bolts and washers ensures a secure assembly that, with proper care, should withstand regular use.
| Category | Indoor Furnishing |
|---|---|
| Product Name | Coaster 600174 |
| Style | Contemporary |
| Color | Black |
| Frame Material | Metal |
| Shape | Rectangular |