Do you have a question about the Cobra 58197 and is the answer not in the manual?
Crucial safety guidelines and steps for installing the product.
Essential precautions for safe operation and handling of the camera unit.
Note regarding the non-use of extension cords with the provided power adapter.
Explanation of electrical symbols used in the manual for clarity.
Regulatory compliance information regarding FCC rules for intentional emitters.
Overview of the camera's parts and essential hardware included for installation.
Detailed steps for physically attaching the camera to solid or hollow mounting surfaces.
Procedures for connecting power cables and adjusting the camera's view for optimal positioning.
Guidelines for maintaining the camera, cleaning, and resolving common operational issues.
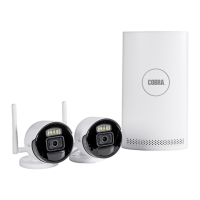
The Cobra 1080P Weatherproof Color Wireless NVR Camera with Night Vision is a surveillance device designed to provide security monitoring. This camera is intended for use with an NVR (Network Video Recorder) system, offering wireless connectivity for flexible placement.
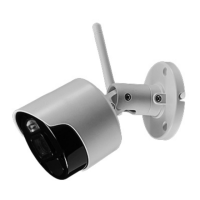
The primary function of this device is to capture and transmit video footage in 1080P resolution, providing clear color images during daylight hours and black and white images in low-light conditions thanks to its night vision capabilities. It is designed to be weatherproof, allowing for outdoor installation in various environmental conditions. The wireless functionality simplifies installation by reducing the need for extensive cabling, connecting to an NVR system for recording and viewing. The camera features an antenna for wireless communication and a sync cable with a sync button for pairing with the NVR. Its adjustable mounting base allows for precise positioning and aiming to cover desired viewing areas.
Before installation, it is crucial to test the camera's functionality by connecting it to its Power Adapter and an AC outlet. Once confirmed operational, plan the mounting location carefully. Consider the distance to the AC outlet and the Power Adapter, using the included Extension Cable if necessary, and route all cables to avoid tripping hazards. The camera should be mounted high enough to be out of reach of children while still providing an optimal viewing angle. Avoid mounting the camera upside down; ensure the hood is positioned above the lens to protect it. Also, prevent strong light from shining directly into the camera lens, as this can affect image quality.
The mounting process involves using the camera's base as a template to mark the locations for mounting holes on the chosen surface. For solid surfaces, drill pilot holes slightly smaller than the screws, then align the camera and drive the screws through the mounting holes into the pilot holes until the camera is securely attached. For hollow surfaces, drill holes the same diameter as the anchors, tap the anchors until almost flush with the surface, then align the camera and drive screws through the mounting holes into the anchors until secure. Throughout the mounting process, ensure the cable is routed through the notch on the base to keep the base flush with the mounting surface.
Once mounted, the camera's position can be adjusted for optimal viewing. Loosen the Position Screws (one on each side) to rotate the camera and ensure the recorded image is properly oriented. After rotation, tighten these screws securely. The Vertical Screw allows for tilting the camera up or down, and the Horizontal Screw enables panning left or right. Always tighten the respective screws securely after making adjustments. Remember to only loosen adjustment screws slightly and not remove them entirely.
Cable connections are straightforward. Connect the Power Adapter to the camera. If additional length is needed, use the Extension Cable to connect the Power Adapter to a 120 VAC outlet. It is critical that the Power Adapter is plugged in indoors in a clean, dry location to prevent damage and ensure safety. The camera operates continuously when the Power Adapter is plugged in. When not in use, unplug the Power Adapter from its electrical outlet.
To synchronize the camera with the NVR, pull back the cover on the Sync Cable and press the Sync Button. After synchronization, close the cover securely. Refer to the NVR instructions for detailed guidance on operating the camera with the NVR system.
Regular inspection and maintenance are essential to ensure the safe and proper operation of the Cobra camera. Periodically inspect the general condition of the camera. This includes checking for loose hardware, damaged cords or electrical wiring, and any cracked or broken parts. Also, look for any other conditions that might affect its safe operation. If any issues are found, address them promptly.
The external surfaces of the camera should be wiped periodically with a clean cloth to remove dirt and debris, which can accumulate and potentially obstruct the lens or affect the camera's overall appearance.
Maintaining the area surrounding the camera is also important. Ensure that no obstacles, such as overgrown bushes or tree branches, interfere with the camera's visibility. Clear any obstructions that might block the camera's view or impede its functionality.
If the camera is not working, first check if there is power at the outlet and ensure all cables are securely connected. If the image quality is poor, the camera lens might be dirty and should be cleaned with a clean cloth. If the view is undesirable, loosen the Vertical and Horizontal Screws, then tilt or pan the camera as needed, and retighten the screws. If the image appears upside down or sideways, loosen the Position Screws, rotate the camera to the correct orientation, and then tighten the screws securely.
All repairs and parts replacements should be undertaken by certified and licensed technicians to ensure the device's integrity and safety. The manufacturer explicitly states that the buyer assumes all risk and liability arising from repairs or installations performed by unqualified individuals. For technical questions or support, contact the provided customer service number.
| Brand | Cobra |
|---|---|
| Model | 58197 |
| Resolution | 1080p |
| Night Vision | Yes |
| Power Source | Battery |
| Weather Resistance | IP65 |
| Motion Detection | Yes |
| Two-Way Audio | Yes |
| Wireless | Yes |
| Type | Security Camera |
| Connectivity | Wireless |
| Storage | Cloud, MicroSD |