EasyManua.ls Logo

Code Alarm PROFESSIONAL CA2LCD5 - User Manual

Code Alarm PROFESSIONAL CA2LCD5
24 pages
Print Icon
To Next Page IconTo Next Page
Loading...
12017 Voxx Electronics Corporation. All rights reserved.
PROFESSIONAL
SERIES
Owners Guide
For Models:
CASECRS
&
CA2LCD5
IMPORTANT NOTE: The operation of the Security and Convenience System as described in this manual is
applicable to most vehicles. However, due to the conguration of some vehicles, some functions AND/OR
SAFETY PRECAUTIONS may not apply. Please see your installing dealer for more information.
Deluxe Vehicle Security and
Remote Start System
Question and Answer IconNeed help?

Do you have a question about the Code Alarm PROFESSIONAL CA2LCD5 and is the answer not in the manual?

Summary

Using Your Remote Control

Arming the Security System

Instructions for arming the vehicle security system using the remote control, including silent choice options.

Passive Arming Bypass

How to temporarily bypass the passive arming feature of the security system.

Bypassing The Shock Sensor

Procedure to arm the system while temporarily bypassing the shock sensor.

Hidden Alarm Function

Enables arming the system with silent siren/horn if triggered.

Disarming the Security System

Steps to disarm the vehicle security system and unlock doors.

Two Stage Door Unlock (Optional)

Unlocks only the driver's door on the first press, then remaining doors on second press.

Activating the Trunk Release Feature (Optional)

How to activate the trunk release function by pressing and holding a specific button.

Activating the AUX 1 Output (Optional)

Enables activation of programmed auxiliary functions like power windows.

Entering AUX Mode and Activating Additional AUX Outputs

Procedure to enter AUX mode to control additional outputs like AUX 2 through AUX 5.

Using the Progressive Car Finder Feature

Locates the vehicle by flashing parking lights and sounding audible alerts.

Using the Personal Protection Alarm (Panic)

Activates a panic alarm and suspends normal transmitter functions.

Programmed Transmitter Notification

System indicates the number of programmed transmitters upon ignition ON.

Valet Mode

Disables security and remote start functions; status LED is solid.

User Selectable Notification Chirps

Enables or disables audible chirps for system arm/disarm without programming.

User Selectable LED

Controls whether the LED is ON or OFF when the system is armed/locked.

Manually Overriding the Security System

Procedure to disarm the system using the valet button when the transmitter is lost.

Carjack Mode (Anti-Hijack Mode)

Activates a sequence of deterrents if carjack mode is triggered.

Using Your Remote Starter

Remote Start Ready Mode - Manual Transmission Vehicles Only

Steps to prepare a manual transmission vehicle for remote starting.

Cancelling Remote Start Ready Mode - Manual Transmission Vehicles Only

Conditions that will cause the system to exit remote start ready mode.

Remote Starting Your Vehicle

Instructions for activating the remote start function and system checks.

Remote Start Shutdown

How to turn off the vehicle when it is running via remote start.

Entering the Vehicle while it is Running via Remote Vehicle Start

Procedure to enter the vehicle and take manual control while remote started.

Enter & Exit Vehicle with Remote Start Ready Mode Active

Utilizes quick-stop feature for manual transmission vehicles to leave vehicle running.

Using the “Quick-stop” Feature

Allows short stops while keeping the vehicle running and secure.

Engaging Quick Stop for Manual Transmission Vehicles

Specific steps for engaging Quick Stop on manual transmission vehicles.

Preheating or Precooling the Vehicles interior

Setting temperature controls before starting the vehicle remotely.

User Programmable Run Time; Run Time Extension

Allows extending the vehicle's remote start run time.

Turbo Timer

Keeps the engine running to cool down the turbocharger after driving.

Operating the 2; 3 Hour Start Up Timer Mode

Enables periodic engine starts every 2 or 3 hours for 48 hours.

Activating the 2; 3 Hour Start Up Timer Mode

Steps to activate the 2 or 3 hour periodic start timer.

Deactivating the 2; 3 Hour Start Up Timer Mode

Methods to deactivate the 2 or 3 hour periodic start timer.

Operating the Daily Start Timer

Starts the vehicle based on a 24-hour countdown timer.

Temperature Start Mode

Starts the vehicle automatically if the temperature drops below a set threshold.

Remote Start Safety Features

Conditions that prevent or shut down remote start for safety.

Status LED, Light Flashes, and Siren;Horn Indications

Status LED Flash Indications

Interprets different LED flash patterns and their meanings.

Siren;Horn Chirp Indications

Explains the meaning of various siren and horn chirp patterns.

Parking Light Flash Indications

Decodes the system's status based on parking light flashes.

Remote Start Shutdown Diagnostics

Diagnoses shutdown reasons using parking light flash patterns.

Additional 2-Way LCD Remote Control Functions

Check Vehicle Status

How to check the current status of the vehicle using the remote.

Display Illumination

Turns on the remote control's display illumination.

Melody;Vibration Mode

Configures the remote to vibrate or play melody tones for responses.

Button Beeps

Toggles audible button beeps on or off for the remote.

Battery Save Mode

Enables a power-saving mode on the 2-way LCD transmitter.

Clear Flashing Icons and Melody Sound

Resets melody sounds and flashing icons on the LCD screen.

Stopping LCD Trigger Melody

Stops the alarm melody without disarming the system.

Button Lock

Locks or unlocks the remote control buttons to prevent accidental presses.

Illumination

Toggles the remote's display illumination on or off.

2 Car Mode

Allows the remote to control a second security system.

Parking Meter Countdown

Sets a countdown timer for parking meters.

Adjusting the Clock and Timer Settings

Navigates the function menu to adjust clock and timer settings.

Remote Control Buttons & Functions

4-Button Transmitter

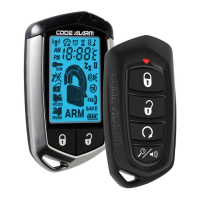
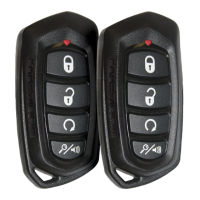
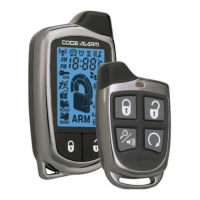
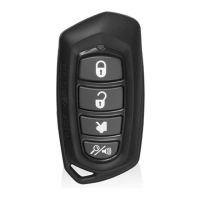
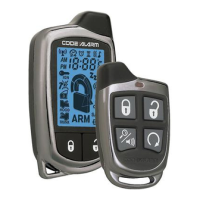
Details functions and operation methods for the 4-button remote transmitter.

AUX 2, 3, 4, 5 - Access in AUX Mode

Explains how to access and use AUX outputs 2-5 via AUX mode.

LCD 5-Button Transmitter

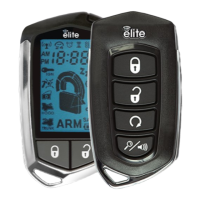
Details functions and operation methods for the 5-button LCD remote transmitter.

AUX 2, 3, 4, 5 - Access in AUX Mode

Explains how to access and use AUX outputs 2-5 via AUX mode on the LCD remote.

Replacing Remote Control Batteries

4 Button Remote Control - Model CAT4 M

Instructions for replacing batteries in the 4-button remote control.

2 Way LCD Remote Control - Model CATLCD

Instructions for replacing batteries in the 2-way LCD remote control.

LIMITED LIFETIME WARRANTY

Overview

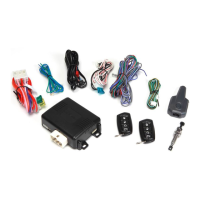
The Code Alarm Professional Series Owner's Guide describes a Deluxe Vehicle Security and Remote Start System, specifically for models CASECRS and CA2LCD5. This system offers a comprehensive suite of features for vehicle security, convenience, and remote operation.

Function Description

The primary function of this device is to provide vehicle security and remote starting capabilities. It allows users to arm and disarm the security system, offering protection against unauthorized access and theft. The remote start feature enables users to start their vehicle from a distance, allowing for preheating or precooling the interior before entry. The system also includes various auxiliary outputs that can be programmed to control additional vehicle functions.

Usage Features

Security System Operation:

  • Arming: To arm the system, users press the lock button. The parking lights will flash twice, indicating the system is armed, doors are locked (if connected), and the starter disable is activated. The LED status indicator blinks once per second. A "Silent Choice" feature allows for a second press of the lock button to activate an audible arming response.
  • Passive Arming Bypass: If passive arming is enabled, pressing the lock and car find/panic buttons simultaneously will bypass it temporarily. The system responds with one chirp, and the LED turns on. To exit, press the lock or unlock button.
  • Shock Sensor Bypass: To arm the system and ignore the shock sensor, press the lock button, then within 5 seconds, press the lock and car find/panic buttons. The system responds with one long chirp. This bypass is for a single arm cycle.
  • Hidden Alarm Function: To arm with a hidden alarm, press the car find/panic button first, then within 3 seconds, press the lock button. The siren/horn will be silenced if the system is triggered.
  • Disarming: To disarm, press the unlock button. The parking lights flash once, indicating the system is disarmed and doors are unlocked. A second press of the unlock button (if Silent Choice is enabled) activates an audible disarming response. For 2-step unlock, a third press activates the audible response.
  • Two-Stage Door Unlock (Optional): If enabled, pressing the unlock button once unlocks only the driver's door. Pressing it again within three seconds unlocks the remaining doors.
  • Trunk Release (Optional): Press and hold the trunk button for 3 seconds to open the vehicle's trunk or hatch.
  • AUX 1 Output (Optional): Pressing the lock and unlock buttons simultaneously activates AUX 1, which can be programmed for functions like power window or sunroof automation.
  • Additional AUX Outputs (AUX 2-5): To access AUX 2-5, users must enter AUX Mode. For 4-button transmitters, press and hold the car find/panic and start buttons for 2 seconds (LED flashes once). For LCD 5-button transmitters, press and hold the function button for 2 seconds (LCD displays "AU"). AUX Mode remains active for 15 seconds or until exited by pressing the same button combination again.
    • AUX 2: Press and hold the lock button for 3 seconds.
    • AUX 3: Press and hold the unlock button for 3 seconds.
    • AUX 4: Press and hold the car find/panic button for 3 seconds.
    • AUX 5: Press and hold the start button for 3 seconds.
  • Progressive Car Finder: Press the car find/panic button to locate the vehicle. The parking lights flash, and the system sounds 5 times at low volume, increasing with each press.
  • Personal Protection Alarm (Panic): Press and hold the car find/panic button for 3 seconds to activate the alarm. During panic, normal button functions are suspended, but lock/unlock may still work. Press and hold car find/panic again for 3 seconds to stop the alarm, or it stops automatically after 30 seconds.
  • Programmed Transmitter Notification: Each time the ignition is turned on, the status LED flashes the number of programmed transmitters, helping identify unauthorized transmitters.
  • Valet Mode: When active, the status LED lights solid, and all security and remote start functions are disabled. To enter/exit, turn the ignition ON, push and hold the programming/valet button until the LED turns solid, then release.
  • User Selectable Notification Chirps: To toggle ARM/DISARM chirps, turn ignition ON then OFF, then press the valet/programming button 3 times. One chirp indicates ON, two chirps indicate OFF.
  • User Selectable LED: To toggle the LED ON/OFF when armed/locked, turn ignition ON, OFF, ON, OFF, then press the valet/programming button 3 times. One chirp indicates ON, two chirps indicate OFF.
  • Manually Overriding Security System: If the transmitter is lost or its battery fails, open the door (alarm sounds), turn the ignition key to ON, and within 10 seconds, press and release the valet button. The alarm stops, and the system enters bypass mode.
  • Carjack Mode (Anti-Hijack Mode): If enabled, trigger by turning ignition ON and pressing and holding the lock and car find/panic buttons for 2 seconds. Parking lights flash once.
    • 50 seconds: Siren chirps for 15 seconds, alerting user to press valet button to turn off.
    • 65 seconds: Siren sounds continuously, parking lights flash.
    • 90 seconds: Starter kill activates. System remains in this state until battery depletes.
    • To override: Turn ignition OFF then ON, and press valet button within 10 seconds.

Remote Vehicle Starter Operation:

  • Remote Start Ready Mode (Manual Transmission):
    1. With the engine running via ignition key, place transmission in neutral and set parking brake.
    2. With foot off brake, press and release the start button. LED flashes 3 times, parking lights turn on.
    3. Remove keys from ignition; vehicle remains running.
    4. Exit vehicle and close all doors.
    5. Within 1 minute of step 1, press the lock button. Vehicle shuts down, sounds 2 short chirps then 1 long chirp to confirm ready mode is set.
  • Cancelling Remote Start Ready Mode (Manual Transmission): Ready mode exits if any door, hood, or trunk is opened, brake is pressed, parking brake is released, or ignition is turned ON.
  • Remote Starting Your Vehicle: Press and release the start button twice within 2 seconds. System sounds, parking lights flash once, and vehicle checks safety parameters before starting. If it stalls, it pauses 5 seconds and attempts 3 more times (total 4 attempts).
  • Remote Start Shutdown: Press and hold the start button for 3 seconds to turn the vehicle off.
  • Entering Vehicle While Running via Remote Start:
    1. Unlock doors.
    2. Enter vehicle. DO NOT PRESS BRAKE PEDAL.
    3. Insert key into ignition and turn to ON or RUN position.
    4. Press brake pedal. Remote start disengages, vehicle operates normally.
  • Entering & Exiting Vehicle While Remote Start Ready Mode is Active (Manual Transmission):
    1. With Ready Mode set, activate remote start.
    2. Open vehicle door to retrieve items.
    3. Exit vehicle and close all doors.
    4. Press the lock button. Unit waits 3 seconds, shuts down, verifies doors closed, then emits 2 short/1 long tone and light flash pattern, indicating Manual Transmission Ready Mode is active.
  • "Quick-Stop" Feature: Allows vehicle to run while secure and keys are with you (for preheating/cooling).
    • To Engage (Automatic):
      1. Stop vehicle, place in PARK.
      2. With foot off brake, press and release the start button twice within 2 seconds. LED flashes 3 times.
      3. Remove keys, exit vehicle. Press lock button to lock doors (optional).
    • To Engage (Manual):
      1. With vehicle running, foot off brake, parking brake set ON.
      2. Press and release the start button to activate remote start.
      3. Exit vehicle, close all doors.
      4. Press and release the lock button.
      5. Within 3 seconds, press the start button. Unit enters Quick Stop Mode and runs until remote start time-out.
  • Preheating or Precooling: Set temperature controls before exiting. After remote start, heater/AC activates to desired setting.
  • User Programmable Run Time / Run Time Extension: Extends current remote start cycle. If system runs for 15 minutes and 4 minutes remain, extending resets to 15 minutes.
    1. Remote start must be active.
    2. Press and release the start button 4 times.
    3. System chirps once, parking lights flash 4 times to confirm reset.
  • Turbo Timer Mode (Optional): Keeps engine running to cool turbo.
    1. With vehicle running via ignition key, foot off brake.
    2. Engage parking brake, press lock and unlock buttons simultaneously.
    3. Parking lights turn on to confirm activation.
    4. Turn ignition key OFF; vehicle runs for pre-programmed time (1, 3, or 5 minutes).
    • To disengage: Press brake pedal.
  • 2 / 3 Hour Start Up Timer Mode: Starts vehicle every 2 or 3 hours for 48 hours (useful in cold climates). Default is 3 hours.
    1. Turn ignition ON then OFF.
    2. Press and hold valet button.
    3. Press the start button 4 times. System chirps 2 times/flashes 4 times for 3-hour setting, or chirps 1 time/flashes 2 times for 2-hour setting.
    4. Release valet button.
    • To exit: Turn ignition ON, OR activate remote start.
  • Daily Start Timer: Starts vehicle based on a 24-hour countdown.
    1. From remote, press lock and unlock buttons together to activate 24-hour countdown.
    2. After operating vehicle for the day, turn ignition ON/OFF (vehicle disarmed).
    3. Within 10 seconds, while pressing brake, press and release the start button twice.
    4. Vehicle emits 2 chirps, parking lights flash 4 times.
  • Temperature Start Mode: Starts vehicle if temperature drops below a preset threshold.
    1. Vehicle must be armed.
    2. Press and release lock and unlock buttons together.
    3. Vehicle emits 1 chirp, parking lights flash 1 time. (Defaulted OFF, must be programmed).
  • Remote Start Safety Features: System shuts down or prevents remote start if: hood is open, brake pedal is pressed before ignition ON, engine is over-revved, Valet Mode is active, or Remote Start Ready Mode is not set (manual transmission).

Additional 2-Way LCD Remote Control Functions:

  • Check Vehicle Status: Press function button twice, then press start button within 3 seconds.
  • Display Illumination: Press and hold function button for 1 second. Display illuminates for 5 seconds.
  • Melody / Vibration Mode: To toggle melody/vibration on response, press function button, then press and hold start button for 2 seconds.
  • Button Beeps: To toggle button beeps, press function button, then press and hold car find/panic button for 2 seconds.
  • Battery Save Mode: Press and hold function button for 5 seconds. LCD displays "SAVE". Transmitter won't look for incoming signals until a button is pressed.
  • Clear Flashing Icons and Melody Sound: Press function button 3 times within 3 seconds.
  • Stopping LCD Trigger Melody: If alarm is triggered, press any button once (without disarming) to stop the melody. Alarm continues to sound.
  • Button Lock: Press function button, then press and hold lock button for 2 seconds to toggle. When active, remote beeps/vibrates twice when a button is pressed.
  • Illumination Toggle: Press function button twice, then press and hold lock button for 2 seconds to toggle display illumination on/off.
  • 2 Car Mode: To control a second security system, press function button, then press lock and unlock buttons together for 3 seconds. The "2 Car" icon appears on the LCD. Use the same method to exit. (Second system must be installed and transmitter learned).
  • Parking Meter Countdown: Has 6 preset times. Press function button, then press and hold car find/panic button for 2 seconds to access. Each additional press of car find/panic increases countdown time.
  • Adjusting Clock and Timer Settings: Access through Function Menu (press and hold function button for 3 seconds). Scroll with function button.
    • Clock Hour/Minute: Press car find/panic to increase, start to decrease.
    • Alarm Clock Hour/Minute: Press car find/panic to increase, start to decrease.
    • Alarm Clock ON/OFF: Press car find/panic for ON, start for OFF.
    • Countdown Timer Hour/Minute: Press car find/panic to increase, start to decrease.
    • Countdown Timer ON/OFF: Press car find/panic for ON, start for OFF.

Maintenance Features

Replacing Remote Control Batteries:

  • 4-Button Remote Control (Model CAT4M): Batteries last approximately 1 year. Reduced range and dim LED indicate weak battery.
    1. Remove 1 screw, disassemble halves of remote by unsnapping.
    2. Remove old battery, noting +/- symbols, replace with new battery.
    3. Reassemble halves, reinstall 1 screw.
    4. Test operation.
  • 2-Way LCD Remote Control (Model CATLCD): AAA battery lasts approximately 6 months. Reduced range and battery icon showing 1 bar or less indicate weak battery.
    1. Gently slide battery cover off.
    2. Remove old AAA battery, noting +/- symbols, replace with new AAA battery.
    3. Gently slide battery cover back on.
    4. Test operation.

Code Alarm PROFESSIONAL CA2LCD5 Specifications

General IconGeneral
BrandCode Alarm
ModelPROFESSIONAL CA2LCD5
CategoryRemote Starter
LCD DisplayYes
Channels2
Two-way CommunicationYes
Keyless EntryYes
Number of Buttons on Remote5
Engine Start/StopYes
Door Lock/UnlockYes
Trunk ReleaseYes
Panic ModeYes
Valet ModeYes
Security FeaturesShock sensor
ConfirmationVisual and Audible
CompatibilityMost Vehicles

Related product manuals