EasyManua.ls Logo

Coleman 2000001080 - User Manual

Coleman 2000001080
2 pages
Print Icon
To Next Page IconTo Next Page
Loading...
4. Insert one end of each black pole
into pins in front corners of tent.
(Fig. 2)
5. Go to opposite end of each pole
and gradually apply pressure to
the pole forming an arch. Insert
the pin into the pole end at the
corners of tent. (Fig. 3)
6. Attach frame clips along edges
of tent to black main poles.
(Fig. 3A)
7. Stretch corners and sides of tent until floor is
taut then hammer stakes through loops to
secure. (Fig. 3B)
STITCH LINE
HOLIDAY DOME TENT 12’ X 10’
MODEL 2000001080
Before you begin
Read all instructions before set up.
• Select a level campsite clear of rocks, branches, and other hard
or sharp objects, to install your tent.
WARNING: Keep clear of overhead power lines.
Do not set up your tent under trees.
For best results in windy conditions, position end of tent into
the wind.
Enlist the help of at least one other person to assist you when
it is time to assemble the tent.
Fig. 2
To Set Up Tent
1. Unfold tent and spread out on a clean, level surface
with the door facing the desired direction. (Fig. 1)
2. Assemble two main tent poles by interlocking the
longer, black shock-corded, poles.
3. Insert both, long, black poles through sleeves in top
of tent as shown. (Fig. 1)
Fig. 3
Parts and Components
Description Part Number
Main Poles, Long, Black (2) 5010000364
Rainfly Awning Pole, Thin, Black (1) 5010000365
Rainfly 5010000366
1. Assemble longer interlocking shock-corded rainfly pole.
2. Unfold rainfly. Locate the sleeve, along front edge, and the hook & loop fasteners on the underside of rainfly.
3. Drape rainfly over tent. Make sure the sleeve is centered over the door and the hook & loop fasteners, on the underside of the rain
fly, are positioned over the black
main poles.
4. Clip hooks on elastic cords, on the
back corners of rainfly, onto metal
loops at back corners of tent.
(Fig. 4A)
5. Slide rainfly pole through sleeve at
front of the flap. (Fig. 4)
To Attach Rainfly
(continued on other side)
Fig. 1
Door
Fig. 4
Rainfly
Awning Pole
Sleeve on
Front of
Rainfly
Long, Black,
Shock-corded
Main Poles
3A
Door
3A
3B
Question and Answer IconNeed help?

Do you have a question about the Coleman 2000001080 and is the answer not in the manual?

Summary

Tent Setup and Rainfly Attachment

Preparation and Safety Precautions

Read instructions, select a level site, avoid trees and power lines, and enlist help for assembly.

Main Tent Setup Procedure

Unfold tent, assemble poles, insert poles into sleeves and pins, attach frame clips, and secure with stakes.

Rainfly Attachment Steps

Assemble rainfly pole, drape rainfly over tent, attach clips and fasteners, and secure guylines.

Tent Features and Storage

Cooler Access and Ventilation

Utilize the rear zippered opening for ventilation or access to beverages.

Electrical Cord Access Panel

Use the designated panel for safely routing outdoor-rated electrical cords.

Tent Storage Procedure

Ensure tent is clean and dry before folding and storing poles separately.

Important Usage and Care Information

Manage condensation, dry tent before storage, and avoid prolonged sun exposure.

Flame Resistance Warning

Keep all flame and heat sources away from tent fabric for safety.

Overview

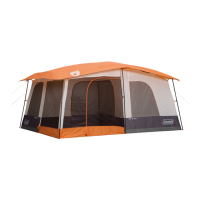
The Coleman Holiday Dome Tent 12' x 10' (Model 2000001080) is a spacious and user-friendly shelter designed for outdoor camping, offering comfort and convenience for multiple occupants. Its primary function is to provide a temporary, weather-resistant living space in various outdoor environments.

Function Description

The tent serves as a portable shelter, protecting campers from the elements such as sun, wind, and light rain. Its dome structure is engineered for stability and interior space, making it suitable for family camping or group outings. The design prioritizes ease of setup and takedown, allowing users to quickly establish and dismantle their campsite. The tent's construction includes features that enhance ventilation and accessibility, contributing to a more comfortable camping experience.

Usage Features

Setup and Assembly:

The setup process for the Holiday Dome Tent is designed to be straightforward, ideally with the assistance of at least one other person. Before beginning, it is crucial to select a level campsite, clear of rocks, branches, and other sharp objects, and away from overhead power lines and trees. For optimal performance in windy conditions, the tent should be positioned with its end facing into the wind.

  1. Unfolding and Positioning: The tent is first unfolded and spread out on a clean, level surface. The door should be oriented in the desired direction for easy access.
  2. Main Pole Assembly: Two long, black, shock-corded main poles are assembled by interlocking their sections. These poles form the primary structural support of the tent.
  3. Pole Insertion: Both assembled main poles are then inserted through the sleeves located at the top of the tent.
  4. Securing Poles (Front): One end of each black pole is inserted into the pins located in the front corners of the tent.
  5. Securing Poles (Rear): Users then proceed to the opposite end of each pole, gradually applying pressure to form an arch. The pin at the rear corner of the tent is then inserted into the pole end, completing the arch.
  6. Frame Clip Attachment: Frame clips, positioned along the edges of the tent, are attached to the black main poles, further securing the tent's structure.
  7. Staking: The tent's corners and sides are stretched until the floor is taut. Stakes are then hammered through the loops to secure the tent firmly to the ground, preventing movement in windy conditions.

Rainfly Attachment:

The rainfly is an essential component for enhanced weather protection, particularly against rain and dew. Its attachment process is also designed for efficiency.

  1. Rainfly Pole Assembly: A longer, interlocking shock-corded rainfly pole is assembled.
  2. Rainfly Positioning: The rainfly is unfolded, and its sleeve, located along the front edge, is identified, along with the hook & loop fasteners on its underside. The rainfly is then draped over the tent, ensuring the sleeve is centered over the door and the hook & loop fasteners are positioned over the black main poles.
  3. Rear Attachment: Hooks on elastic cords, located on the back corners of the rainfly, are clipped onto metal loops at the back corners of the tent.
  4. Rainfly Pole Insertion: The rainfly pole is slid through the sleeve at the front flap of the rainfly.
  5. Rainfly Pole Securing (Front): One end of the black rainfly awning pole is inserted into a pin in the front corner of the tent. Pressure is then applied to the other end of the pole to form an arch, and it is inserted into the other front pin.
  6. Rainfly Fastener Attachment: Hook & loop fasteners, located on the underside of the rainfly, are wrapped around the black main poles to secure the rainfly in place.
  7. Front Corner Clips: Hooks on elastic cords, located on the front corners of the rainfly, are clipped onto metal loops at the front corners of the tent.
  8. Guylines: Guylines are threaded through loops on web straps on the rainfly. These guylines are then stretched until taut and secured with stakes, providing additional stability against wind.

Cooler Access:

A unique feature of this tent is the smaller zippered opening at the rear, which serves a dual purpose: enhanced ventilation and convenient access to a beverage cooler.

  1. Ventilation: To use it as a vent, the flap is unzipped to expose the screen, allowing air circulation.
  2. Cooler Access: To use it for cooler access, the other flap is unzipped, creating an avenue to bring beverages into the tent without having to open the main door.

Electrical Cord Access:

For modern camping needs, the tent includes an electrical cord access panel located in the lower right corner. Users can unzip this panel to bring in an electrical cord, provided it is a UL-approved cord rated for outdoor usage. This feature allows for the safe and convenient use of electrical devices inside the tent.

Maintenance Features

Post-Usage Care:

Proper care and maintenance are crucial for extending the lifespan of the tent.

  1. Drying: Never store the tent, even for a short period, without thoroughly drying it. Any moisture can lead to mold or mildew.
  2. Cleaning: Brush off any caked dirt before packing. Do not pack stakes or poles inside the tent itself; use a separate storage bag for these items to prevent damage to the fabric.
  3. Stake Removal: Stakes should be removed by pulling on the stake itself, not by pulling on the tent fabric, to avoid damaging the tent.
  4. Pole Storage: Tent poles should not be left telescoped together during storage, as this can cause issues with their functionality over time.

Storage:

When preparing the tent for storage, follow these steps:

  1. Separate Components: All metal poles and stakes must be placed in their designated storage bag to prevent them from damaging the fabric items in the carry case.
  2. Cleanliness and Dryness: Ensure the tent is clean and completely dry before placing it in the carry case.
  3. Preparation for Folding: Remove the rainfly, spread it out on the floor of the tent, and unzip the door and vents before taking the tent down for storage.
  4. Folding and Rolling: Neatly fold the tent to the width of the pole storage bag. Place the pole bag on the tent, roll the tent tightly, and then place it in the carry case.
  5. Storage Location: Store the tent in a clean, dry area to protect it from environmental damage.

Important Considerations:

  • Condensation: Under certain conditions (e.g., cold weather, high humidity), condensation may form inside the tent. This is caused by water vapor from breath, perspiration, or wet clothing, and is not leakage. It can be minimized by removing wet clothing and ensuring good ventilation.
  • UV Exposure: Do not leave the tent set up for weeks at a time. Prolonged exposure to ultraviolet rays from the sun can seriously damage the material and cause discoloration.
  • Flammability Warning: Keep all flame and heat sources away from the tent fabric. The tent meets CPAI-84 flammability requirements, meaning the fabric may burn if left in continuous contact with a flame source. Applying any foreign substance to the tent fabric may render its flame-resistant properties ineffective.

Coleman 2000001080 Specifications

General IconGeneral
CategoryCamping Equipment
Model Number2000001080
BrandColeman
Fuel TypePropane
BTU20, 000 total BTUs
Burner2 burners

Related product manuals