EasyManua.ls Logo

Coleman Denali 9230-410 - User Manual

Coleman Denali 9230-410
2 pages
Print Icon
To Next Page IconTo Next Page
Loading...
– Position the two 5-section 3-way hub Side Poles
approximately 10’ apart. (illus. 1)
– Place the 5-section 4 way hub Ridge Pole between
and parallel to the two Side Poles. (illus. 1)
Attach the four 5-way Corner Hub (A)s to the ends of
the outside side poles. (illus. 1), (illus. 2)
Attach the two 5-way Hub (B)
to the ends of the middle
ridge pole. (illus. 1), (illus. 2)
– Connect the six 2-section roof
poles to the hubs to complete
the roof frame main section.
(illus. 1), (illus. 2)
Attach the ten 1-section poles
to the open hub on each
corner and the center ridge
pole to fully complete the
roof frame assembly.
(illus. 1), (illus. 2)
Attach the four corner upright
poles to the downward
hub at each corner. (illus. 2)
Attach the two center
upright poles to the
downward hub on
the center ridge. (illus. 2)
Denali
14’x10’
When You Are Ready To Set Up Your Tent
– Select a level campsite clear of rocks, branches and
other hard or sharp objects.
– Do not set up your tent under trees.
For best results in windy conditions, position the end
of tent into the wind.
Instructions apply to Part Number 9230-410
(4) Corner Upright Poles
Part No. 9230-3671
(2) Center Upright Poles
Part No. 9230-3811
(6) 2-Section Poles
Part No. 9230-3771
(10) 1-Section Poles
Part No. 9230-3691
Rainfly
Part No.
9230-3661
POLE ASSEMBLY PARTS
1 Frame Assembly
5-WAY CORNER
HUB (A)
SIDE POLE
w/ 3-WAY HUB
SIDE POLE
w/ 3-WAY
5-WAY
HUB (A)
5-WAY
HUB (A)
CENTER
POLE
5-WAY
HUB (B)
2-SECTION
POLES
CORNER
POLE
5-WAY HUB (B)
CORNER
HUB (A)
SIDE POLE
w/ 3-WAY HUB
SIDE POLE
w/ 3-WAY HUB
RIDGE POLE
w/ 4-WAY HUB
2-SECTION
POLES
1-SECTION
POLES
illus. 2 Tent Frame Assembly
illus. 1 Roof Frame Assembly
(2) Side Poles w/ 3-way hub
Part No. 9230-3711
(1) Ridge Pole w/ 4-way hub
Part No. 9230-3751
(4) 5-way Corner
Hubs (A)
Part No. 9230-3791
(4) 5-way Corner Hubs (B)
Part No. 9230-3791
RIDGE POLE
w/ 4-WAY HUB
Question and Answer IconNeed help?

Do you have a question about the Coleman Denali 9230-410 and is the answer not in the manual?

Summary

Pole Assembly Parts

Tent Setup

Prepare for Setup

Select a level campsite clear of rocks, branches, or other sharp objects. Avoid setting up under trees.

Frame Assembly Steps

Assemble the tent frame by connecting side poles, ridge pole, and various corner and center hubs.

Attaching Tent Components

Attach Rainfly

Drape the rainfly over the tent frame and insert 1-section poles into the rainfly's pole pockets.

Attach Tent to Frame

Position the tent under the frame and attach tent hooks to the center hub and side/corner hubs.

Important Information and Warnings

Condensation and Care

Manage condensation by ensuring good ventilation. Dry tent thoroughly before storing; do not store poles telescoped.

Stake Removal and Sealing

Remove stakes by pulling on the stake itself. Consider seam sealing for added protection.

Flame and UV Warning

Keep tent away from flame sources; fabric burns if in contact with flame. UV rays can damage material.

Overview

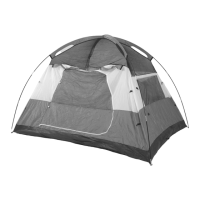
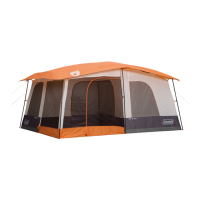
This document provides instructions for assembling the Coleman Denali™ 14'x10' tent, identified by Part Number 9230-410. It details the components, assembly steps, and important usage and maintenance considerations for the tent.

Function Description:

The Coleman Denali™ 14'x10' tent is designed to provide temporary shelter for outdoor activities like camping. It features a robust frame assembly that supports a rainfly, offering protection from the elements. The tent is intended for use in various outdoor conditions, with specific recommendations for setup to maximize stability and longevity.

Important Technical Specifications:

Pole Assembly Parts:

  • Side Poles: 2 units, with 3-way hubs (Part No. 9230-3711). These form the main side structure of the tent's roof frame.
  • Corner Upright Poles: 4 units (Part No. 9230-3671). These provide vertical support at the tent's corners.
  • Ridge Pole: 1 unit, with a 4-way hub (Part No. 9230-3751). This forms the central ridge of the tent's roof.
  • 5-way Corner Hubs (A): 4 units (Part No. 9230-3791). These connect the side poles and corner upright poles.
  • 5-way Corner Hubs (B): 4 units (Part No. 9230-3791). These connect the ridge pole to the side poles.
  • 2-Section Poles: 6 units (Part No. 9230-3771). These are used to complete the main roof frame section.
  • 1-Section Poles: 10 units (Part No. 9230-3691). These complete the roof frame assembly by connecting to the open hubs.
  • Center Upright Poles: 2 units (Part No. 9230-3811). These provide vertical support along the center ridge of the tent.
  • Rainfly: 1 unit (Part No. 9230-3661). This is the outer protective layer that covers the tent frame.

Tent Dimensions:

  • The tent has a base dimension of 14 feet by 10 feet.

Material Flammability:

  • The tent fabric meets the flammability requirements of CPAI-84. It will burn if left in continuous contact with any flame source. The application of any foreign substance to the tent fabric may render the flame-resistant properties ineffective.

Usage Features:

Site Selection:

  • Level Campsite: Always select a level campsite that is clear of rocks, branches, and other hard or sharp objects to prevent damage to the tent floor and ensure stability.
  • Avoid Trees: Do not set up the tent under trees. This can protect the tent from falling debris and sap, and also reduce the risk of lightning strikes during storms.
  • Wind Positioning: For optimal performance in windy conditions, position the end of the tent into the wind to minimize wind resistance and increase stability.

Frame Assembly (Step 1):

  1. Side Pole Placement: Position the two 5-section 3-way hub Side Poles approximately 10 feet apart.
  2. Ridge Pole Placement: Place the 5-section 4-way hub Ridge Pole between and parallel to the two Side Poles.
  3. Corner Hub (A) Attachment: Attach the four 5-way Corner Hubs (A) to the ends of the outside side poles.
  4. Hub (B) Attachment: Attach the two 5-way Hubs (B) to the ends of the middle ridge pole.
  5. Roof Frame Completion (Main Section): Connect the six 2-section roof poles to the hubs to complete the main roof frame section.
  6. Roof Frame Completion (Full Assembly): Attach the ten 1-section poles to the open hub on each corner and the center ridge pole to fully complete the roof frame assembly.
  7. Corner Upright Pole Attachment: Attach the four corner upright poles to the downward hub at each corner.
  8. Center Upright Pole Attachment: Attach the two center upright poles to the downward hub on the center ridge.

Rainfly Attachment (Step 2):

  1. Draping: Drape the rainfly over the top of the tent frame, ensuring the pole pockets are on the underside of the fly.
  2. Pole Insertion: Insert the end of one 1-section pole into a pole pocket on the underside of the rainfly. Repeat this process for the remaining nine 1-section poles and pole pockets.

Tent Attachment to Frame (Step 3):

  1. Positioning: Position the tent body under the tent frame.
  2. Hook Attachment (Middle): Locate the row of 5 hooks with red webbing, which marks the middle of the tent. Starting from the middle, attach the hook on the center of the tent roof through the hole on the center 4-way hub.
  3. Hook Attachment (Side Edge): Attach the hook of the side edge of the tent through the hole on the 5-way Hub (B) on the ridge. Repeat for the second side hook.
  4. Hook Attachment (Corners): Attach the corner hooks on the tent through the holes on the 5-way corner Hubs (A).
  5. Pole Pin Insertion: Insert a pole pin at the end of the fabric loop at the base edge of the tent sides and four corners into the bottom of the poles.
  6. Pole Clip Attachment: Attach the pole clips to the tent poles.
  7. Staking (Tent Body): Stake out the tent through the rings with the pole pins.
  8. Staking (Guylines): Stake out the guylines. There should be two at each end, two at each corner, and one at each ridge.

Maintenance Features:

Condensation Management:

  • Cause: Condensation can form on the inside surfaces of the tent due to water vapor from breath, perspiration, or wet clothing, especially in cold or humid conditions. This is not leakage.
  • Minimization: To minimize condensation, remove wet clothing from the tent and ensure good ventilation through the tent.

Storage:

  • Drying: Never store the tent, even for a short period, without thoroughly drying it and brushing off caked dirt.
  • Separate Bags: Do not pack stakes or poles inside the tent. Use separate storage bags for these components.
  • Pole Storage: Tent poles should not be left telescoped together during storage.

Stake Removal:

  • Method: Stakes should be removed by pulling on the stake itself, not by pulling on the tent fabric or tent stake loop, to prevent damage.

Seam Sealing:

  • Recommendation: Seam sealer has not been provided with the tent. For additional protection, it is recommended to seam seal the tent prior to camping. Seam sealer can be purchased from local retailers or sporting goods stores.

UV Exposure:

  • Warning: Do not leave the tent set up for weeks at a time. Prolonged exposure to the sun's ultraviolet (UV) rays can seriously damage the material and/or cause it to become discolored over time.

Cleaning:

  • Brush off caked dirt before storage. Specific cleaning instructions for the fabric are not detailed but generally involve mild soap and water, avoiding harsh chemicals.

Customer Support:

  • For assistance, contact The Coleman Co., Inc. at 1-800-835-3278 or visit www.coleman.com.
  • The product is made in Sri Lanka.
  • The manual revision is 1/06.

Coleman Denali 9230-410 Specifications

General IconGeneral
BrandColeman
ModelDenali 9230-410
CategoryCamping Equipment
LanguageEnglish

Related product manuals