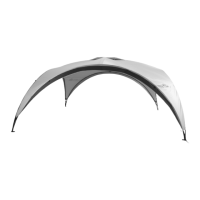
14’ EVENT SHADE MODEL 9391-144
STITCH LINE
Before you begin
Read all instructions before set up.
• Select a level site clear of rocks, branches, and other hard
or sharp objects to install your shelter.
WARNING: Keep clear of overhead power lines.
• It is important to the stability and life of your shelter to have a
secure mounting surface.
• Consult a local contractor for any local building code
requirements.
• Enlist the help of at least one other person to assist you when it
is time to assemble the shelter.
Corner Locator
Important: All four Pad Feet of the Event Shade must be located
14 feet apart. For accurate placement, use the rings on the corner
locator to mark locations (Fig. 1):
a) Place white ring on corner locator at point “A” and mark with
a stake.
b) Extend rings “B” & “C” out to form a 90° angle amd mark both
points with a stake. Distance between point “B” & “C” will
measure 19’ 8”.
c) To locate corner “D”, unhook white ring from corner “A” and
move diagonally as shown and mark.
d) Remove and stow corner locator for future use.
(continued on other side)
Fig. 1
To Set Up Shelter
1. Assemble Peak Pole
with Center Hub. (Fig. 2)
Fig. 2
Fig. 3
2. Assemble both Peak Connector
Poles. (Fig.3)
4. Partially assemble the four Leg Poles with Ridge Hub. (Fig. 7)
NOTE: Do not assemble the last pole on each side of the Ridge
Hubs at
this time.
3. Insert ends
of the Peak
Connector Poles
marked with the
arrows into the
Peak Pole with
Center Hub.
(Fig. 4, 5 & 6)
Fig. 4
Fig. 5
Fig. 6
Fig. 7
19’ 8”
Fig. 9
5. Insert end of Peak Connector Pole into Ridge Hub (Fig. 8 & 9).
Repeat for the remaing three Leg Pole with Ridge Hubs.
NOTE: Make sure
metal pin locks into
slot on top of Ridge
Hub, you may have to
twist Peak Connector
from side to side.
Slot
Metal Pin
Peak Connector
Pole
Fig. 8
Parts and Components
Description Part Number
Peak Pole w/Center Hub (1) 9391-1401
Peak Connector Poles (2) 9391-1411
Leg Pole w/Ridge Hub (4) 9391-1421
Pad Feet (4) 9391-1451
Canopy (1) 9391-1461
Peak Pole w/Center Hub (1)
Leg Pole w/Ridge Hub (4)
Pad Feet (4)
Peak Connector Poles
Center Hub
Ridge Hub