EasyManua.ls Logo

Coleman CORVUS 9234-809 User Manual

Coleman CORVUS 9234-809
2 pages
To Next Page IconTo Next Page
Page #1 background imageLoading...
Page #1 background image
CORVUS
TM
9’ X 8’ MODEL 9234-809
STITCH LINE
Before you begin
Read all instructions before set up.
• Select a level campsite clear of rocks, branches, and other hard
or sharp objects, to install your tent.
WARNING: Keep clear of overhead power lines.
Do not set up your tent under trees.
For best results in windy conditions, position end of tent into
the wind.
Enlist the help of at least one other person to assist you when
it is time to assemble the tent.
Parts and Components
Description Part Number
Main Poles (2) 9234-1081
Ridge Pole (1) 9234-1091
Rainfly Pole, Gray (1) 9234-1101
Rainfly 9234-1111
Fig. 2
To Set Up Tent
1. Unfold tent and spread out on a clean, level surface with the
door facing the desired direction. Unzip door.
2. Assemble main tent poles by interlocking both longer, black
shock-corded, poles.
3. Insert black poles through sleeves in top of tent forming an
“X” as shown. (Fig. 1)
4. Insert one end of each black pole
into pins in rear corners of tent.
(Fig. 2)
Fig. 1
5. Go to opposite
end of each pole
and gradually
apply pressure
to the pole form-
ing an arch.
Insert the pin
into the pole end
at the tent
corners. (Fig. 3)
Fig. 3
Fig. 6
7. Attach frame clips along edges of tent
to frame poles. (Fig. 4)
Fig. 4
To Attach Rainfly
1. Assemble both interlocking shock-corded poles (gray rainfly
pole and black ridge pole).
2. Drape rainfly over tent. Make sure colored-fabric end is
centered over the door with
the web pockets facing
down.
3. Slide black ridge pole with
rounded tips under rainfly
and insert each end into
web pockets located at front
and back. (Fig. 5)
Fig. 8
Fig. 5
4. At the sides of the tent with
triangular shaped windows,
slide remaining gray pole
under rainfly. Insert the metal
end of the pole into the
hooks located on the tent to
secure. (Fig. 6)
Fig. 7
5. Hook clips on elastic cords
at corner of rainfly to the
rings in the four corners of
the tent. (Fig. 7)
6. Tie guylines onto web straps located on the rainfly, stretch
until taut, and secure with stakes. (Fig 8 & 9)
(continued on other side)
6. Stretch corners of tent until floor is taut then hammer stakes
through loops to secure.
Fig. 9
9234-809_TagA4.qxd 10/12/06 11:40 AM Page 1
Question and Answer IconNeed help?

Do you have a question about the Coleman CORVUS 9234-809 and is the answer not in the manual?

Coleman CORVUS 9234-809 Specifications

General IconGeneral
BrandColeman
ModelCORVUS 9234-809
CategoryCamping Equipment
LanguageEnglish

Summary

To Set Up Tent

Unfold and prepare tent

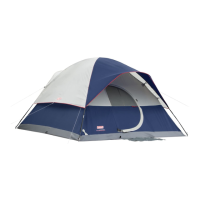
Unfold the tent on a clean, level surface with the door facing the desired direction. Unzip the door.

Assemble main tent poles

Interlock both longer, black shock-corded poles to form the main structure.

Insert poles into tent sleeves

Thread the assembled black poles through the tent's top sleeves, forming an 'X'.

Connect poles to rear corner pins

Insert one end of each black pole into the pins located in the tent's rear corners.

Form tent arches and secure

Apply pressure to poles to create arches, inserting the pin into the pole end at the tent corners.

Secure tent floor with stakes

Stretch the tent corners until the floor is taut, then hammer stakes through the loops.

Attach frame clips

Fasten the frame clips along the tent edges to the corresponding frame poles.

To Attach Rainfly

Assemble rainfly poles

Connect the shock-corded gray rainfly pole and the black ridge pole.

Drape rainfly over tent

Center the rainfly over the tent, aligning the colored fabric end with the door.

Insert ridge pole under rainfly

Slide the black ridge pole under the rainfly, inserting ends into web pockets.

Insert gray pole under rainfly

Thread the gray pole under the rainfly and secure its metal end into tent hooks.

Hook rainfly clips to tent rings

Attach the elastic cord clips at the rainfly corners to the rings on the tent corners.

Tie and secure guylines

Tie guylines onto web straps on the rainfly, stretch taut, and secure with stakes.

Door and Window Vents

Open door fully

Unzip the door completely, roll it up, and secure with the fabric loop toggle.

Use door vent for ventilation

Unzip the secondary zipper to expose the vent, then roll up the door flap.

Vent back and side windows

Unzip back and side window vents, roll up flaps, and secure with toggles.

Electrical Cord Access

Route electrical cord

Unzip the lower right access panel and bring in an outdoor-rated electrical cord.

Cooler Access

Use as vent

Unzip the smaller rear opening flap to expose the screen for ventilation.

Use as cooler access

Unzip the other rear flap to create an opening for cooler access.

Attaching the Gear Loft

Install gear loft

Insert toggles through the fabric loops on the tent ceiling to attach the gear loft.

To Store

Prepare tent for storage

Clean and dry the tent. Fold neatly, place poles and stakes in bags, then roll tightly.

Store tent properly

Place the rolled tent in its carry case and store in a clean, dry area.

Things You Should Know

Condensation management

Minimize condensation by removing wet items and ensuring good tent ventilation.

Tent care and storage

Dry thoroughly, brush off dirt, do not pack stakes/poles inside tent. Do not leave poles telescoped.

Safety warnings

Keep flame sources away; fabric will burn. Avoid prolonged sun exposure. Remove stakes carefully.

Related product manuals