EasyManua.ls Logo

Coleman Tioga Backpacker 9273A827C User Manual

Coleman Tioga Backpacker 9273A827C
4 pages
To Next Page IconTo Next Page
Page #1 background imageLoading...
Page #1 background image
Connect Frame to Tent
– Insert one end of main tent pole end
onto pin of pin & ring system, at tent
corner. (illus. 3)
– Go to opposite end of pole and
gradually apply pressure to the pole
forming an arch until you are able to
insert the pin into the pole.
Repeat for second pole.
Tioga Backpacker
1
Layout & Positioning
of Tent, Pole Assembly
Layout and position tent with door
facing desired direction. (illus. 1)
– Unzip door.
Stake down tent corners only, using the
rings at the end of the stake loops.
Keep the floor taut. (illus. 2)
Assemble frame poles by
interlocking shock-corded poles.
This will make two long poles.
– Insert the poles diagonally into pole
sleeves. The center of the poles should
cross forming an “X” in the middle of
tent. (illus. 1)
2
When You Are Ready
To Set Up Your Tent
– Select a level campsite clear of rocks,
branches and other hard or sharp objects.
Do not set up your tent under trees.
For best results in windy conditions,
do not position the door of tent into
the wind.
(1) Rainfly
Pole
Rainfly
Part No. 9273A2221
(2) Main
Tent Poles
POLE ASSEMBLY PARTS
Assembled
poles
inserted
through
pole
sleeves
Instructions apply to Part Number 9273A827C
illus. 1
illus. 3
Insert pole end onto
pin & ring
illus. 4
Tent frame
set-up
Part No. 9273A2231
Part No. 9273A2241
illus. 2 Tent stake
through ring
Question and Answer IconNeed help?

Do you have a question about the Coleman Tioga Backpacker 9273A827C and is the answer not in the manual?

Coleman Tioga Backpacker 9273A827C Specifications

General IconGeneral
BrandColeman
ModelTioga Backpacker 9273A827C
CategoryCamping Equipment
LanguageEnglish

Summary

Pole Assembly Parts

Main Tent Poles

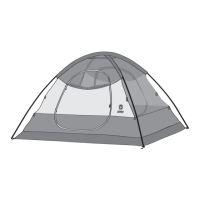
Main tent poles, part number 9273A2231.

Rainfly Pole

Rainfly pole, part number 9273A2241.

Tent Layout and Pole Assembly

Tent Positioning and Staking

Position tent with door facing desired direction and stake corners.

Assemble and Insert Frame Poles

Assemble frame poles by interlocking and insert them diagonally to form an 'X'.

Connect Tent Frame Poles

Attach Pole Ends to Tent Corners

Insert one end of main tent pole onto the pin at the tent corner.

Form Tent Arches

Apply pressure to the opposite pole end to form an arch and insert the pin.

Attach Tent to Frame Clips

Secure Tent Body to Poles

Attach frame clips along the edges of the tent to the frame poles.

Attach Rainfly

Assemble and Position Rainfly Pole

Assemble rainfly pole and insert into pockets on the underside of the rainfly.

Connect Rainfly to Tent Frame

Connect elastic loops with 'S' hooks to tent corner rings and secure with ties.

Stake Out Rainfly and Guylines

Extend vestibules, stake out the rainfly, and stake out guylines for stability.

Important Tent Usage and Care Information

Condensation Management

Minimize condensation by removing wet clothing and providing good ventilation.

Storage and Maintenance

Dry tent thoroughly before storage; do not store poles telescoped.

Safety Warnings

Keep away from flame sources; tent fabric may burn if exposed to flame.

Related product manuals