Do you have a question about the Coleman 2000002596 and is the answer not in the manual?
Lists steel poles (long, short, curved) and door poles with quantities, diameter, and replacement kit numbers.
Details spring lengths and part numbers for self-rolling windows, with a caution about sharp edges.
Unfold tent, assemble leg poles, and attach ridge poles to the tent structure.
Stretch tent corners taut, secure with stakes, and insert poles into corresponding sleeves.
Attach frame clips to leg poles and adjust tent tension by twisting pole sections.
Insert vertical door pole into the zippered sleeve on the hinged side of the door.
Insert the longer door pole into the top zippered sleeve and secure into hinge plates.
Drape rainfly over tent, centering it, and secure with hook and loop fasteners and metal hooks.
Stretch guylines taut and secure them with stakes for stability.
Insert color-coded springs into window sleeve openings and secure with hook & loop fasteners.
Push top of window to engage spring for automatic roll-down, unzip to open, zip to close.
Roll up springs, place poles/stakes in bag, ensure tent is clean and dry before storage.
Neatly fold tent to match pole bag width, roll tightly, and store in a clean, dry area.
Address condensation by ensuring good ventilation and removing wet items.
Avoid tree sap, UV damage, and store tent only when dry to maintain its properties.
Keep flame sources away, tent meets flammability standards, avoid pulling tent for stake removal.
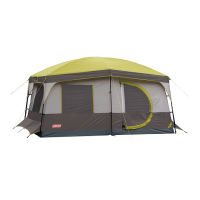
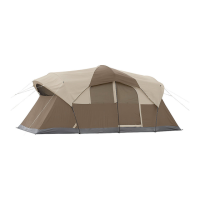
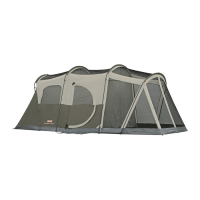
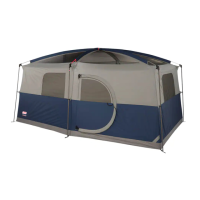
The Coleman Rockwall 12 Tent, Model 2000002596, is a spacious and feature-rich shelter designed for outdoor enthusiasts. This tent offers a comfortable and secure camping experience with its robust construction and user-friendly design.
The primary function of the Coleman Rockwall 12 Tent is to provide a temporary, portable shelter for camping and outdoor activities. It is designed to house multiple occupants comfortably, offering protection from the elements such as rain, wind, and sun. The tent features a self-rolling window system for ventilation and privacy, a hinged rigid door for easy access, and an electrical cord access port for powering devices inside the tent. Additionally, it includes a tent lighting system (pre-wired, light sold separately) and a room divider for customizable interior space. The tent's design emphasizes ease of setup and takedown, making it suitable for various camping scenarios.
Before setting up, users should select a level site clear of rocks, branches, or sharp objects. It is crucial to avoid setting up under trees due to potential lightning strikes or falling limbs, and to keep clear of overhead power lines. For optimal performance in windy conditions, the narrow end of the tent should face into the wind. Assistance from at least one other person is recommended for assembly.
The setup process begins by unfolding the tent and spreading it on a clean, level surface with the door facing the desired direction. The six steel, shock-corded Leg Poles are assembled first, followed by the three steel, shock-corded, curved Ridge Poles. The tent corners are then stretched taut and secured with plastic stakes. The Ridge Poles are inserted into the sleeves on top of the tent, with the red-marked Ridge Pole going into the center sleeve. The curved ends of the Leg Poles are then inserted into the ends of the Ridge Poles.
Once the poles are in place, the six Leg Poles are rotated upright, and pins are inserted into the web loops at the side locations. To stretch the tent to its finished size, users push a button on each Leg Pole, twist the lower section counterclockwise, pull up the top section until taut, and then twist the lower section clockwise until the button locks into the center or lowest hole. Frame Clips on the front and back of the tent are attached to the Leg Poles, and plastic stakes are driven through web straps at the bottom of each Leg Pole to secure the tent.
The rainfly is draped over the tent, ensuring the seams face down and are centered over the curved Ridge Poles. Large hook and loop fasteners on the underside of the rainfly are centered over the ends of the tent and pressed onto the loop pads to secure it. Additional hook and loop fasteners on the underside of the rainfly are wrapped around the center Leg Poles at the front and back. Metal hooks on the elastic straps of the rainfly are inserted into the holes on each Leg Pole, and guylines are stretched taut and secured with stakes.
The door assembly involves inserting the shorter black Vertical Door Pole (with plastic tips) through the zippered vertical pole sleeve on the hinged side of the door. One end of the Vertical Door Pole is inserted into the bottom hinge plate, pressure is applied to create a slight bow, and the other tip is inserted into the top hinge. The vertical pole sleeve is then zipped up. The longer black Door Pole (with plastic cap tips) is inserted into the zippered pole sleeve at the top of the door. One end is inserted into the top hinge plate, pressure is applied to create a bow, and the other tip is inserted into the bottom hinge. The pole sleeve is then zipped up to enclose the Door Pole.
The tent features self-rolling windows operated by metal "springs." Users must carefully unroll these springs from their bag, matching the color code on the spring to the fabric "flag" sewn to the window or door sleeve opening. The spring is inserted into the sleeve, and the hook & loop fastener is closed. To open the window, users push in at the top to engage the springs, then unzip the window panel to allow it to roll down automatically. To close, the window panel is zipped back up.
An access panel in the lower right corner of the tent can be unzipped to bring in an electrical cord. Only UL-approved cords rated for outdoor usage should be used.
A divider panel can be installed by inserting toggles through the top and bottom fabric loops in the center of the tent, allowing for customizable interior space.
The tent includes a smaller zippered opening at the back for added ventilation and easy access to a beverage cooler. Unzipping the flap exposes a screen for ventilation, or unzipping the other flap creates an avenue to bring beverages into the tent.
Proper storage is crucial for the longevity of the tent. All "springs" must be rolled up and placed in their bag with stakes. All poles and stakes must be placed in the storage bag to prevent damage to the fabric items placed in the carry case. Before storing, the tent must be clean and completely dry. The rainfly should be removed and spread out, and the door and vents unzipped before taking the tent down. The tent should be neatly folded to the width of the pole storage bag, placed on the tent, rolled tightly, and placed in the carry case. Store the tent in a clean, dry area.
Condensation can form inside the tent under certain conditions (cold weather, high humidity) due to water vapor from breath, perspiration, or wet clothing. This is not leakage and can be minimized by removing wet clothing and ensuring good ventilation.
Tree limbs, tree sap, bird droppings, or moisture dripping from trees can damage the tent fabric and its coating, leading to leaks or loss of flame-resistant properties.
Never store the tent, even for a short period, without thoroughly drying it and brushing off caked dirt. Stakes or poles should not be packed inside the tent; a separate storage bag should be used.
Stakes should be removed by pulling on the stake itself, never by pulling on the tent, as this can cause property damage or personal injury.
Tent poles should not be left telescoped together during storage.
Leaving the tent set up for weeks at a time is not recommended, as exposure to ultraviolet rays from the sun can seriously damage the material and cause discoloration.
The tent fabric meets the flammability requirements of CPAI-84. However, the fabric may burn if left in continuous contact with any flame source. Users should keep all flame and heat sources away from the tent fabric. The application of any foreign substance to the tent fabric may render the flame-resistant properties ineffective.
"Springs" may have sharp edges and should be handled with care to avoid injury. They should be kept out of reach of children. All "springs" must be removed from sleeves before tearing down the tent to avoid damage to the tent fabric or part. To avoid injury, they should be carefully rolled up and stored in the bag with stakes.
| Brand | Coleman |
|---|---|
| Model | 2000002596 |
| Category | Tent |
| Type | Dome |
| Shape | Dome |
| Color | Green |
| Material | Polyester |
| Water Resistance System | WeatherTec System |
| Setup Time | 10 minutes |
| Pole Material | Fiberglass |
| Capacity | 4 Person |
| Center Height | 4 ft 11 in |
| Dimensions | 9 x 7 feet |