21
COMUNELLO ®Copyright 2014 - All right reserved
ENGLISH
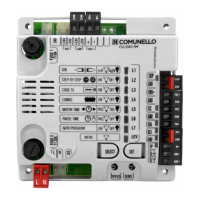
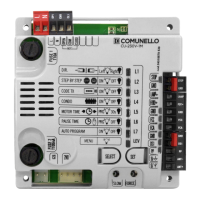
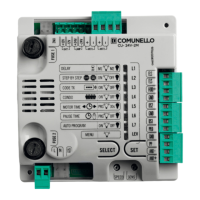
L1 SOFT STOP ON OFF
L2 SOFT START ON OFF
L3 SAFE 1 IN OPEN ON OFF
L4 HOLD-TO-RUN ON OFF
L5 FOLLOW ME ON OFF
L6 PAUSE FLASHING ON OFF
L7 ALWAYS CLOSE ON OFF
LEV MENU 2 FLASHES
The control unit is factory set with leaves opening and closing delay disabled
(4 sec.). If the control unit is used in the conguration for an automation
with 2 operators, it may be necessary to set a different leaves delay time;
programming must be performed with the gate closed as follows: make
sure you have enabled Extended Menu 1, press the SELECT key to select
blinking LED L4 then press the SET key momentarily; now wait for a time
equivalent to the desired time interval and then press the SET key again
momentarily, at the same time the xed 4 second leaves opening delay and
the closing delay for the programmed time will be saved and LED L4 will
remain steady on.
If you want to deactivate this function (without leaves delay), select blinking
LED L4 and then press the SET key twice consecutively in a time interval
of 2 seconds, at the same time the LED will switch off and the operation
will be terminated.
5. RELEASE STROKE:
The control unit is factory set with the release stroke function disabled. To
enable the Release Stroke function at maximum power, proceed as follows:
make sure you have enabled Extended Menu 1, use the SELECT key to
select blinking LED L5 then press the SET key, LED L5 becomes steady on
and the programming procedure will be completed. If you wish to enable
the Release Stroke function at the power set with the “FORCE” trimmer,
repeat the procedure described above,
press the SELECT key twice (LED L5 will blink rapidly) rather than just once.
Repeat the procedure if you wish to restore the initial conguration.
This procedure makes it possible to facilitate release of the gate lock and
thus allow correct execution of the opening stroke. With this function, before
starting the opening stroke the control unit sends a closing command for 2
seconds with the thrust force associated with the selection made.
6. SLAM LOCK:
The control unit is factory set with the Slam Lock function disabled. This
function consists in adding, in the presence of a deceleration stage during
closing, a stroke lasting 1 second at the maximum power or at the power
selected with the “FORCE” trimmer, in such a way as to ensure positive
engagement of the gate lock, if installed. If you wish to enable the Slam
Lock function at maximum power, proceed as follows: make sure you have
enabled Extended Menu 1, use the SELECT key to select blinking LED L6
and then press the SET key: LED L6 becomes steady on and programming
will be completed. If you wish to enable the Slam Lock function at the power
set with the “FORCE” Trimmer, repeat the operation described by pressing
the SELECT key twice (LED L6 will blink rapidly) rather than once. Repeat
the procedure if you wish to restore the initial conguration.
7. PREFLASHING/COURTESY LIGHT:
The control unit is factory set with the Preashing and Courtesy Light
functions disabled. If you wish to enable the Preashing function proceed
as follows: make sure you have enabled Extended Menu 1, use the SEL key
to select blinking LED L7 and then press the SET key: the LED becomes
steady on and programming will be completed. If you wish to enable the
Courtesy Light function, repeat the operation described above, pressing
the SELECT key twice (the LED will blink rapidly) rather than once. Repeat
the procedure if you wish to restore the initial conguration.
Preashing Operation: The 24 Vac 4W max. Flashing Light output will
always switch on 3 seconds before the gate starts the closing operation.
Courtesy Light Operation: The 24 Vac 4W max. Courtesy Light output
will switch on for 3 minutes whenever an opening command is transmitted.
EXTENDED MENU 2
The control unit is factory set to allow direct selection exclusively of the main
menu functions. If you wish to enable the functions described in Extended
Menu 2, proceed as follows: select blinking LED no. 8 and press SET
twice. The LED will start blinking alternately 1 1 0 1 1 0 1 1 0. This means
there is a period of 30 seconds to select the functions in Extended Menu 2
using the SELECT and SET keys and then, after a further 30 seconds, the
control unit will revert to the main menu.
1. SOFT STOP:
The control unit is factory set with the Soft Stop function disabled. If you
wish to enable the function, proceed as follows: ensure you have enabled
Extended Menu 2 and then use the SEL key to select blinking LED L1
and press the SET key; at the same time LED L1 becomes steady on and
programming will be completed. With this function enabled at the end of the
movement the control unit will reduce operator force to zero gradually in a
2 second interval. Repeat the procedure if you wish to restore the previous
conguration.
2. SOFT START:
The control unit is factory set with the Soft Start function disabled. If you
wish to enable the function, proceed as follows: ensure you have enabled
Extended Menu 2 and then use the SELECT key to select blinking LED
L2 and press the SET key; at the same time LED L2 becomes steady
on and programming will be completed. With this function enabled at
the start of each movement the control unit will modulate start-up of the
operator, gradually increasing the force from the minimum to the value set
by the “FORCE” trimmer during the rst 2 seconds of operation. Repeat the
procedure if you wish to restore the previous conguration.
Note: when the Soft Start function is enabled, the control unit automatically
disables the Starting Torque function, while if Soft Start is disabled then
Starting Torque is automatically enabled.
3. SAFE 1 also in opening:
The control unit allows the operation of input DS1 to be modied. If you want
SAFE 1 to operate also during opening (momentary stopping of the gate,
as soon as it is freed the control unit resumes the opening movement),
proceed as follows: ensure you have enabled Extended Menu 2 and then
press the SEL key to select blinking LED L3 and press the SET key: LED L3
becomes steady on and programming will be completed.
Repeat the procedure if you wish to restore the initial conguration.
4. HOLD-TO-RUN:
The control unit provides the opportunity to set the “Hold-to-run” function.
If you wish to enable this function, proceed as follows: ensure you have
enabled Extended Menu 2 and then use the SELECT key to select blinking
LED L4 and press the SET key; at the same time LED L4 becomes steady
on and the operation will be completed.
With this function enabled using either the remotes or the Pushbuttons to
operate the gate, the following operation will be obtained: the command
must be kept maintained constantly to move the gate. When the command
is released, movement will stop immediately. Repeat the procedure if you
wish to restore the previous conguration.
5. FOLLOW ME
The control unit allows the “Follow me” function to be congured;
programmable only if a Pause Time has already been set, this function
reduces the Pause Time to 5 seconds after freeing the SAFE1 photocell,
meaning the gate re-closes 5 seconds after transit of the user. To activate
this function proceed as follows: ensure you have enabled Extended
Menu 2 and then press the SELECT key to select blinking LED L5 and
then press the SET key: LED L5 becomes steady on and programming will
be completed. Repeat the procedure if you wish to restore the previous
conguration.
6. FLASHING LIGHT OPERATION:
The control unit is factory set with Flashing Light during Pause Time
disabled. If you wish to enable this function, proceed as follows: make
sure you have enabled Extended Menu 2, press the SELECT key to select
blinking LED L6 and then press the SET key: LED L6 becomes steady on
and programming will be completed. Repeat the procedure if you wish to
restore the previous conguration.
7. ALWAYS CLOSE FUNCTION:
The control unit provides the facility to set “Always Close” operation: this
function, which is programmable only if a Pause Time has already been
programmed, is activated after a power failure; if the gate open condition
is conrmed a closing movement is started automatically, preceded by
5 seconds of preashing. If you wish to enable the function, proceed as
follows: ensure you have enabled Extended Menu 2 and then use the SEL
key to select blinking LED L7 and press the SET key; at the same time LED
L7 becomes steady on and the operation will be completed. Repeat the
procedure if you wish to restore the previous conguration.
EXTENDED MENU 3
 Loading...