12
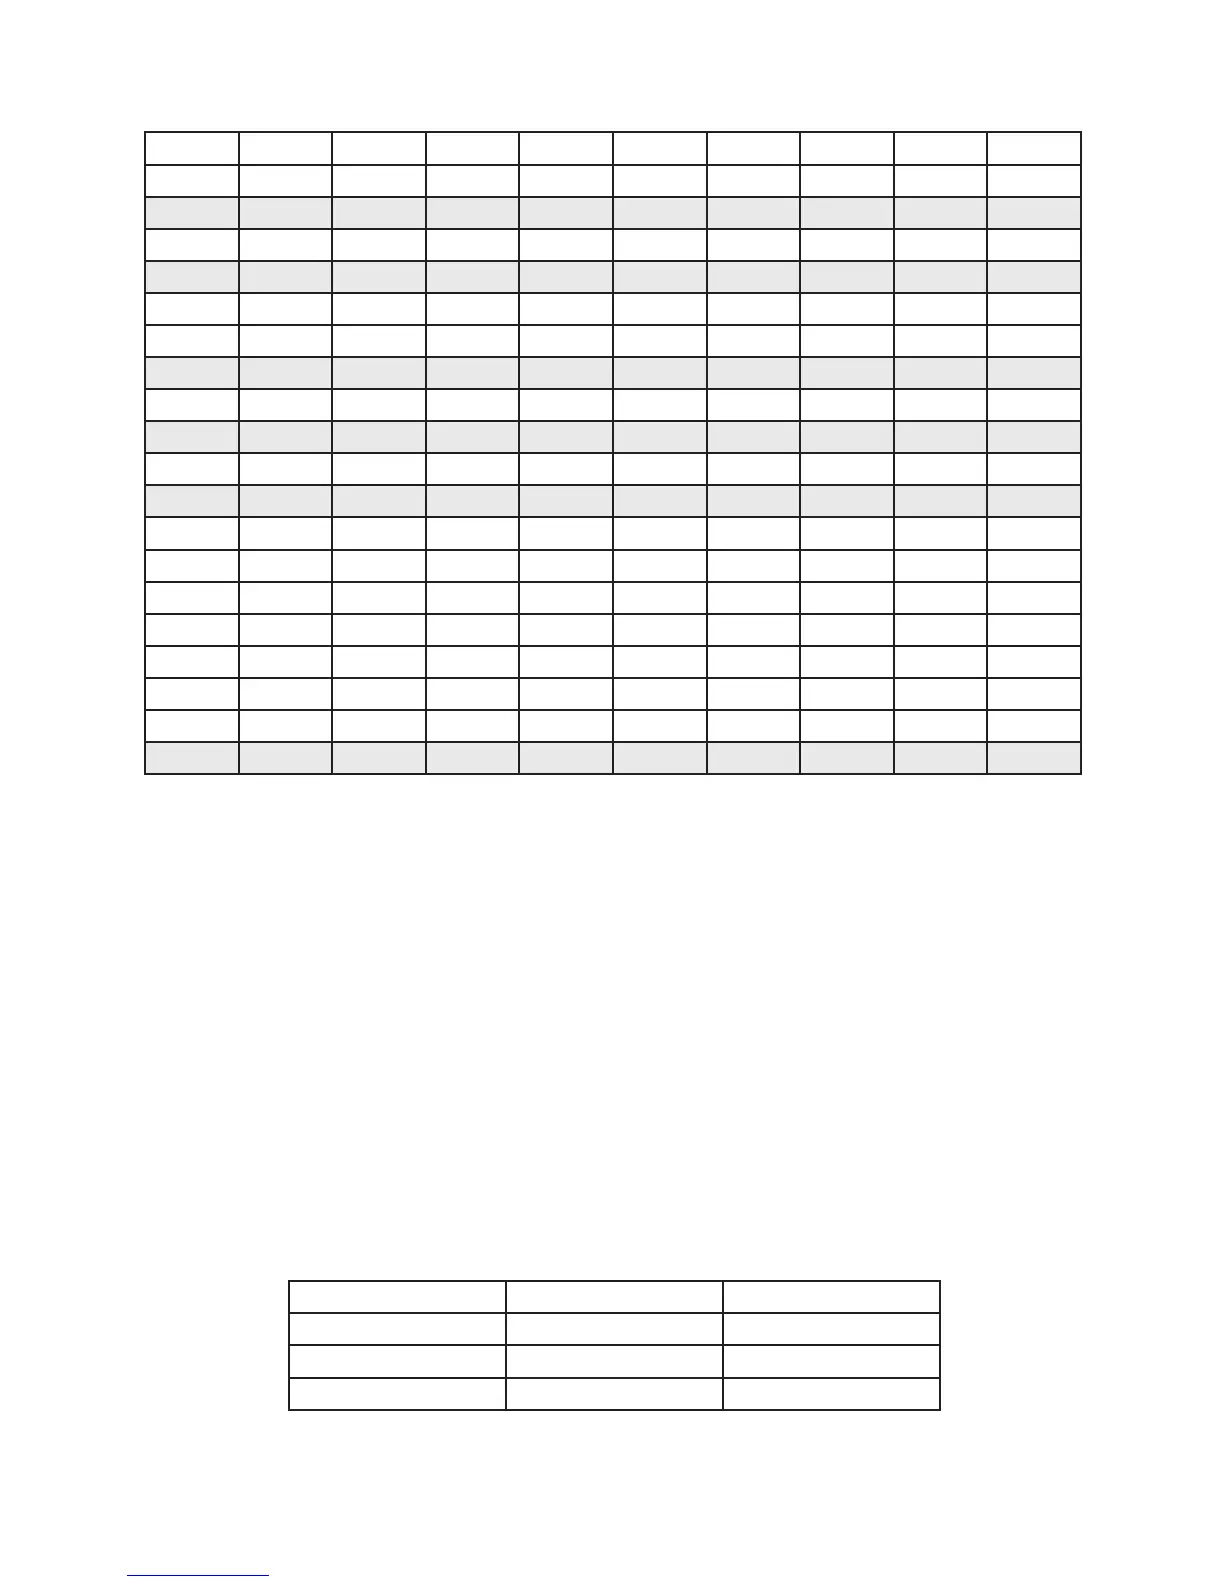
Table 3 — Typical Switchover Pressure DIP Switch Settings
PSI SW1-9 SW1-8 SW1-7 SW1-6 SW1-5 SW1-4 SW1-3 SW1-2 SW1-1
75
OFF OFF ON OFF OFF ON OFF ON ON
100
OFF OFF ON ON OFF OFF ON OFF OFF
125
OFF OFF ON ON ON ON ON OFF ON
135
OFF ON OFF OFF OFF OFF ON ON ON
150
OFF ON OFF OFF ON OFF ON ON OFF
175
OFF ON OFF ON OFF ON ON ON ON
200
OFF ON ON OFF OFF ON OFF OFF OFF
225
OFF ON ON ON OFF OFF OFF OFF ON
250
OFF ON ON ON ON ON OFF ON OFF
275
ON OFF OFF OFF ON OFF OFF ON ON
300
ON OFF OFF ON OFF ON ON OFF OFF
325
ON OFF ON OFF OFF OFF ON OFF ON
350
ON OFF ON OFF ON ON ON ON OFF
375
ON OFF ON ON ON OFF ON ON ON
400
ON ON OFF OFF ON OFF OFF OFF OFF
425
ON ON OFF ON OFF ON OFF OFF ON
450
ON ON ON OFF OFF OFF OFF ON OFF
475
ON ON ON OFF ON ON OFF ON ON
500
ON ON ON ON ON OFF ON OFF OFF
Units of Measure
The IntelliSwitch is capable of displaying pressure in PSI, BAR or MPA. The units of measure are factory set
to PSI. Units of measure may be changed by setting DIP Switches 11 and 12 on the electronic circuit board
inside the system.
To access the DIP switches, REMOVE AC power from the system. Remove the knob on the outlet pressure
adjustment regulator by carefully lifting the center label on the knob and removing the nut. Using a Phillips
screwdriver, remove the 4 screws and washers holding the front panel. Unscrew the nut on the outlet pressure
adjustment regulator being careful not to allow the front panel to fall. There are two long studs attached to
the inside of the front panel that will allow hanging of the panel to the bottom of the enclosure.
Using Table 4 and Figure 3, set the switchover pressure DIP switches to the desired value. When completed,
place the front panel back into place being careful not to pinch any wires. Attach the large nut to the outlet
pressure adjustment regulator rst. This only needs to be nger tight. Re-install the 4 screws and washers
holding the front panel. Attach the knob to the regulator using the nut and reapply the label. The nut
holding the knob should be tightened securely.
Re-apply AC power.
Table 4 — Units of Measure
Units of Measure SW1-11 SW1-12
PSI ON OFF
BAR OFF ON
MPA OFF OFF
The indicator lights on the front panel will show the units selected. For PSI and BAR the light will be ON.
If MPA is selected neither the PSI or BAR light are ON signifying MPA.