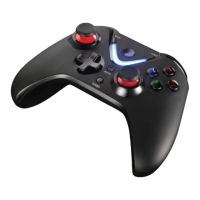
The Cosmic Byte Ares Wireless Controller is a versatile gaming peripheral designed for an immersive gaming experience across multiple platforms. It features a robust design with several user-friendly functionalities and a focus on wireless connectivity.
Function Description
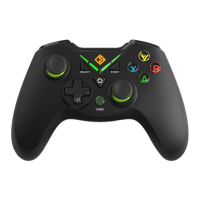
The Ares Wireless Controller serves as a primary input device for gaming on various platforms, including PC (Windows), Android devices, and PlayStation 3 (PS3). It offers precise control through its dual analog sticks, D-pad, and a full set of action buttons, along with pressure-sensitive triggers for nuanced gameplay. The controller supports different input modes (X-input, Direct Input, PC Analog, Android, PS3) to ensure compatibility with a wide range of games and systems. Key features include vibration effects for enhanced feedback, backlit action buttons for visibility in low-light conditions, and a turbo function for rapid button presses.
Important Technical Specifications
- Model: ARES Wireless
- Humidity: 20~80%
- Temperature: -10°C~+60°C
- Working Current: <150mA
- Product Size: 156 X 105 X 55mm
- Interface: USB (for charging and dongle connection)
- Packing Size: 180 X 75 X 150mm
- Agreement: USB 2.0/3.0
- Work Voltage: 3.7-4.2V
- Work Distance: 6-8 meters (wireless range)
- Working Mode: ANDROID/DirectInput/Xinput/PS3
- Product Weight: 220g
- Battery: 700mAh
- Charging: USB C Port
Usage Features
Controller Layout
The controller features a standard layout:
- Home Button: Central button for various functions, including mode switching and pairing.
- USB C Port: For charging the controller.
- Start Button: Standard game function.
- Back Button: Standard game function.
- LED Light: Toggle on/off functionality.
- Pressure Sensitive Left & Right Triggers: For analog input in games.
- Rubberised Textured Left Stick: For precise movement control.
- LED A B X Y Buttons with LED: Main action buttons with backlighting.
- Rubberised Textured Right Stick: For camera control or secondary actions.
- Direction Pad (D-PAD): For directional input.
- Auto Function Button: For auto turbo feature.
- Turbo Function Button: For setting turbo on specific buttons.
- LSB (Left Stick Button): Clickable left analog stick.
- RSB (Right Stick Button): Clickable right analog stick.
- L1/R1: Shoulder buttons.
- L2/R2: Triggers.
- Reset Button: Located on the back of the controller.
Mode and Indicator Status
The controller indicates its current working mode through LED colors:
- X Input: Blue LED
- Direct Input: Red LED
- PC Analog: Yellow LED
- Android: Green LED
- PS3: Automatic mode detection
- PC (Windows): Plug and Play for Windows 8 and above. Connects as X-input automatically. If issues arise, reconnect the gamepad.
- Android/PS3: No driver required. For Android (4.0 above), an OTG function is required. Connect the gamepad to the phone using an OTG cable and wireless dongle. Android compatibility may vary and is not covered under warranty.
- Device Connection: Connect the gamepad to the PC using the wireless dongle. Ensure no obstructions between the gamepad and dongle for optimal connection. A USB Extension cable is recommended for best results. No mode change is needed when connecting to Android or PS3.
Power Off
To turn off the controller, press the 'B' button and 'Back' button simultaneously for 5 seconds.
Change Mode
Press the 'HOME' key for more than 5 seconds to switch between X-input and Direct input modes.
ABXY LED and V LED Switch
- ABXY LED: Press 'X' + 'Back' button to toggle the ABXY LED on/off.
- V LED: Press 'A' + 'Back' button to toggle the V LED on/off.
Left Joystick and D-Pad Switch
Press 'L3' + 'Back' to switch the functionality between the left joystick and the D-pad.
Turbo Function
- Set Turbo: Press the desired action button (A, B, X, Y, L1, L2, R1, R2) and then press the 'Turbo' button.
- Cancel Turbo: Press the button with active turbo and then press the 'Turbo' button again.
Auto Turbo Function
- Set Auto Turbo: Press the desired action button (A, B, X, Y, L1, L2, R1, R2) and then press the 'AUTO' button.
- Cancel Auto Turbo: Press the button with active auto turbo and then press the 'AUTO' button again.
Pairing Steps (to the Dongle)
If the dongle and controller's Home button LED continuously blink, they are not paired.
- Plug the receiver (dongle) into your PC.
- Press the 'Home' button on the controller.
- Press the 'Home' button twice when the lights start blinking.
- Both the LED on the dongle and controller will stop blinking, indicating successful pairing.
- The controller is now ready for use.
Maintenance Features
Battery Management
- Low Battery: When the battery is low, the LED will flash, and the gamepad will turn off vibration to conserve power.
- Charging: While charging, the LED will flash slowly.
- Charging Complete: Once fully charged, the LED will turn off.
- Charging Recommendation: Use only 5A/1V chargers or plug the controller into a PC USB port for charging. Using fast chargers can damage the battery and components, and will void the warranty.
Troubleshooting
The manual includes a dedicated section for troubleshooting, indicating support for resolving common issues.
Warranty
The controller comes with a 1-year warranty covering manufacturing defects only. Physical damage, water damage, tampered products, and regular wear and tear from battery usage are not covered. A QR code is provided for accessing the Warranty Claim Procedure.
Support
- Phone: 1800 31300 7700 (Mon-Fri 10am to 5PM)
- Email: cc@thecosmicbyte.com
- FAQ/Support Website: support.thecosmicbyte.com