EasyManua.ls Logo

Craftsman 139.53978SRT User Manual

Craftsman 139.53978SRT
40 pages
To Next Page IconTo Next Page
Page #1 background imageLoading...
Page #1 background image
Owner's Manual
1/2 HP
GARAGE DOOR OPENER
For Residential Use Only
Model No:
139.53978SRT
CAUTION:
Read and follow all safety rules
and operating instructions
before first use of this product.
Fasten the manual near the
garage door after installation.
Complies with UL 325 ,/"_'_
regulations effective _ U| |
January 1, 1993
[] Safety Precautions
[] Assembly
[] Installation
[] Adjustment
[] Maintenance
[] Operation
[] Troubleshooting
[] Parts List
Sears, Roebuck and Co., Hoffman Estates, IL 60179 U.S.A
visit our Craftsman website: www.sears.com/craftsman

Table of Contents

Question and Answer IconNeed help?

Do you have a question about the Craftsman 139.53978SRT and is the answer not in the manual?

Craftsman 139.53978SRT Specifications

General IconGeneral
BrandCraftsman
Model139.53978SRT
CategoryGarage Door Opener
LanguageEnglish

Summary

You'll Need Tools

Sectional Door Installation

One-Piece Door Installation

Carton Inventory

Garage Door Opener Assembly

Assemble Rail and Install Trolley

Details on how to assemble the garage door opener rail and install the trolley.

Fasten Rail to Opener

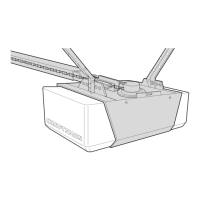
Instructions for attaching the assembled rail to the opener powerhead.

Install Idler Pulley

Steps for installing the idler pulley onto the rail assembly.

Install Chain/Cable and Sprocket Cover

Guides on installing the chain/cable and securing the sprocket cover.

Tighten the Chain

Instructions for properly tightening the chain on the opener assembly.

Important Installation Instructions

Garage Door Opener Installation Guide

Determine Header Bracket Location

How to determine the correct location for the header bracket above the garage door.

One-Piece Door Header Bracket Location

Specific guidance for determining header bracket location for one-piece doors.

Install the Header Bracket

Instructions for mounting the header bracket to the wall or ceiling.

Attach Rail to Header Bracket

Procedures for connecting the opener rail to the installed header bracket.

Position the Opener

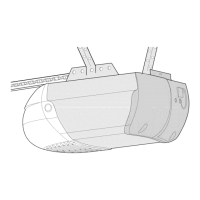
Instructions on how to position the opener unit correctly relative to the door.

Hang the Opener

Steps for securely hanging the opener unit to structural supports in the garage.

Install the Door Control

How to install the wall-mounted door control and wiring.

Install Light and Lens

Instructions for installing the light bulb and lens cover on the opener.

Attach Emergency Release Rope and Handle

How to attach the emergency release rope and handle to the opener.

Electrical Requirements

Information on electrical connections and requirements for the opener.

Safety Reversing System

Install Safety Reversing Sensor

Step-by-step guide to installing the safety reversing sensor brackets.

Fasten Door Bracket

Connect Door Arm to Trolley

Adjusting Travel Limits

Adjusting Door Force Controls

Safety System Testing

Test Safety Reversing Sensor

Procedure to test the functionality of the safety reversing sensor.

Test Safety Reverse System

Procedure to test the door's safety reverse system against an obstruction.

Important Safety Instructions

Care of Your Opener

Maintenance Schedule

A schedule for routine maintenance tasks like chain tension and lubrication.

Operating Your Opener

Operating the Door Control

Specific instructions on using the wall-mounted door control button.

Receiver and Remote Control Programming

Troubleshooting Common Problems

Repair Parts Identification

Rail Assembly Parts

Lists and illustrates various replacement parts for rail assembly.

Installation Parts

Lists and illustrates replacement parts for the opener installation.

Opener Assembly Parts

Available Accessories

Programming Keyless Entry

Step-by-step guide for programming the Keyless Entry system.

Sears Warranty Information

Related product manuals