EasyManua.ls Logo

Craftsman 139.53970SRT User Manual

Craftsman 139.53970SRT
76 pages
To Next Page IconTo Next Page
Page #1 background imageLoading...
Page #1 background image
KG
KG
1
2
3
1/2 HP
GARAGE DOOR OPENER
ABRIDOR DE PUERTA DE COCHERA
For Residential Use Only/Sólo para uso residencial
Model/Modelos 139.53960SRT 139.53968SRT 139.53970SRT
139.53971SRT 139.53973SRT
®
Sears, Roebuck and Co., Hoffman Estates, IL 60179 U.S.A
www.sears.com/craftsman
Read and follow all safety rules
and operating instructions before
first use of this product.
Fasten the manual near the garage
door after installation.
Periodic checks of the opener are
required to ensure safe operation.
Lea y siga todas las reglas de
seguridad y las instrucciones de
operación antes de usar este
producto por primera vez.
Guarde este manual cerca de la
puerta de la cochera.
Se deben realizar revisiones
periódicas del abridor de puertas
para asegurar su operación
segura.
Owners Manual/Manual del Propietario
ENGLISH ESPAÑOL
®
Question and Answer IconNeed help?

Do you have a question about the Craftsman 139.53970SRT and is the answer not in the manual?

Craftsman 139.53970SRT Specifications

General IconGeneral
TypeChain Drive
Model Number139.53970SRT
Horsepower1/2 HP
Voltage120V
Frequency60 Hz
Remote Controls2
Safety SensorsYes
Battery BackupNo
Warranty1 Year
Drive SystemChain Drive

Summary

Preparing Your Garage Door

Safety Warnings and Precautions

Essential safety guidelines before installation and operation.

Installation Tools Required

Essential Hand Tools

List of necessary hand tools for assembly and adjustments.

Installation Planning

Sectional Door Planning

Specific planning points for sectional garage doors.

One-Piece Door Planning

Specific planning points for one-piece garage doors.

Carton Inventory

Opener Component Identification

Visual guide to all parts included in the opener carton.

Hardware Inventory

Assembly Hardware Details

List and description of hardware for assembly.

Installation Hardware Details

List and description of hardware for installation.

Assembly Step 1: Rail and Trolley

Rail Assembly Procedure

Steps to assemble the rail and install the trolley.

Trolley Installation

How to connect the inner and outer trolleys.

Assembly Step 2: Rail to Motor Unit

Attaching Rail to Motor Unit

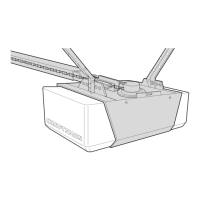
Securing the rail assembly to the motor unit.

Assembly Step 3: Idler Pulley Installation

Installing the Idler Pulley

Procedure for installing the idler pulley.

Assembly Step 4: Chain and Sprocket Cover

Chain and Cable Installation

Installing the chain/cable and connecting to the trolley.

Sprocket Cover Attachment

Securing the sprocket cover for safety.

Assembly Step 5: Chain Tightening

Adjusting Chain Tension

Steps to properly tighten the chain for operation.

Important Installation Instructions

General Installation Safety

Critical safety warnings for the entire installation process.

Installation Step 1: Header Bracket Location

Sectional Door Header Bracket Placement

Determining header bracket location for sectional doors.

One-Piece Door Header Bracket Placement

Determining header bracket location for one-piece doors.

Installation Step 2: Installing the Header Bracket

Wall Header Bracket Installation

Mounting the header bracket on the wall.

Ceiling Header Bracket Installation

Mounting the header bracket on the ceiling.

Installation Step 3: Attaching Rail to Header Bracket

Connecting Rail to Header Bracket

Procedure for attaching the rail to the header bracket.

Installation Step 4: Opener Positioning

Sectional Door Opener Placement

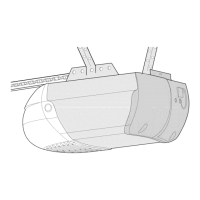
Positioning the opener for sectional doors.

One-Piece Door Opener Placement

Positioning the opener for one-piece doors.

Installation Step 5: Hanging the Opener

Securing Opener to Hanging Brackets

Fastening the opener to the structural supports.

Installation Step 6: Door Control Installation

Mounting the Door Control Button

Installing the wired door control button.

Connecting Door Control Wiring

Wiring the door control to the motor unit.

Installation Step 7: Light and Lens

Installing Light Bulb and Lens

Installing the light bulb and securing the lens cover.

Installation Step 8: Emergency Release

Attaching Release Rope and Handle

Connecting the emergency release rope and handle.

Installation Step 9: Electrical Requirements

Grounding and Wiring

Ensuring proper electrical grounding and connection.

Installation Step 10: Safety Reversing Sensor

Sensor Installation and Alignment

Mounting and aligning the safety reversing sensor.

Installing Safety Sensor Brackets

Door Track Bracket Mounting

Attaching sensor brackets to the door track.

Wall Mount Bracket Installation

Mounting sensor brackets on the wall.

Floor Mount Bracket Installation

Mounting sensor brackets on the floor.

Mounting and Wiring Safety Sensors

Securing Sensor Brackets

Fastening sensor brackets to mounts using hardware.

Aligning Safety Sensors

Aligning sensor eyes for proper beam detection.

Installation Step 11: Fastening Door Bracket

Sectional Door Bracket Attachment

Attaching the door bracket to sectional doors.

One-Piece Door Bracket Attachment

Attaching Bracket to One-Piece Doors

Securing the door bracket to one-piece doors.

Installation Step 12: Connecting Door Arm

Sectional Door Arm Connection

Connecting the door arm to the trolley for sectional doors.

One-Piece Door Arm Connection and Adjustment

Assembling the One-Piece Door Arm

Fastening the straight and curved door arm sections.

Adjusting Travel Limits for One-Piece Doors

Setting UP and DOWN travel limits for one-piece doors.

Adjustment Step 1: Travel Limits

Adjusting Upward Travel Limit

Procedure to increase or decrease door opening travel.

Adjusting Downward Travel Limit

Procedure to increase or decrease door closing travel.

Adjustment Step 2: Force Adjustment

Adjusting Down Close Force

Setting the force required for door closing.

Adjusting Up Open Force

Setting the force required for door opening.

Adjustment Step 3: Safety Reversal Test

Testing Reversal System

How to test the door's reversal mechanism with an obstruction.

Adjustment Step 4: Safety Sensor Test

Testing Reversing Sensor Functionality

Verifying the safety reversing sensor is working correctly.

Operation Safety Instructions

General Operating Safety

Critical safety rules for operating the garage door opener.

Using Your Garage Door Opener

Activating the Opener

Methods to activate the garage door opener.

Using Door Controls and Console

Wall-Mounted Door Control Operation

How to use the wall-mounted control panel.

Premium Control Console Features

Using the light and lock features on the console.

Manually Opening the Garage Door

Disconnecting the Trolley

Steps to manually disconnect the trolley for door operation.

Opener Care and Maintenance

Limit and Force Adjustment Guide

Referencing pages for adjusting limits and force.

Maintenance Schedule

Recommended periodic checks and lubrication.

Remote Control Battery Replacement

Replacing the Battery

Instructions for replacing the remote control battery.

Troubleshooting Common Problems

Opener Not Operating

Diagnosing issues when the opener doesn't respond.

Door Reverses or Stops

Troubleshooting door movement issues.

Programming Your Opener

Adding Remote Controls

Steps to program new remote controls to the opener.

Erasing Remote Codes

How to clear all programmed remote codes.

Keyless Entry PIN Programming

Setting or Changing Keyless Entry Code

Instructions for programming the keyless entry PIN.

Rail Assembly Parts Identification

Key Rail Components

Identification of parts for the opener rail assembly.

Installation Parts Identification

Key Installation Components

Identification of parts needed for installation.

Motor Unit Assembly Parts

Identifying Motor Unit Components

Diagram showing parts within the motor unit.

Available Accessories

Keyless Entry and Outdoor Switch

Optional accessories for access and control.

Sears Warranty Information

Limited Warranty Terms

Details on warranty coverage for parts and labor.

Sears Service and Support

Home Repair Services

Information on in-home repair services.

Parts and Maintenance Agreements

How to purchase parts and service agreements.

Related product manuals