Do you have a question about the Craftsman 358795790 - 22cc and is the answer not in the manual?
Covers operator, tool, fuel, cutting, maintenance, and storage safety guidelines.
Overview of the trimmer, unpacking instructions, and carton contents.
Details preparation and the process of assembling trimmer components.
Information on fueling, fuel safety, mixture, and filling the tank.
Steps to check the tool before starting operation.
Procedures for starting a cold or warm engine.
Guides on proper posture and operational procedures.
Specific safety precautions to follow during operation.
Method for extending the trimmer line during operation.
Techniques for trimming, scalping, mowing, and sweeping.
Steps for replacing the trimmer line on the spool.
Covers maintenance safety, air filter, starter rope, and drive shaft lubrication.
Details troubleshooting suggestions and basic carburetor settings.
Step-by-step guide for carburetor adjustments, including checks.
Guidance on properly storing the trimmer.
A chart for diagnosing and resolving common trimmer issues.
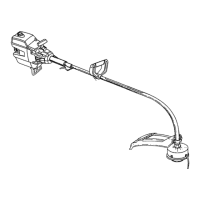
The Sears/Craftsman 22cc Gas Weedwacker is a versatile, air-cooled, 2-cycle engine-powered tool designed for lawn care tasks such as trimming, scalping, mowing, and sweeping. It is intended for use with a 15-inch cutting path and utilizes a .080" diameter Sears Laser Line® for cutting. The tool is designed for line trimmer use only, and blades should never be used with it due to the risk of serious injury.
The Weedwacker operates by means of a rapidly rotating trimmer line that cuts through grass and weeds. The tip of the line does the cutting, and users are advised to allow the line to trim at its own pace rather than crowding it into the cutting area for better results. The tool features an all-position carburetor, allowing for operation in various orientations.
For trimming, the operator holds the tap button about 3 inches above the ground and tilts the trimmer head at an angle, letting the tip of the line do the cutting without forcing it into the work area. Scalping, which removes unwanted vegetation, involves holding the tap button about 3 inches above the ground and tilting the trimmer head at an angle to strike the ground around trees, posts, and monuments. This technique, however, increases line wear. For mowing, the trimmer is ideal for areas conventional lawn mowers cannot reach. In this position, the line should be kept parallel to the ground, avoiding pressing the head into the ground to prevent scalping and tool damage. Sweeping utilizes the fanning action of the rotating line for quick cleanup; the line should be kept parallel to and above the surfaces being swept, moving the tool from side to side.
The trimmer line advances semi-automatically. Approximately 2 inches of line are advanced each time the bottom of the trimmer head is lightly tapped on the ground while the engine is running at full throttle. The most efficient line length is the maximum allowed by the line limiter. If the line is worn down to two inches or less, more than one tap will be required to achieve the most efficient length. Scalping can occur when tapping the trimmer head on the ground, so it's recommended to tap in an inconspicuous area for critical locations.
Before operation, users must read the operator's manual and follow all warnings and safety instructions to prevent serious injury or blindness to themselves and others. It is crucial to wear a safety face shield or goggles, heavy, long pants, boots, and gloves during operation. Loose clothing, jewelry, short pants, or bare feet should be avoided, and hair should be secured above shoulder length. The tool should not be operated when tired, ill, or under the influence of alcohol, drugs, or medication. Hearing protection is recommended for use exceeding 1/2 hour per day. The engine should never be started or run inside a closed room or building due to the risk of fatal exhaust fumes. Handles must be kept free of oil and fuel.
Before each use, the entire tool must be inspected for damaged parts, fuel leaks, and securely fastened components. Cracked, chipped, or damaged trimmer head parts must be replaced. Only .080" diameter Sears Laser Line® should be used; wire, rope, or string are strictly prohibited. The shield must be properly attached. The specified trimmer head must be correctly installed and fastened.
Fueling the engine requires a specific mixture of 16 parts regular unleaded gasoline to 1 part high-quality 2-cycle, air-cooled engine oil. Fuel mixing and pouring must be done outdoors, away from sparks or flames, using an approved container. Smoking near fuel or the tool is forbidden. Fuel spills must be wiped up before starting the engine, and the fueling site should be at least 10 feet away. The engine must be stopped before removing the fuel cap. For storage, the fuel tank should be emptied, and any fuel in the carburetor should be used up by running the engine until it stops. Alcohol-blended fuels (gasohol) can attract moisture, leading to acid formation and damage to the fuel system during storage, so it's important to empty the tank if storing for 30 days or longer.
To start a cold engine, the ignition switch is moved to "on," the choke to "full," and the foam grip is grasped while the throttle trigger is fully squeezed. The starter rope is pulled sharply until the engine pops or attempts to run, but no more than 8 pulls. If it doesn't start, the choke is moved to "half," and the rope is pulled up to 5 more times. Once the engine runs for 5 seconds, the choke is moved to "off," keeping the throttle trigger fully squeezed until the engine runs smoothly. For a warm engine, the ignition switch is "on," the choke is "half," and the throttle trigger is fully squeezed while pulling the starter rope up to 5 times. If the engine doesn't start after 5 pulls, it may be flooded, and the procedure should be repeated with the choke at "off" after a few minutes.
When operating, the engine should be brought to cutting speed before entering the material. It should not be run at a higher speed than necessary, as the cutting line works efficiently at less than full throttle, increasing line life and decreasing head wear. The throttle trigger should always be released to allow the engine to return to idle speed when not cutting. To stop the engine, release the throttle trigger and move the ignition switch to the "OFF" position.
Regular maintenance is essential for the tool's longevity and performance. The trimmer line should be kept at the proper length. The spark plug wire must be disconnected before performing any maintenance, except for carburetor adjustments. Carburetor adjustments should be made with the drive shaft housing supported to prevent the trimmer line from contacting any object, holding the tool by hand, and not using the optional shoulder strap for support. Others should be kept away during carburetor adjustments. Only genuine replacement parts recommended by Sears should be used.
The air filter should be cleaned after every 5 tanks of fuel or 5 hours of operation, or more frequently in dusty conditions. To clean, loosen the two screws on the air filter cover, remove the cover and filter, wash the filter in soap and water, squeeze it dry, and replace it. Gasoline or other flammable solvents should not be used to clean the air filter to avoid fire hazards. The air filter must fit into the corners of the housing to prevent dust from entering the engine and causing damage.
The flexible drive shaft requires lubrication after every 10 hours of operation or before operating if the unit has been stored for 90 days or longer, using Flex Shaft Lube Part No. 530-030102. To lubricate, the throttle trigger housing screws and nut are removed, the throttle cable is disconnected, and the cable is pulled from the foam grip. The hex screws are loosened (but not removed) to remove the drive shaft housing from the nose cone. The flexible drive shaft is then removed from the housing, inspected for broken wires, twists, or kinks, and replaced if damaged. The shaft is wiped clean to remove old grease, a uniform coat of lube is applied to its entire surface, and the remaining lube is injected into the top of the drive shaft housing. The shaft is then reinstalled, ensuring it seats into the drive gear, and the throttle cable and drive shaft housing are reassembled. Care must be taken to avoid injury from broken wires when handling the flexible drive shaft.
If the starter rope breaks, it can be replaced. This involves disconnecting the spark plug wire, removing screws and nuts from the throttle trigger housing and front shroud, and separating the front shroud from the engine. The old rope is untied from the pulley ratchet, and the new 42-inch rope is melted at both ends to prevent fraying. The pulley is turned clockwise as far as it goes, then counterclockwise until the pulley notch aligns with the housing notch, and then one complete turn counterclockwise again. A hex wrench is inserted into the hole formed by the notches to hold the pulley. One end of the new rope is inserted through the handle and secured with a knot, and the other end is threaded through the rope exit hole, into the pulley, and up through the pulley hole. The rope is wrapped counterclockwise around the pulley ratchet, tucking the loose end under the rope where it exits the pulley hole, leaving a 3/4 to 1-inch tail flat on top of the pulley between the retainer rib and screw post. The rope tail must not extend beyond the raised circle on the pulley to prevent interference with the retaining tab. The rope tail is secured with a screw and washer, tightened until the washer contacts the rope. The hex wrench is removed, and the rope is slowly fed into the pulley housing before reassembling the unit.
Carburetor adjustments are a complicated task and should be performed in sequence. They are typically needed if the engine does not idle properly, dies or hesitates when accelerating, loses cutting power, or does not return to idle from full throttle within 2 seconds. Before making adjustments, the engine should be warmed up by cutting grass for 3 minutes, and the air filter should be removed. The mixture screw is turned clockwise until it stops (without overtightening), then one full turn counterclockwise. The idle speed screw is adjusted until the engine idles without stalling and without the trimmer head moving. Further adjustments to the mixture screw may be needed to achieve smooth acceleration and deceleration. If the engine does not operate correctly after repeating the adjusting steps, the tool should be taken to a Sears Service Center.
For storage, the tool should be allowed to cool, the fuel tank emptied, and the tool secured. It should be stored in an area where fuel vapors cannot reach sparks or open flames from water heaters, electric motors, switches, or furnaces. The tool should be stored so the line limiter cannot accidentally cause injury, and it can be hung by the drive shaft housing, out of reach of children.
| Engine Displacement | 22cc |
|---|---|
| Power Source | Gas |
| Shaft Type | Curved |
| Starter System | Pull Start |
| Cutting Width | 17 inches |
| Product Type | Gas Trimmer |
| Cutting Swath | 17 inches |