5
ENGLISH
Replacing the Sanding Pad (Fig.E)
The sanding pad
2
is designed to be a consumable part and
will occasionally need to be replaced. The sanding pad needs
replacement when signs of wear become evident. Sanding
pads are available at extra cost from your local dealer or
authorized CRAFTSMAN servicecenter.
1. Holding the base firmly, remove the pad screws
12
from
the bottom of thepad.
2. Remove thepad.
3. Reinstall pad. Replace the three screws. Be careful not to
over‑tightenscrews.
Detail Attachment (Fig.D)
The detail attachment
7
is used for fine detailsanding.
1. Remove the tip screw
10
.
2. Remove the
removeable pad tip
6
from thebase.
3. Fit the detail attachment onto the sanding base as shown
in Figure D.
4. Fit and tighten thescrew.
5. Align the appropriate sanding sheet with the
fingerattachment.
Replacing Diamond-Shaped Pad Tip (Fig.D)
When the removeable pad tip
6
or tip holder is worn, it can
be replaced. Spare parts are available from your dealer.
1. Remove the tip screw
10
.
2. Replace the worn part.
3. Fit and tighten the screw.
Attaching Hook and Loop Sanding Sheets
(Fig.B)
For best results, use CRAFTSMAN accessories.
• To attach the sanding sheet
8
, carefully center the sheet
over the sanding pad
5
ensuring the holes in the disc align
with the holes in the pad and press the sheet firmly in place.
• The hook and loop fastening system sanding sheet
can be easily removed by simply pulling it off. It can be
reused as desired.
Sanding Sheet Tips (Fig.C)
• Detach the two additional diamond‑shaped tips
9
from
the sanding sheet
8
NOTE: The diamond‑shaped tip can be reversed and
replaced whenworn.
• When the front part of the tip is worn, detach it from the
sheet, reverse it and press it onto the
diamond‑shaped pad
tip
6
again.
• When the whole tip is worn, remove it from the sanding
base and fit a newtip.
NOTE: For optimal dust collection, ensure the correct type of
sanding paper isused.
removing/installing attachments or accessories.
An accidental start‑up can causeinjury.
ASSEMBLY AND ADJUSTMENTS
WARNING: To reduce the risk of serious personal
injury, turn unit off and disconnect it from
power source before making any adjustments or
The label on your tool may include the following symbols. The
symbols and their definitions are asfollows:
V ......................... volts
Hz .......................hertz
min ..................... minutes
or DC ......direct current
...................... Class I Construction
(grounded)
…/min ..............per minute
BPM .................... beats per minute
IPM ..................... impacts per minute
OPM .................... oscillations per
minute
RPM .................... revolutions per
minute
sfpm ................... surface feet per
minute
SPM .................... strokes per minute
A ......................... amperes
W ........................watts
Wh ......................watt hours
Ah ....................... amp hours
or AC ...........alternating current
or AC/DC .... alternating or direct
current
...................... Class II Construction
(double insulated)
n
o
.......................no load speed
n .........................rated speed
PSI....................... pounds per square
inch
......................earthing terminal
.....................safety alert symbol
..................... visible radiation
do not stare into
the light
..................... wear respiratory
protection
..................... wear eye protection
..................... wear hearing
protection
..................... read all
documentation
..................... do not expose to
rain
WARNING: Use of this tool can generate and/or
disperse dust, which may cause serious and permanent
respiratory or other injury. Always use NIOSH/OSHA
approved respiratory protection appropriate for
the dust exposure. Direct particles away from face
andbody.
WARNING: Always wear proper personal hearing
protection that conforms to ANSI S12.6 (S3.19)
during use. Under some conditions and duration
of use, noise from this product may contribute to
hearingloss.
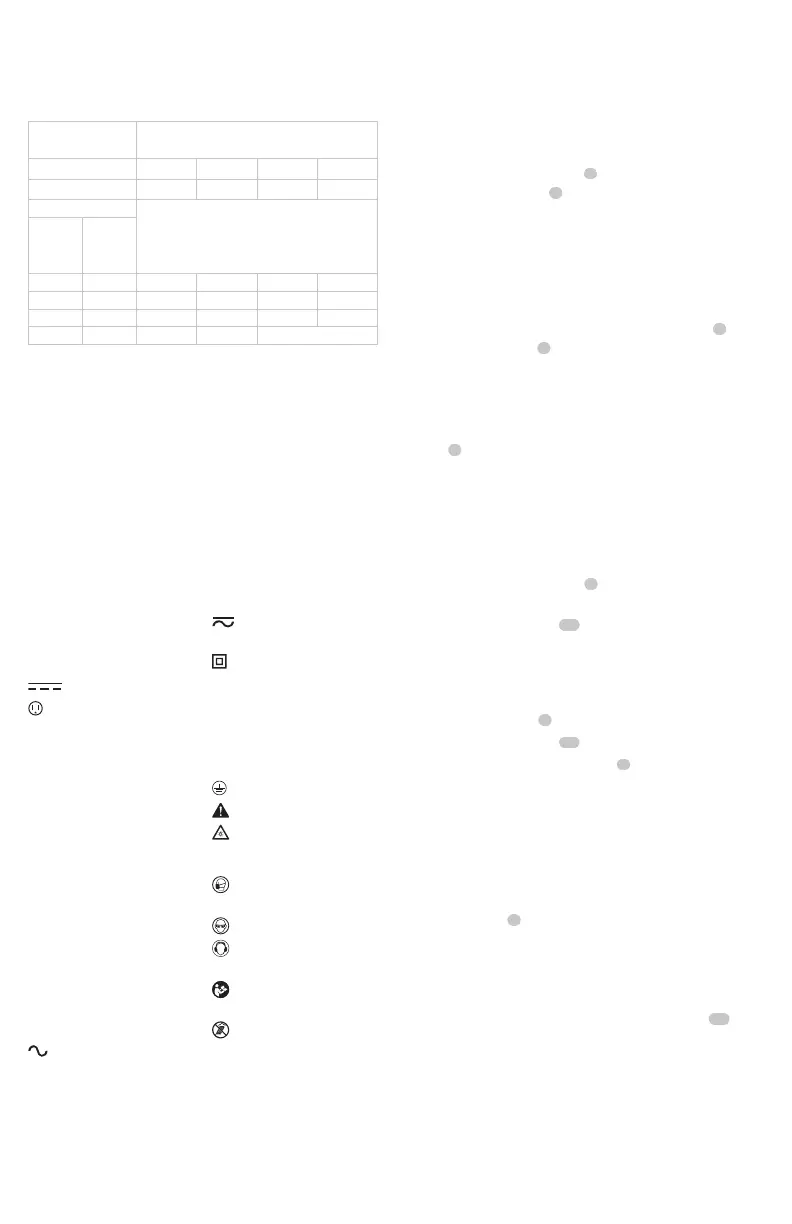
size to use depending on cord length and nameplate
ampere rating. If in doubt, use the next heavier gauge. The
lower the gauge number, the heavier thecord.
Minimum Gauge for Cord Sets
Volts
Total Length of Cord in Feet
(meters)
120 V 25 (7.6) 50 (15.2) 100 (30.5) 150 (45.7)
240 V 50 (15.2) 100 (30.5) 200 (61.0) 300 (91.4)
Ampere Rating
American Wire Gauge
More
Than
Not
More
Than
0 6 18 16 16 14
6 10 18 16 14 12
10 12 16 16 14 12
12 16 14 12 Not Recommended