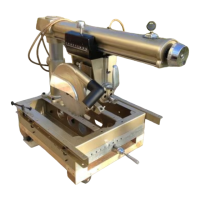
Do you have a question about the Craftsman RADIAL ARM SAW 315.22038 and is the answer not in the manual?
| Model Number | 315.22038 |
|---|---|
| Blade Diameter | 10 inches |
| Arbor Size | 5/8 inch |
| Motor | 1.5 HP |
| Voltage | 120V |
| Max. Crosscut | 12 inches |
Explains safety alert symbols and general warnings for user safety.
Defines safety symbols and covers critical safety advice including manual understanding.
Covers safe practices for extension cords, grounding, and avoiding electrical hazards.
Provides guidelines to prevent kickback and ensure safe handling of materials.
Explains the importance and procedure for proper grounding to prevent electric shock.
Describes essential features like arm lock, bevel controls, and blade specifications.
Details components such as carriage, column, fence, and control cut device.
Explains the motor, rip scales, riving knife, and various blade guards.
Step-by-step instructions for building the saw's leg stand.
Details how to securely attach the saw unit to the assembled leg stand.
Guides the installation of the yoke assembly onto the carriage and arm.
Ensures the table supports are perfectly level for accurate cuts.
Step-by-step guide for installing the fixed front table onto the saw.
Adjusts the front table for flatness and levelness using center screws.
Details the process of mounting the blade and attaching the blade guard assembly.
Ensures the riving knife is centered with the blade for safe ripping.
Ensures the saw arm is precisely perpendicular to the table for cross cuts.
Squares the blade to the table at 0° bevel for accurate angled cuts.
Squares the miter angle of the blade to the fence to prevent binding and kickback.
Squares the blade to the table at 90° bevel for accurate horizontal cuts.
Calibrates rip scale indicators for accurate fence-to-blade distance readings.
Guides the connection and setup of the control cut device for improved operation.
Covers fundamental principles for using the radial arm saw safely and effectively.
Details the causes of kickback and methods to avoid it for safer operation.
Step-by-step guide for performing a standard cross cut operation.
Instructions for performing angled cross cuts using the miter scale.
Details the procedure for making cuts with the blade angled relative to the table.
Guides on performing cuts with both angled arm and angled blade.
Highlights specific dangers associated with rip cuts and necessary safety measures.
Provides steps for preparing the saw for safe and accurate rip cuts.
Step-by-step instructions for performing a rip cut operation safely.