24
ENGLISH
16 2 Headphone connection
17
1 Headphone connection
18 AUDIO IN/OUT socket
19 VIDEO IN/OUT socket
20 IN-AV-OUT switch
21 VOLUME (volume control)
22 Antenna socket
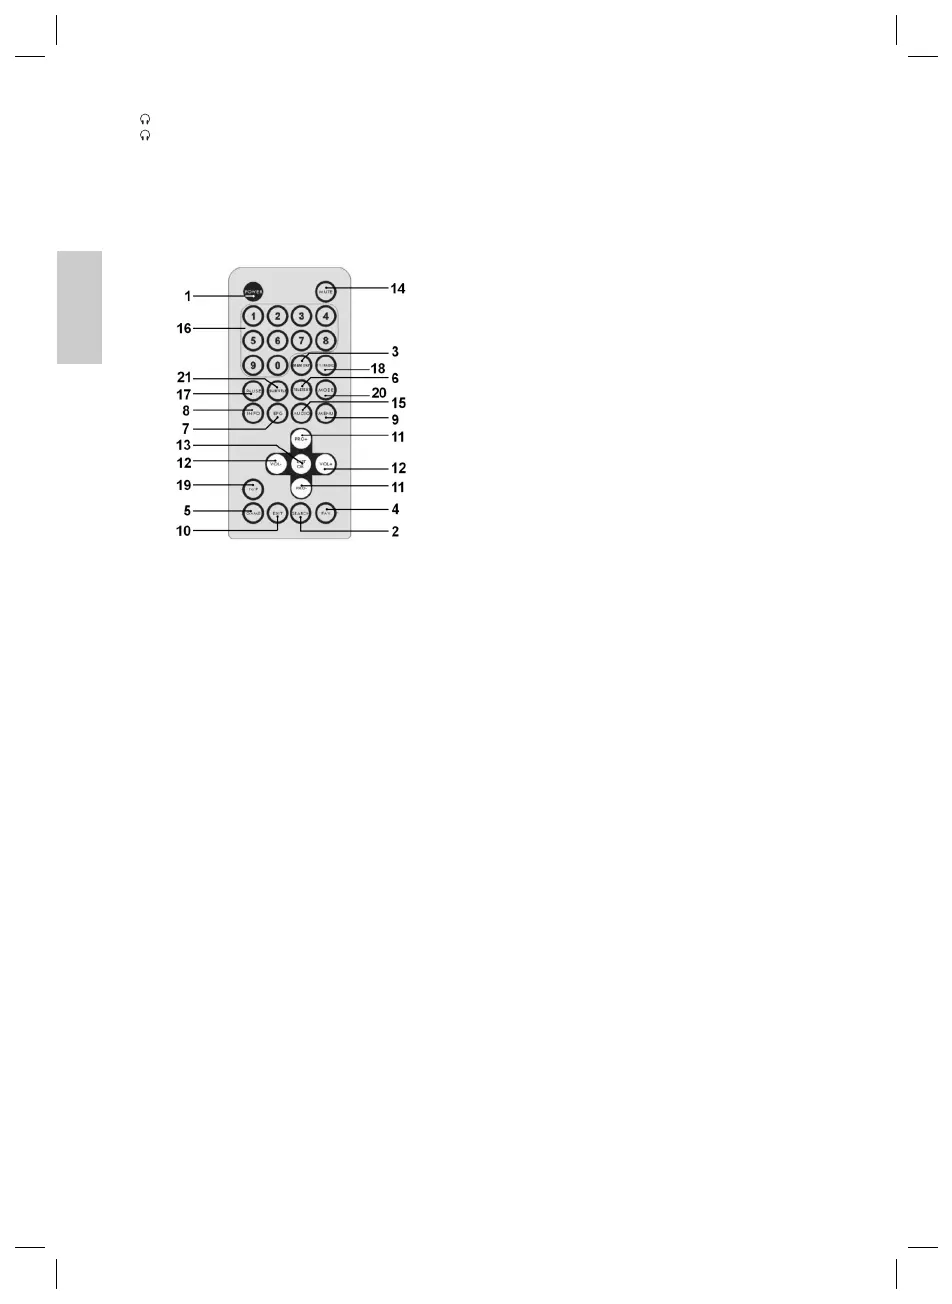
4. Remote Control
Inserting the Batteries
• Open the lid of the battery compartment on the back
of the remote control.
• Insert 2 batteries of type R03 „AAA“ 1.5V. Please
ensure that the polarity is correct (see the fl oor of the
battery compartment)!
• If the remote control is not used for a prolonged pe-
riod, remove the batteries in order to prevent battery
acid leaking.
Note:
• Please point the remote control at the television
screen (which must be switched on).
• Please do not place any thing on the remote control;
do not drop the remote control; do not allow it to
become wet and do not dismantle it.
• Press the buttons briefl y but not too quickly one after
the other. The set needs at least two seconds before
it turns over.
• Turn the set on before pressing the buttons for chan-
nel selection.
• Different types of batteries or new and used batteries
must not be used together.
Note: Do not dispose of batteries in the domestic waste.
Please return used batteries to the relevant collection
points or the shop where they were bought.
Never throw batteries into a fi re.
1 POWER (On/Off)
With this button the television set is switched on and
off. If the button is pressed a second time the televisi-
on set is switched off.
2 SEARCH (Automatic Search)
In DVB mode this takes you immediately to the auto-
matic channel search.
3 MEMORY
With this button you can add the current channel to
your favourites list.
4 FAV (Favourites List on/off)
With this button you can switch the favourites list on
and off.
5 GAME
This button is used to call up the games menu.
6 TELETEXT
With this button you can switch the teletext on.
7 EPG (Electronic Programme Guide)
With this button you can display the electronic pro-
gramme guide on the screen.
8 INFO
With this button you can show the channel information
(signal strength/quality etc.) of the channel to which
the television is currently tuned. Press the button
again to hide the information.
9 MENU
This button is used to call up the main menu.
10 EXIT
With this button you can return to the previous menu,
exit from the menu or return from OSD displays (e.g.
teletext) to the television channel.
11 PRO+ / PRO- (Channel Selection)
With the PRO+ button you can select the next
channel.
With the PRO- button you can select the previous
channel.
If the menu is on the screen these buttons are used
for navigating within the menu.
12 VOL+ / VOL- (Volume Control)
With VOL+ you can turn up the volume of the televi-
sion set.
With VOL- you can turn down the volume of the
television set.
Note: The volume can’t be adjusted louder than it is
preset at the device.
13 LIST/OK (Confi rmation)
a) With this button you can call up the channel list in
DVB mode.
b) When the menu is on the screen this button is
used to confi rm a selection.
14 MUTE
With this button the sound is switched on and off, or
press the VOL+ / VOL- buttons to turn the volume
back on.
15 AUDIO
With this button the menu window for the audio chan-
nel is displayed in order that you can adjust the sound
mode (LR, LL or RR). Press the button again to return
to the television channel.
16 0, 1, 2, 3, ..., 9
With these buttons you can enter a channel number
directly or enter data (e.g. teletext pages).
17 PAUSE (only in DVB Mode)
With this button you can stop the picture (still frame).
The sound is switched off. Press this button again to
cancel the function.
18 TV/RADIO
With this button you can switch between the RADIO
and television (TV) operating modes.
05-CTV 722 LCD_GB Neu2 24 20.02.2006, 9:58:32 Uhr
 Loading...