20
PRODUCT CARE
Changing The Hydrostatic Transmission Oil/Oil Filter
WARNING
If the mower has been recently run, the engine, muffler and surrounding metal surfaces will
be hot and can cause burns to the skin. Let the engine cool for at least five minutes. Exercise
caution to avoid burns.
NOTE: Use care when changing the hydrostatic transmission oil and oil filter. Do not allow oil to drip onto
the hydrostatic transmission oil pumps.
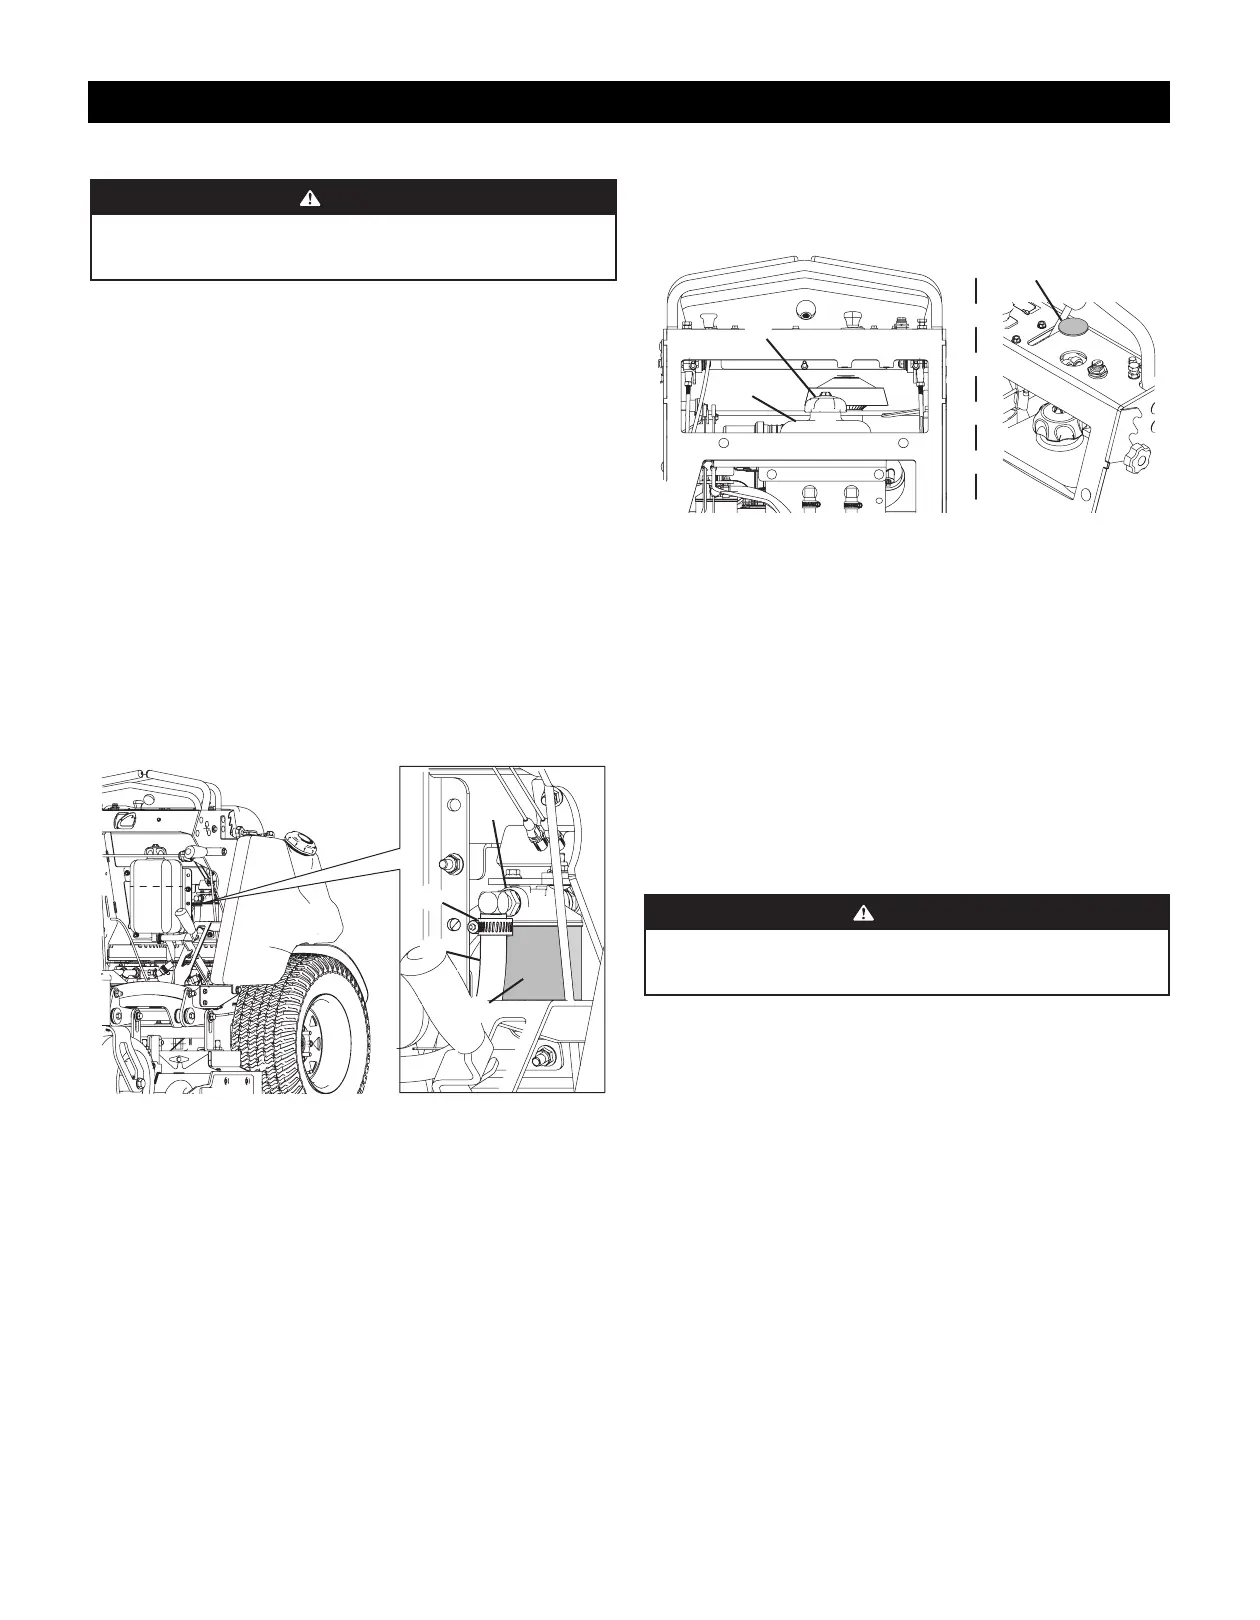
1. Place a suitable container on the left side of the mower deck as close as possible to the oil filter.
2. Loosen the hose clamp (a) securing the transmission oil hose (b) to the transmission oil filter
assembly (c) (Figure 27).
3. Positioning a funnel under the transmission oil filter assembly so that the funnel will empty into the
container positioned in STEP 1.
4. Disconnect the transmission oil hose from the transmission oil filter assembly and allow the
hydrostatic transmission oil to drain into funnel.
5. If necessary, perform the following to replace the oil filter:
f. Remove the existing oil filter (d) from the transmission oil filter assembly (c).
g. Apply a light amount of oil to the filter gasket.
h. Install the new oil filter and tighten 3/4 to 1 turn after gasket contacts transmission oil filter
assembly base.
9. Reconnect the transmission oil hose to the transmission oil filter assembly and secure hose using the
hose clamp loosened in STEP 2.
10. Tighten the hose clamp (a) securing the transmission oil hose (b) to the transmission oil filter
assembly (c).
11. Add new hydrostatic transmission oil. Refer to Adding Hydrostatic Transmission Oil in this
procedure.
(d)
(c)
(b)
(a)
Figure 27
Adding Hydrostatic Transmission Oil
1. Loosen the two star knobs securing the leg pad to the mower.
2. Remove the leg pad from the mower.
3. Remove the rear panel from the mower. Refer to Removing/Installing The Rear Panel on page 7.
4. Remove the hydrostatic transmission oil reservoir cap (a)
5. Mowers with 48, 54 or 60 inch Mowing Decks Only: Insert a funnel into the reservoir (b). (Figure 28).
6. Mowers with 36 inch Mowing Decks Only:
g. Remove the black cap (c)from the control panel by reaching under the panel and squeezing the two
tabs and pushing up (Figure 28).
h. Insert a long necked funnel through the control panel and into the hydrostatic transmission oil
reservoir.
9. Add hydrostatic transmission oil until the level is even with the upper reservoir mounting bolts
(Figure 26).
10. Replace the hydrostatic transmission oil reservoir cap (and black cap if removed from securely
tighten
11. Purge air from the hydrostatic transmission. Refer to Purging Air From The Hydrostatic Transmission
in this procedure.
12. Reinstall the rear panel. Refer to Removing/Installing The Rear Panel on page 7.
13. Using the two star knobs, reinstall the leg pad.
(a)
(b)
(c)
Figure 28
Purging Air From The Hydrostatic Transmission
Due to the effects air has on efficiency in hydrostatic drive applications, it is critical that air is removed or
purged from the system.
IMPORTANT: These purge procedures must be preformed any-time a hydrostatic system has been
opened for maintenance or repair, or if any additional oil has been added to the system.
Air creates inefficiency because it has compression and expansion rates that are higher than that of oil.
Air trapped in the oil may cause the following symptoms:
1. Noisy operation.
2. Lack of power or drive after short-term operation.
3. High operation temperature and excessive expansion of oil.
Before starting, make sure the reservoir is at the proper oil level. Refer to Checking The Hydrostatic
Transmission Oil Level in this Section.
IMPORTANT: The following procedures should be performed with the mower drive wheels off the
ground, then repeated under normal operating conditions.
WARNING
Certain procedures require the mower engine to be operated and the vehicle to be raised off
of the ground. To prevent possible injury to the servicing technician and/or bystanders, insure
the vehicle is properly secured.
1. With the bypass valves open and the engine running, slowly move the drive control levers in both
forward and reverse directions (5 to 6 times). As air is purged from the unit, the oil level in the
reservoir will drop.
2. With the bypass valve closed and the engine running, slowly move the directional control in both
forward and reverse directions (5 to 6 times). Check the oil level, and add oil as required after
stopping engine.
3. It may be necessary to repeat STEPS 1 and 2 until all the air is completely purged from the system.
When the wheels moves forward and reverse at normal speed and the reservoir oil remains at a
constant level, purging is complete.

 Loading...