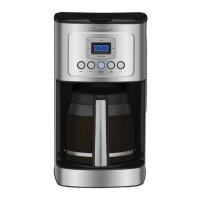
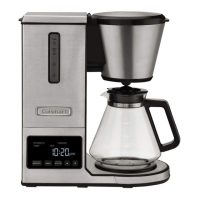
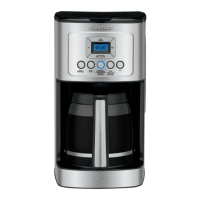
The Cuisinart PerfecTemp® 14-Cup Programmable Coffeemaker, DCC-3200C SERIES, is designed to brew coffee with optimal flavor and convenience. This instruction booklet provides comprehensive guidance for its operation, programming, and maintenance, ensuring a satisfying coffee experience.
Function Description
The coffeemaker's primary function is to brew up to 14 cups of coffee. It incorporates several features aimed at enhancing the brewing process and coffee quality. The PerfecTemp® technology ensures that water is heated to an ideal temperature for flavor extraction. A charcoal water filter is included to remove chlorine, bad tastes, and odors from tap water, contributing to a purer coffee flavor. The unit also features a showerhead design that evenly distributes water over the coffee grounds, minimizing temperature loss during brewing.
For those who prefer a stronger brew, the coffeemaker offers a "Bold" flavor strength setting. Additionally, a "1-4 Cup" button adjusts the brewing process to maximize flavor when preparing smaller batches (fewer than 5 cups). The coffeemaker is fully programmable, allowing users to set an "Auto On" time for automatic brewing up to 24 hours in advance, ensuring fresh coffee is ready when needed. An "Auto Off" feature can be programmed to shut off the coffeemaker from 0 to 4 hours after the brew cycle is completed, providing energy efficiency and peace of mind.
The "Brew Pause™" feature allows users to temporarily stop the flow of coffee from the basket to pour a cup mid-brew. However, it's noted that using this feature may slightly weaken the flavor strength of the finished pot, and the carafe should not be removed for more than 20 seconds to prevent overflow.
Usage Features
Operating the Cuisinart PerfecTemp® coffeemaker is straightforward. Before the first use, it's recommended to flush the system by running a full reservoir of water through the unit without coffee.
To prepare coffee:
- Water Filter Installation: The charcoal water filter should be soaked in cold tap water for 15 minutes before being placed into the water filter holder. The holder then slides into a channel in the water reservoir. The filter should be flushed with cold tap water for 10 seconds before use. It's recommended to change the water filter every 60 days or after 60 uses, and more frequently in areas with hard water.
- Filling the Reservoir: Lift the coffeemaker lid and pour the desired amount of water into the reservoir, using the water level indicator on the side.
- Adding Coffee Grounds: Insert either a #4 paper filter or the reusable gold-tone filter into the filter basket. Ensure paper filters are fully open and inserted correctly. Add one level scoop of ground coffee per cup. The maximum capacity for ground coffee is 15 tablespoons; exceeding this amount may cause overflow if the coffee is too finely ground.
- Positioning the Carafe: Place the 14-cup glass carafe on the heating plate and ensure the coffeemaker lid is closed.
- Plugging In: Plug the coffeemaker into an electrical outlet.
- Setting Preferences:
- Press the "1-4 Cup" button if brewing fewer than 5 cups. A blue indicator light will illuminate.
- Press the "Bold" button for stronger coffee flavor; a blue indicator light will illuminate. Press again to revert to regular strength.
- Adjust the carafe warming plate temperature (Low, Medium, or High) by pressing the "Carafe Temp" button. The selection will appear on the display.
- Starting Brew: Press the "Brew/Off" button to begin brewing.
- Ready Tone: The coffeemaker features an audible "Brew Cycle Finished" alert that beeps 5 times when brewing is complete. This tone can be turned on or off using the "Tone" button.
Programming Features:
- Setting the Clock: When plugged in, "12:00" will flash on the display. Use the "Hour" and "Minute" buttons to set the current time. Hold the buttons to scroll quickly or press and release to advance one digit at a time. Ensure the PM indicator is correct for PM times.
- Setting Auto On Time: Press and hold the "Prog/Auto On" button for 2 seconds. The display will flash the default or previously selected time. Use the "Hour" and "Minute" buttons to program the desired start-brew time. The unit will automatically exit setup mode after 5 seconds, and the indicator light will illuminate, confirming activation.
- Setting Auto Off Time: Press and hold the "Auto Off" button for 2 seconds. The display will flash the programmed Auto Off default (2:00) or previously selected time. Use the "Hour" and "Minute" buttons to program the desired shut-off time, from 0 to 4 hours after the brew cycle. The unit will automatically exit setup mode after 5 seconds.
Maintenance Features
Regular cleaning and decalcification are essential for maintaining the coffeemaker's performance and ensuring optimal coffee flavor.
Cleaning:
- Daily Cleaning: Always turn off the coffeemaker and unplug it from the electrical outlet before cleaning. Lift the lid, remove, and discard the paper filter and ground coffee. The filter basket can be washed in warm, soapy water, rinsed thoroughly, or cleaned in the upper rack of a dishwasher. Dry all parts after use.
- Carafe Cleaning: Remove the carafe from the heating plate, discard any remaining coffee, and wash the carafe and lid in warm, soapy water, rinse thoroughly, or place them in the upper rack of a dishwasher.
- Base Unit Cleaning: Never immerse the base unit in water or other liquids. To clean the base, wipe it with a clean, damp cloth and dry before storing. Fingerprints and blemishes on the housing can be cleaned with soap and water or a nonabrasive cleaning solution. Wipe the heating plate with a clean, damp cloth. Avoid using rough, abrasive materials or cleansers on any part of the coffeemaker. Do not dry the inside of the water reservoir with a cloth, as lint may remain.
- Filter Basket Area: Do not put water in the unit once the filter basket has been removed. Wipe the area under the filter basket with a damp cloth.
Decalcification:
Decalcification is necessary to remove calcium deposits that accumulate over time on the metal parts, which can affect performance and flavor. The "CLEAN" LED indicator will light up when it's time to decalcify.
- Preparation: Before decalcifying, remove the charcoal water filter from the water reservoir.
- Solution: Fill the water reservoir to capacity with a mixture of 1/3 white vinegar and 2/3 water.
- Initiate Cleaning Cycle: Press and hold the "CLEAN" button. The "CLEAN" LED indicator will flash, indicating the coffeemaker is in Clean mode. Release the button.
- Completion: When the cycle is completed, 5 beeps will sound, and the coffeemaker will shut off.
- Repeat if Necessary: If the "CLEAN" indicator illuminates again, repeat the cleaning procedure with a fresh solution of vinegar and water. One cleaning cycle is usually sufficient.
- Rinsing: Once the "CLEAN" indicator remains off, run one cycle with a full reservoir of fresh, cold water to rinse the unit.
- Filter Replacement: Return the charcoal water filter to its holder inside the water reservoir.
Any other servicing should be performed by an authorized service representative. The coffeemaker is designed to be BPA-free, ensuring that all parts in contact with coffee or liquids are safe.