30
PRO-VISION rev.04
PRO-VISION
Light Peak Settings8.2.2.
Select:1.
Main menu
* Light Programs
** Peaks
* This menu is accessible if the light output is enabled
in the Set-up menu (see section 4.4). A password may
also be required to access it (see sect. 4.2.1).
* * This tab is accessible if the “Use Peak” option
is enabled in section 8.2.1.
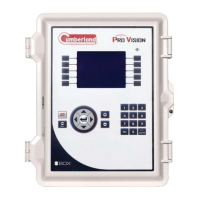
Light peak settings
To modify use
-
Adjust
Cycle
Sunrise
Inte nsity
Enabled
Peak time
Sunset
Cycle 1
0:15 H:M
2min
100%
No
1min
2min
Set the following parameters:2.
Adjust — Select the desired light cycle. All
parameters below are related to the chosen
cycle.
Enabled — Select “Yes” to use light peaks
during the selected light cycle.
Cycle — Select how much time is required
to perform a light peak cycle (see previous
graph). Note that the “Cycle Time” must be
even or longer than the “Peak time + Peak Sun-
rise + Peak Sunset”.
Peak Time — Select during how much time
the light peak intensity must be maintained
(from 0 to 59 minutes).
Sunrise / Sunset — Select the duration of
the peak sunrise and sunset (see previous
graph). These parameters range from 1 to
60 minutes.
Intensity — Set the intensity of light peaks to
the desired value. It ranges from the regular
light intensity (as defined in previous section)
to 100%.
9. TIME CLOCKS
Clocks in a Broiler or 9.1.
Turkey Facility
When it is used in a broil e r or in a turkey facil -
ity, the controller can control 8 time clocks
with 12 timer cycles each. These outputs
are used to activate different kind of devices
using the real-time clock.
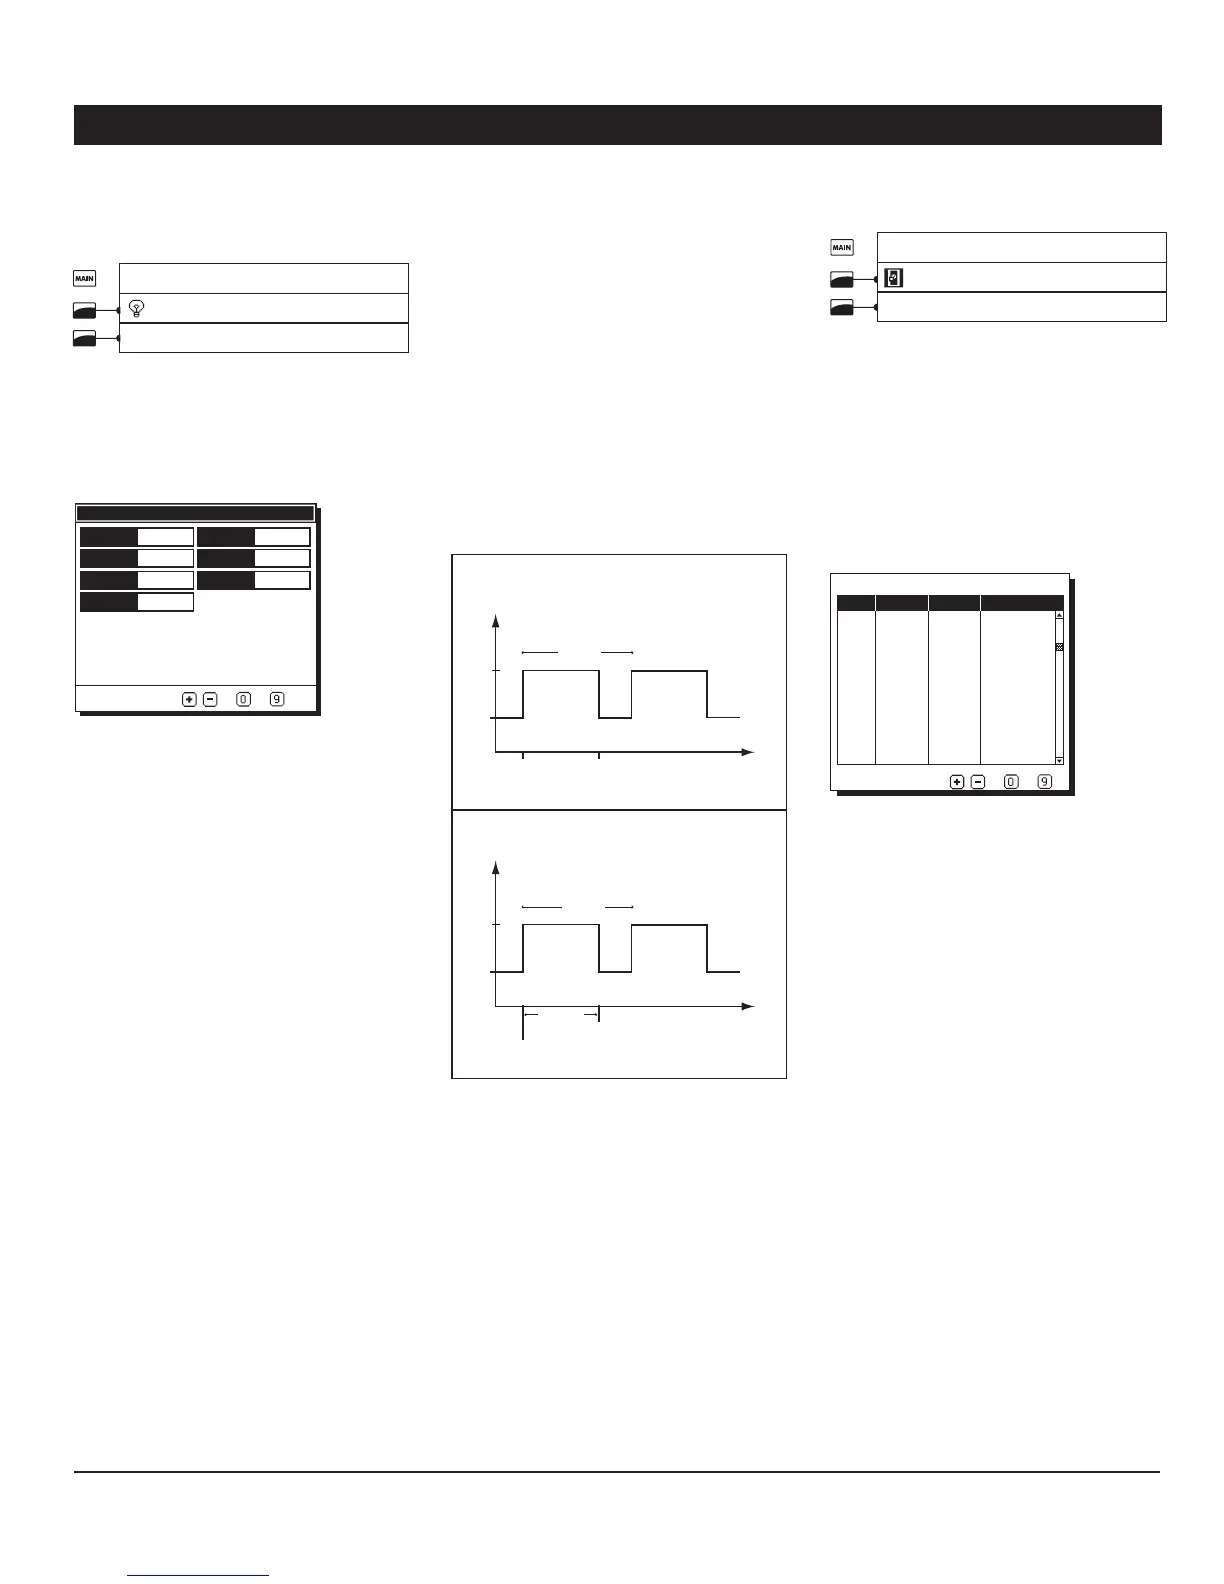
A time clock starts when the “On Time” of a
time clock cycle is reached; the output either
stops after a certain run time or at a certain
time of day. The following diagrams show
both possibilities:
Time
Time
Output
Status
Cycle
Cycle
Output
Status
On
Start Time
(e.g. 8h30AM)
Start Time
(e.g. 8h30AM)
Time Clock:
Start/Run Mode
Time Clock:
Start/Stop Mode
Run Time
(e.g. 30m:15s)
Stop Time
(e.g. 9h00AM)
On
Off
Off
Note that the “Start/Run” mode allows stop-
ping the outputs with a little more precision
since it allows stopping them by the seconds
(contrarily to the “Start/Stop” mode which
allows stopping them by the minutes). Refer
to the Set-up menu in section 4.4 to choose
the desired operating mode of the time clocks
(“Start/Stop” or “Star t/Run” ).
1. Select:
Main menu
* On / Off Settings
* *Time clock
*A password may be required to access this menu
(see section 4.2.1).
* * This menu is accessible if at least 1 time clock is
enabled in the Set-up menu (see section 4.4).
Note that the time clock menu will appear as
shown below only if the “Broiler” or “Turkey”
facility is enabled in the Set-up menu (see
section 4.4).
Cycle Start Stop Run
1 11:00A 11:15A 00:15:00
2 2:00P 2:15A 00:15:00
3 4:00P 4:15P 00:15:00
4 6:00P 6:15P 00:15:00
5 12:00A 12:00A 00:15:00
6 12:00A 12:00A 00:15:00
7 12:00A 12:00A 00:15:00
8 12:00A 12:00A 00:15:00
9 12:00A 12:00A 00:15:00
10 12:00A 12:00A 00:15:00
11 12:00A 12:00A 00:15:00
12 12:00A 12:00A 00:15:00
Display Clock 2
To Modify Press
-
Select the desired time clock output.2.
Set the following parameters:3.
Start Time — Set the time at which each
cycle starts. If 12 cycles are not required, set
the “Start & Stop Times” of the unused cycles
to the same value or set the “Run Time” to
0:00:00. NB. Use the “A M / P M” key to change
the time indicator (if required).
Stop or Run Time — The cycles can either
stop at a specific time of day or after a certain
run time. Set the time at which each cycle
ends. NB. Use the “A M / P M” key to change the
time indicator (if required). *Refer to section 4.4
to choose how the time clocks must stop.