INSTALLING YOUR UPS SYSTEM
Thank you for selecting a CyberPower Systems
Uninterruptable Power Supply (UPS). This
UPS meets the Energy Eciency Certification
of the California Energy Commission (CEC).
CyberPower Systems is dedicated to producing
energy ecient products to maximize our con-
tribution to the environment.
UNPACKING
Inspect the UPS upon receipt. The box should
contain the following:
(a) UPS unit
(b) User’s manual
(c) USB A+B type cable
*PowerPanel® Personal software is available as
a free download at:CyberPowerSystems.com/
products/software.
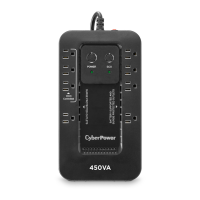
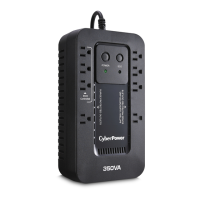
DETERMINE THE POWER
REQUIREMENTS OF YOUR EQUIPMENT
1. Ensure that the equipment plugged into
the UPS does not exceed the UPS unit’s
rated capacity (450VA/260W for EC450G,
550VA/330W for EC550G, 750VA/450W
for EC750G, 650VA/390W for EC650LCD,
and 850VA/510W for EC850LCD). If the
rated capacities of the unit are exceeded,
an overload condition may occur and cause
the UPS unit to shut down or the circuit
breaker to trip.
2. There are many factors that can aect
the amount of power that your electronic
equipment will require. For optimal system
performance keep the load below 80% of
the unit’s rated capacity.
HARDWARE INSTALLATION GUIDE
1. Your new UPS may be used immediately
upon receipt. However, after receiving a
new UPS, to ensure the battery’s maximum
charge capacity, it is recommended that you
charge the battery for at least 8 hours. Your
UPS is equipped with an auto-charge fea-
ture. When the UPS is plugged into an AC
outlet, the battery will automatically charge
whether the UPS is turned on or turned o.
Note: This UPS is designed with a safety
feature to keep the system from being
turned on during shipment. The first time
you turn the UPS on, you will need to have it
connected to AC power or it will not power up.
2. With the UPS unit turned o and un-
plugged, connect your computer, monitor,
and any other peripherals requiring battery
backup into the battery power supplied
outlets. Plug the other peripheral equipment
(e.g. printer, scanner, speakers, etc.) into
the full-time surge protection outlets. DO
NOT plug a laser printer, paper shredder,
copier, space heater, vacuum cleaner, sump
pump, or other large electrical device into
the “Battery and Surge Protected Outlets”.
The power demands of these devices will
overload and possibly damage the unit.
3. Plug the UPS into a 2 pole, 3 wire ground-
ed receptacle (wall outlet). Make sure the
wall branch outlet is protected by a fuse or
circuit breaker and does not service equip-
ment with large electrical demands (e.g.
air conditioner, refrigerator, copier, etc.).
The warranty prohibits the use of extension
cords, outlet strips, and surge strips in con-
junction with the UPS unit.
4. Press the power switch to turn the unit on.
The Power On indicator light will illuminate
green and the unit will “beep” twice.
5. If an overload is detected, an audible alarm
will sound and the unit will emit one long
beep. To correct this, turn the UPS o and
unplug at least one piece of equipment from
the battery power supplied outlets. Make
sure the circuit breaker is depressed and
then turn the UPS on.
6. To maintain optimal battery charge, leave
the UPS plugged into an AC outlet at all
times.
7. To store the UPS for an extended period of
time, cover it and store with the battery fully
charged. While in storage, recharge the bat-
tery every three months to ensure optimal
battery life.
8. Ensure the wall outlet and UPS are locat-
ed near the equipment being attached for
proper accessibility.
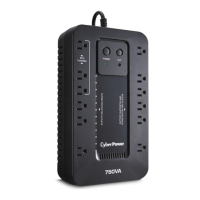
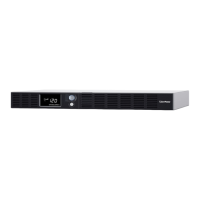
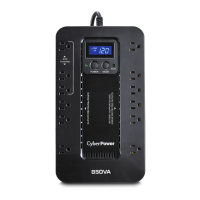
1. Battery and Surge Protected Outlets
The unit has battery powered/surge
suppression outlets to ensure temporary
uninterrupted operation of your equip-
ment during a power failure. (DO NOT plug
a laser printer, paper shredder, copier,
space heater, vacuum cleaner, sump pump,
or other large electrical device into the
“Battery and Surge Protected Outlets.”
The power demands of these devices will
overload and possibly damage the unit.)
2. Full-Time Surge Protection Outlets / ECO
Controlled Outlets
The unit has surge suppression outlets to
provide surge and line noise protection.
Three of the surge-only outlets are also ECO
controlled outlets.
3. ECO Indicator
ECO Indicator shows the condition of ECO
function. For more information, refer to ECO
Function Setup section.
4. Power On Indicator (green)
This LED is illuminated when the utility
power is normal and the UPS outlets are
providing power, free of surges and spikes.
5. Power Switch
To turn the UPS ON, press the power button
for approximately 2 seconds - you will hear
a constant tone (1 second) - and release
after a short beep. To turn the UPS OFF,
press the power button for approximately
2 seconds - you will hear a constant tone (1
second) - and release after two short beeps.
Alarm setting: The audible alarm can be
turned O or On by double click the POW-
ER button. The default setting is for the
Alarm On. To turn the Alarm O, double
click the button. You will hear two short
beeps when the Alarm is turned o. To turn
the Alarm back On, double click the button.
You will hear a single short beep when the
Alarm is turned on. *When the Alarm is
turned O, there will be no audible notifi-
cation when the UPS reaches a low battery
state.
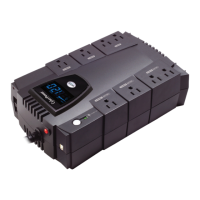
6. Mode Switch
(EC650LCD and EC850LCD only)
Press the Mode Switch for approximately 3
seconds to enter setup mode to select four
functions: Utility High Voltage Range, Utility
Low Voltage Range, ECO ON/OFF, and LCD
sleep ON/OFF. When a function is selected,
press Mode Switch for 3 seconds to view
options. When an option is selected, wait
for 8 seconds for the setting to be con-
firmed. After the setting has been confirmed
the LCD screen will leave setup mode and
go back to status display. If there is no
action for 8 seconds during setup, the LCD
will also leave setup mode and go back to
the status display.
a. Utility High Voltage Range:
Adjust the value of high voltage range.
b. Utility Low Voltage Range:
Adjust the value of low voltage range.
c. ECO: Eon/EoF (ON/OFF):
Turn on or turn o ECO function. For more
information, refer to ECO Function Setup
section.
d. LCD: L1/L0 (ON/OFF):
* When LCD is set to L1, LCD will be always
ON. When LCD is set to L0, LCD will dim if
untouched for 1 minute.
* In battery mode, LCD is always on regard-
less if the setting is L1 or L0.
ECO Button (EC450G, EC550G, and
EC750G only)
Press ECO button for 3 seconds to turn on
or turn o ECO function in line mode.
7. Circuit Breaker
Located on the side of the UPS, the circuit
breaker serves to provide overload and fault
protection.
8. USB Port to PC
The USB port allows connection and
communication between the USB port on
the computer and the UPS unit. The UPS
communicates its status to the PowerPan-
el® Personal software. The USB port is also
used for operating the UPS in ECO mode.
For more information, refer to ECO Function
Setup section.
9. ECO Mode, Surge Protected Outlets
ECO Mode outlets automatically cut power
to peripherals when your computer is in
Sleep mode or is turned o (USB connec-
tion required).
10. Widely-Spaced Outlets
The UPS unit has widely-spaced outlets so
AC power adapters can be plugged into the
UPS without overlapping or blocking adja-
cent outlets.
BASIC OPERATION
 Loading...