Installation and operation manual
5
BRC073A1
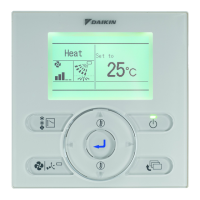
Wired user interface
4P392190-1 – 2014.11
To change the schedule settings of the selected schedule nr
1 Display the
Settings
screen (refer to "Appendix" on page 10).
2 Use to select the desired day (1).
3 Use to highlight the Operation start
Time
and to set the
desired Operation start
Time
(2).
4 Use to highlight
Act
and to select the desired action.
5 Use to highlight the cooling and heating temperature and
to select the desired value.
6 To set a different day of the week, use to highlight the day.
Use to change the day.
7 To copy all actions of the previous day, push while the day
to be set is highlighted.
8 When all the schedule settings are completed, push to display
the confirmation screen.
9 Use to select
Yes
and push .
11. Maintenance Information
1 Display the
Maintenance Information
screen (refer to "Appendix" on
page 10
).
2 The phone number for the
Contact info
will appear at the top of
the screen.
3 Push to return to the
Main Menu
.
12. Configuration
To select the display mode
1 Display the
Display Mode
screen (refer to "Appendix" on page 10).
2 Use to change the setting to
Standard
or
Detailed
.
3 Push to confirm the setting. The basic screen is displayed.
To select the detailed display item
1 Display the
Display Item
screen (refer to "Appendix" on page 10).
2 Use to change the setting to
None
,
Outside Air Temp
or
Room
Temp
.
3 Push to confirm the setting. The basic screen is displayed.
To adjust the contrast of the LCD
1 Display the
Contrast adjustment
screen (refer to "Appendix" on
page 10
).
2 Use to change the contrast.
3 Push to confirm the setting.
13. Current Settings
1 Display the
Current Settings
screen (refer to "Appendix" on page 10).
2 A list of the status of the current settings is displayed.
3 Push to return to the
Main Menu
.
14. Clock & Calendar
To set the date & time
1 Display the
Date & Time
screen (refer to "Appendix" on page 10).
2 Use to move the highlighted item and to set
Year
,
Month
,
Day
and
time
.
3 Push to display the confirmation screen.
4 Use to select
Yes
and push .
To set the hour format (12/24 hours)
1 Display the
12H/24H Clock
screen (refer to "Appendix" on page 10).
2 Use to select
12 H
or
24H
.
3 Push to display the confirmation screen.
4 Use to select
Yes
and push .
INFORMATION (Act column)
There are 3 types of operations:
The temperature setpoints can be configured.
The setback temperature setpoints can be configured.
The temperature and setback temperature setpoints
are disabled.
INFORMATION (Cool and Heat column)
__: Indicates that the temperature and setback
temperature setpoint for this time period are not specified.
The last active setpoint will be used.
- -: Indicates that the setback function is disabled for this
time period.
)
Setting
Schedule nr 1
Mon
Time Act Cool Heat
– 6 :00
:
:
:
:
Return
Setting
Schedule nr 1
Mon
Time Act Cool Heat
– 6 :00
:
:
:
:
ON
OFF
Return Setting
Display Mode
Display
Standard
NOTICE
The room temperature is measured inside the indoor
unit.
Return Setting
Display Item
Display
None
Return Setting
Dark
Light
Contrast Adjustment
Date & Time
Return
0:00
Wednesday
1Day
1Month
2014Year
Setting