EasyManua.ls Logo

Daikin BYCQ140E2W1 - User Manual

Daikin BYCQ140E2W1
8 pages
Print Icon
To Next Page IconTo Next Page
Loading...
INSTALLATION MANUAL
BYCQ140E2W1
BYCQ140E2W1W
BYCQ140E2W1B
Decoration panel
4PEN552012-1B.book Page 1 Thursday, February 14, 2019 12:43 PM
Question and Answer IconNeed help?

Do you have a question about the Daikin BYCQ140E2W1 and is the answer not in the manual?

Summary

Decoration Panel Installation

Before Installation

Guidance for installers, listing accessories and preparation steps before unit installation.

Preparation and Handling of Decoration Panel

Details on airflow selection, optional kits, and safe handling practices for the decoration panel.

Installation of Decoration Panel to Indoor Unit

Step-by-step instructions for securely attaching the decoration panel to the indoor unit body.

Suction Grille and Corner Decoration Cover Installation

Procedures for installing the suction grille and attaching the corner decoration covers.

Precautions and Gap Fixing

Important safety notes and methods to fix gaps between the panel and the ceiling.

Overview

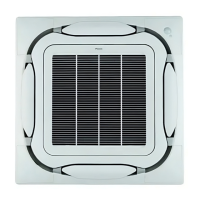
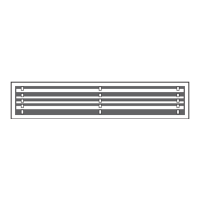
This document is an installation manual for a Daikin decoration panel, specifically models BYCQ140E2W1, BYCQ140E2W1W, and BYCQ140E2W1B. It provides detailed instructions for preparing, installing, and maintaining the decoration panel, including its various components such as the suction grille and corner decoration covers.

The decoration panel serves as the visible part of an indoor air conditioning unit, designed to blend with the ceiling while facilitating air intake and discharge. It incorporates a suction grille for air intake and swing flaps for directing airflow. The manual emphasizes careful handling and proper installation to ensure optimal performance and prevent issues like air leakage, contamination, and dew formation.

Function Description:

The primary function of the decoration panel is to provide an aesthetic finish to the indoor unit, concealing the internal components while allowing for efficient air circulation. It integrates a suction grille for drawing in room air and adjustable swing flaps for directing the conditioned air back into the space. The panel is designed to be installed flush with the ceiling, creating a seamless appearance.

For specific models like the BYCQ140E2W1W, which features white insulations, the manual highlights that dirt formation may be more visible. In such cases, it recommends adjusting the filter cleaning display indications on the remote controller from "light" to "heavy" to account for higher air contamination levels. This suggests that the panel is an integral part of the unit's air filtration and maintenance reminder system.

The panel also includes a swing flap motor lead wire, which connects to the indoor unit's electric components box, enabling the operation of the swing flaps for airflow control. The design allows for the selection of air flow directions, and for discharge in two or three directions, an optional blocking pad kit is required.

Usage Features:

The decoration panel is designed for ease of installation and maintenance, with several features contributing to its usability:

  • Adjustable Airflow: The integrated swing flaps allow for controlled air discharge, enhancing comfort by directing conditioned air effectively. The ability to select different airflow directions, potentially requiring an optional blocking pad kit, offers flexibility in room conditioning.
  • Temporary Latch System: During installation, the panel can be temporarily secured to the indoor unit using temporary latches, simplifying the process before final fastening.
  • Mounting Brackets: Four mounting brackets on the corner sections of the panel hook onto the indoor unit body, ensuring a secure attachment.
  • Hexagon Head Screws: These screws are used to firmly secure the panel to the indoor unit, allowing for fine adjustment to ensure the panel completely covers the ceiling opening and to prevent gaps.
  • Suction Grille Installation: The suction grille can be installed in four directions by rotating it 90 degrees, offering flexibility to match room layouts or customer preferences.
  • Corner Decoration Covers: These covers are designed to be easily attached and removed, with strings to prevent them from falling during maintenance. They contribute to the panel's finished look and protect internal components.
  • Filter Cleaning Indications: For models with white insulations, the manual advises adjusting the filter cleaning display settings on the remote controller, indicating an intelligent system that adapts to different environmental conditions and panel types.

Maintenance Features:

The manual provides clear instructions for maintaining the decoration panel, focusing on ease of access and prevention of damage:

  • Removable Suction Grille: The suction grille can be easily removed by pushing inward on its levers and lifting it to a 45-degree angle. This allows access for cleaning or maintenance of internal components.
  • Detachable Corner Decoration Covers: The corner decoration covers can be pulled up to remove them, providing access to the underlying screws and wiring. They are designed with strings to prevent them from falling and getting damaged during maintenance.
  • Access to Electric Components Box: The electric components box lid can be removed by loosening two screws and sliding it, allowing access to the swing flap motor lead wire connector for wiring or troubleshooting.
  • Prevention of Gaps: The manual emphasizes the importance of properly tightening screws and adjusting the indoor unit body height to prevent gaps between the ceiling and the decoration panel. Accessories like fixing holders and screws are provided to address any remaining gaps.
  • Careful Handling Instructions: To prevent damage during maintenance or installation, users are advised not to place the panel face down, lean it against a wall, or put it on a projecting object.
  • Swing Flap Protection: Users are cautioned not to touch or put pressure on the swing flap to prevent malfunction.
  • String Attachment for Grille and Covers: The strings of the suction grille and corner decoration covers should be attached to pins on the decoration panel. This prevents them from falling during maintenance, simplifying reassembly and preventing damage.
  • Wiring Accessibility: The wiring of the swing flap motor lead wire is designed to be accessible for connection and securement with a clamp, ensuring reliable operation.
  • Warning Against Overtightening: The manual explicitly warns against overtightening screws during assembly to avoid damage to components.

Daikin BYCQ140E2W1 Specifications

General IconGeneral
CompatibilityDaikin Air Conditioners
ColorWhite
ModelBYCQ140E2W1
CategoryAir Conditioner Accessories
BrandDaikin
DisplayLCD
FunctionsTemperature control, Fan speed adjustment, Timer setting

Related product manuals