©2021
Our continuing commitment to quality products may mean a change in specications without notice.
19001 Kermier Rd., Waller, TX 77484
www.daikincomfort.com
IOD-7133
01/2021
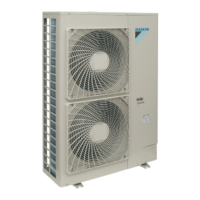
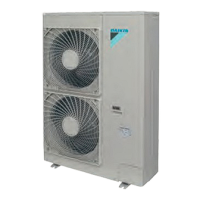
KEH067A41E, KEH063A4E(A), FTDBHMS,
FTDBHML
INSTALLATION IN
STRUCTIONS
Read these Safety Considerations carefully before
installing the drain pan heater. After completing the
installation, check if the unit operates properly during the
start-up operation.
Meaning of DANGER, WARNING, and CAUTION symbols
Indicates an imminently hazardous
situation which, if not avoided, will
result in death or serious injury.
Indicates a potentially hazardous
situation which, if not avoided, could
result in death or serious injury.
Indicates a potentially hazardous
situation which, if not avoided, may
result in minor or moderate injury.
It may also be used to alert against
unsafe practices.
• Inform users that they should store this installation
manual for future reference.
• After completing the installation, make sure that the
unit operates properly during the startup operation.
• All phases of the eld-installation, including, but not
limited to, electrical, piping, and safety, must be done in
accordance with manufacturer’s instructions and must
comply with national, state, provincial, and local codes.
• This product is a heater designed to melt snow that is
blown into the product from the outside to prevent the
drain pan of the outdoor unit from freezing.
• Install the product with a snow-break hood on a high
stand if this product is used in heavy snow areas.
Only personnel that have been trained to install, adjust, service
manual should service the equipment. The manufacturer will not
be responsible for any injury or property damage arising from
improper service or service procedures. If you service this unit,
you assume responsibility for any injury or property damage
which may result. In addition, in jurisdictions that require one or
only licensed personnel should service the equipment.
Improper installation, adjustment, servicing or repair of the
without proper training may result in product damage, property
damage, personal injury or death.
WARNING
DANGER
Do not touch the heater unit without wearing gloves.
The temperature of the heater unit will become high when the
heater is turned on. Touching the heater unit with bare hands will
result in burns or injury.
WARNING
• Wear protective gloves at the time of installation.
Touching the suction mouth or aluminum n of the outdoor unit
may result in injury.
• Do not install the product in places where there is danger of
If the gas leaks and builds up around the unit, it may catch re.
• Do not grab the top plate of the outdoor unit carelessly when
removing the top plate.
The sharp edge of the top plate may cause injury.
• Do not install the outdoor unit in places where small animals
may nest in the outdoor unit.
If small animals intrude and touch the internal parts of the outdoor
unit, the outdoor unit may malfunction, generate smoke, or ignite
Advise the user to keep the place clean.
• Do not touch the heater unit with bare hands.
The temperature of the heater unit will become high when the
heater is turned on.
Touching the heater unit with bare hands may result in burns or
injury.
DANGER
DANGER
DANGER
Cancer and Reproduc�ve Harm -
www.P65Warnings.ca.gov
FOR CALIFORNIA CONSUMERS
0140M00517-A
WARNING
INSTALLATION INSTRUCTIONS