www.DaikinApplied.com 115 IM 1287-6 • REBEL APPLIED ROOFTOP
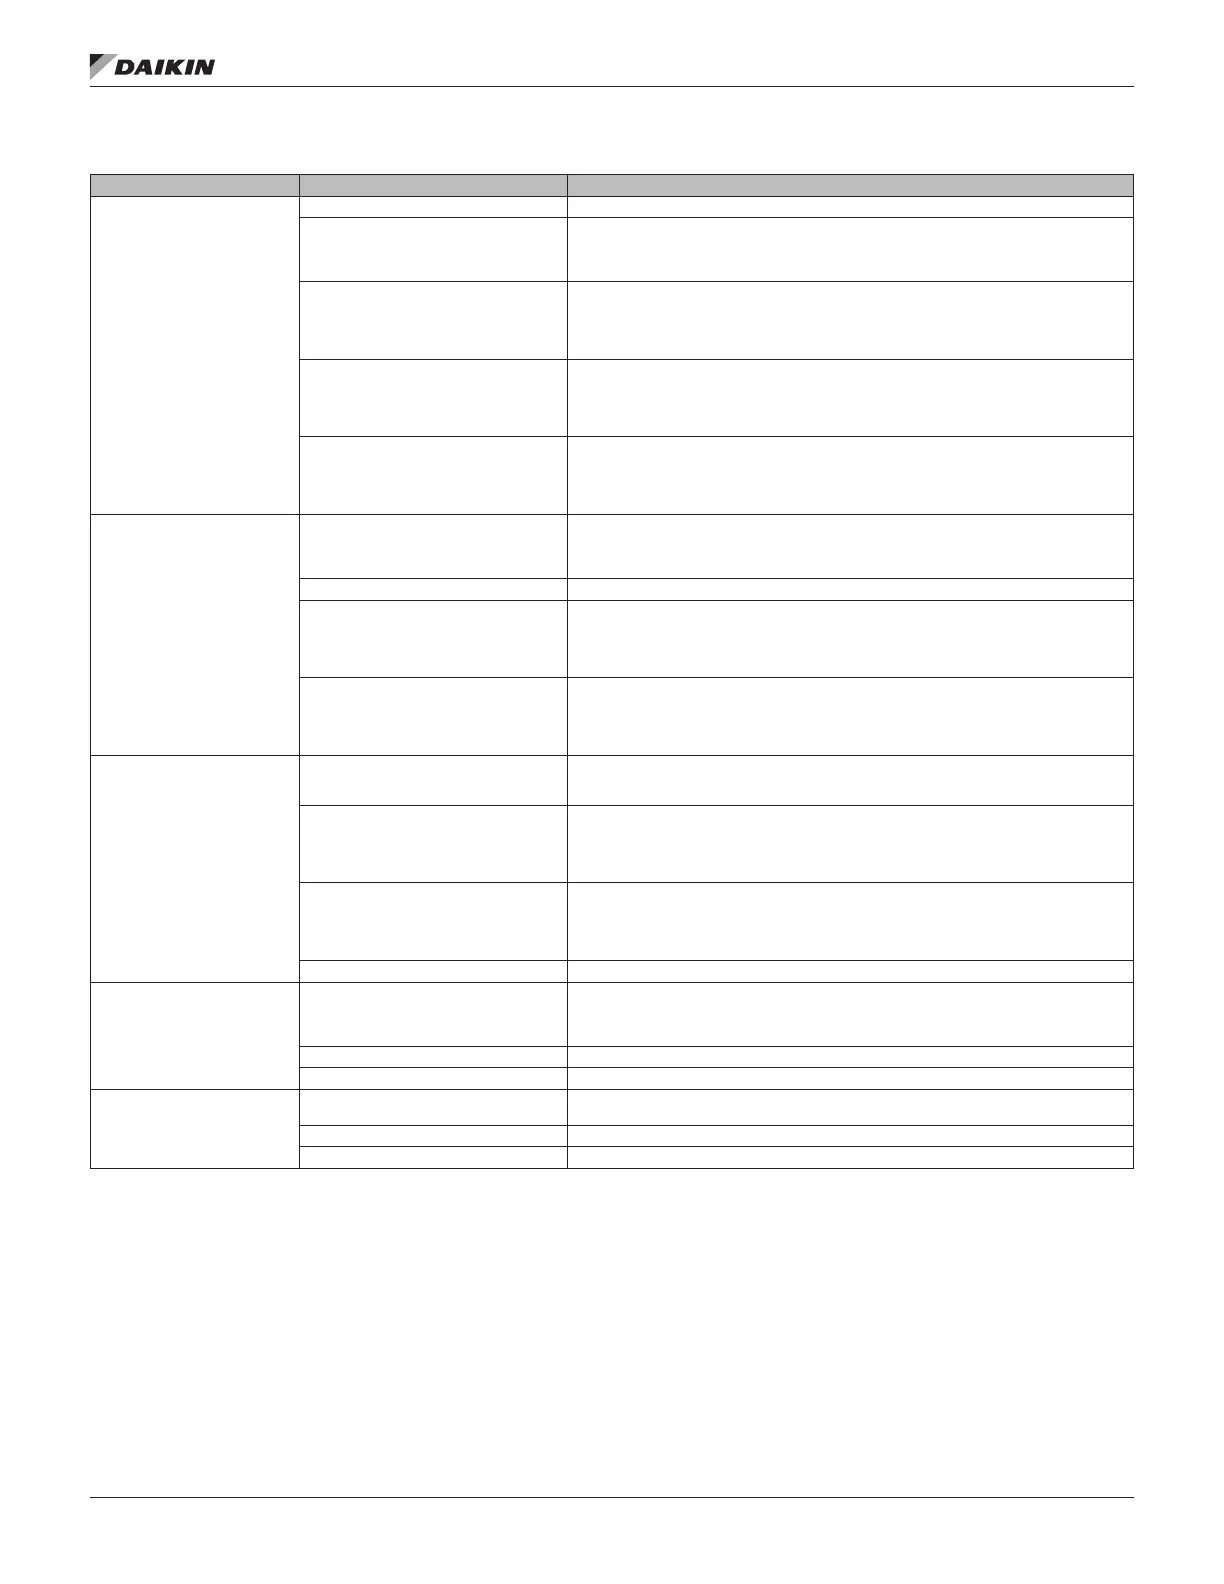
Table 17: Troubleshooting-Main Electric Heat or ERW Electric heat
Problem Cause Remedy
No Heat
Main power OFF Turn main power disconnect switch on
Fan not activated
Check to see if fan unit is on and if auxiliary contact on fan motor starter is closed.
Check all eld wiring for continuity or possible short circuits.
Check wiring diagram on inside of cover of heater or panelboards for interlocks and
remote control equipment to make sure it is all working
Manual thermal cutout tripped
Check for obstructions to airow through the heater. (Outdoor Air Damper Open, Mist
Eliminators Clean, Filters Clean, etc)
Check that heater has at least the minimum amount of airow
Check all manual thermal cutout(s) reset button(s) - reset as required
Check all fuses - replace as required
Automatic thermal cutout tripped
Check for obstructions to airow through the heater. (Outdoor Air Damper Open, Mist
Eliminators Clean, Filters Clean, etc)
Check that heater has at least the minimum amount of airow
Check all manual thermal cutout(s) reset button(s) - reset as required
Check all fuses - replace as required
Fuses blown
Check for obstructions to airow through the heater. (Outdoor Air Damper Open, Mist
Eliminators Clean, Filters Clean, etc)
Check that heater has at least the minimum amount of airow
Check all manual thermal cutout(s) reset button(s) - reset as required
Check all fuses - replace as required
Low Output
Heating element burned out
Check for burned out elements by disconnecting power wiring to the elements and
connecting a reliable ohmmeter to the element terminals
Element resistance (R) should be: R = E2/(1.06xW) ± 5%
Where E = voltage across element; W = Number of kW x 1000/Number of elements
Low line voltage Check nameplate voltage is equal to line voltage
Cycling on automatic thermal cutout
Check for obstructions to airow through the heater. (Outdoor Air Damper Open, Mist
Eliminators Clean, Filters Clean, etc)
Check that heater has at least the minimum amount of airow
Check all manual thermal cutout(s) reset button(s) - reset as required
Check all fuses - replace as required
Fuses blown
Check for obstructions to airow through the heater. (Outdoor Air Damper Open, Mist
Eliminators Clean, Filters Clean, etc)
Check that heater has at least the minimum amount of airow
Check all manual thermal cutout(s) reset button(s) - reset as required
Check all fuses - replace as required
Overheating
Control system
Check to see if fan is ON
Check all eld wiring for continuity or possible short circuits
Check wiring diagram to make sure interlocks and remote control equipment are working
Not enough airow
Check for obstructions to airow through the heater. (Outdoor Air Damper Open, Mist
Eliminators Clean, Filters Clean, etc)
Check that heater has at least the minimum amount of airow
Check all manual thermal cutout(s) reset button(s) - reset as required
Check all fuses - replace as required
Uneven or partially blocked airow
Check for obstructions to airow through the heater. (Outdoor Air Damper Open, Mist
Eliminators Clean, Filters Clean, etc)
Check that heater has at least the minimum amount of airow
Check all manual thermal cutout(s) reset button(s) - reset as required
Check all fuses - replace as required
High line voltage Check nameplate voltage is equal to line voltage
Terminals Overheating
Loose connections
Check for obvious signs of terminal and wiring overheating
Tighten and repair as required|
All terminals should be checked and tightened once a year or at the start of every heating
season
Improperly sized wire All incoming wiring should be sized in accordance with NEC Article 424
High voltage Check nameplate voltage is equal to line voltage
Contactor Hum or Chatter
Low control voltage
Check nameplate voltage is equal to line voltage
Check control voltage, it should not be less than 90% of the contactor coil voltage
Dirt on armature of holding coil Clean contactor armature with low air pressure and a sti brush
Defective contactor Replace contactor


 To Next Page
 Loading...