7
Setting
Date & Time
Year 2009
Month 10
Day 07
Thursday
12:21P
●Select “Minute” with buttons.
Change the minute with buttons.
Holding down the button causes the number to change continuously.
●Press Menu/OK button.
The conrmation screen will appear.
The date can be set between
January 1, 2009 and December 31, 2099.
Note:
8
Setting
Save the settings?
Date & Time
Yes No
●Press button to select Yes on the conrmation screen.
Press Menu/OK button to conrm the clock and return to the basic
screen.
* When setting the schedule, the display returns to the settings screen.
12H/24H CLOCK
1
Setting
Clock & Calendar
Date & Time
12H/24H Clock
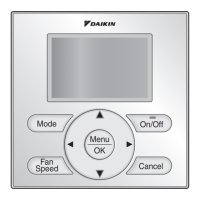
●Display the clock & calendar screen. (See page 27.)
●Press buttons to select 12H/24H Clock on the Clock & Calendar
screen.
The 12H/24H clock screen will appear when the Menu/OK button is
pressed.
2
Setting
12H/24H Clock
12H
By default, the time display is set to the 12H format.
●Press buttons to select 12H 24H on the 12H/24H clock screen.
●The conrmation screen will appear when the Menu/OK button is
pressed.
3
Setting
Save the settings?
12H/24H Clock
Yes No
●Press buttons to select Yes on the conrmation screen.
Pressing the Menu/OK button conrms the 12H or 24H and takes you
back to the main menu screen.
 Loading...


