2
Hardware
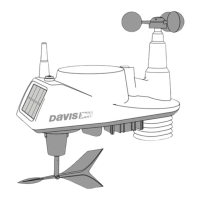
Hardware included with the Vantage Vue sensor suite:
Note: If any of the hardware components are missing or not included, contact Customer Service toll free at
1-800-678-3669 about receiving replacement hardware or other components.
Tools Needed
• Adjustable wrench or 7/16” (11 mm) wrench
• Compass or local area map
Preparing the Sensor Suite for Installation
Follow the steps in the order; each builds on tasks completed in previous steps.
Note: Use a clean, well-lit work table or work area to prepare the sensor suite for installation.
1. Attach the wind cups to the anemometer.
2. Attach the wind vane.
3. Install the rain collector tipping spoon assembly.
4. Install the debris screen in the rain collector.
5. Apply power from the sensor suite battery.
Note: After this step, we recommend that you set up your console, and then come back to finish the installation
of the sensor suite. See your Vantage Vue Console Manual.
Additional steps for advanced set up:
• Verify transmitter ID
• Change the transmitter ID for wireless communication, if necessary
6. Verify data from the sensor suite.
Backing plate
U-Bolt
1/4” lock washers
1/4” hex nuts
0.05” Allen wrench
Debris screen
 Loading...