This document outlines the operation, features, and maintenance of the Dawlance DW-631 Microwave Oven. It serves as a comprehensive guide to ensure safe and efficient use of the appliance.
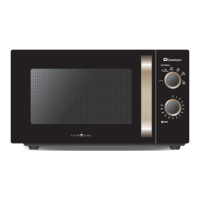
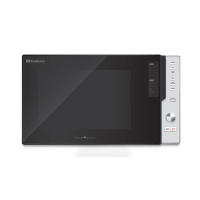
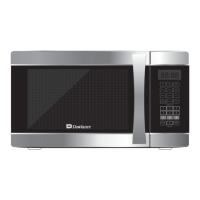
The Dawlance DW-631 is a microwave oven designed for countertop use, offering a variety of cooking and reheating functions. Its primary function is to heat food using microwave energy, providing a convenient and quick method for meal preparation. The oven is equipped with a user-friendly control panel that allows for precise setting of cooking times, power levels, and specialized functions.
Usage Features:
The microwave oven offers several modes to cater to diverse cooking needs:
- Setting the Clock: Upon plugging in, the display flashes ":0". The user can set either a 12-hour or 24-hour clock system by pressing the "Clock" pad once or twice, respectively, and then using the time set pads to input the correct time. An error signal tone will sound if an incorrect time is entered.
- Time Defrosting: This feature allows for defrosting food based on a set time. The oven automatically cycles between defrost and stand times. The "Defrost" pad is pressed, followed by inputting the desired defrosting time using the time set pads, and finally pressing "START". The oven will beep during the cycle to prompt turning or rearranging the food.
- Weight Defrosting (Auto Defrost): This eliminates guesswork by automatically determining defrosting time based on the food's weight. Categories include Meat, Poultry, and Fish. The user selects the food category (e.g., "Meat" pad), then selects the desired weight by repeatedly pressing the category pad, and finally presses "START". The oven will beep to signal when food needs to be turned or rearranged.
- Cooking in One Stage: For straightforward cooking, the user can set a specific power level and cooking time. This involves pressing the "Power" pad multiple times to select the desired power level (e.g., P-HI for 100%, P-50 for 50%), then using the time set pads to input the cooking duration, and finally pressing "START". If no power level is selected, the oven defaults to full power.
- Cooking in Two Stages: This advanced feature allows for sequential defrosting and cooking. First, the "Defrost" pad is pressed, and the defrosting time is set. Then, the "Power" pad is pressed to select the cooking power level, followed by setting the cooking time. Finally, "START" is pressed. The oven will automatically transition from defrost to cooking mode, with beeps indicating the end of each stage.
- Kitchen Timer Mode: This versatile mode can function as a minute timer, delay the start of cooking, or set a holding time after cooking.
- As a Minute Timer: Press the "Kitchen Timer" pad, set the desired countdown time, and press "START".
- To Delay Cooking: Press "Kitchen Timer", set the delay time, program the desired power level and cooking time, and then press "START". The oven will delay its start until the timer counts down.
- To Set a Holding Time: Program the desired cooking time, then press "Kitchen Timer", set the holding time, and press "START". After cooking, the oven will hold the food for the specified duration.
- Speedy Cook: This function provides quick reheating for 30 seconds at full power by simply pressing the "SPEEDY COOK" pad. Repeated presses extend the reheating time in 30-second increments, up to 5 minutes.
- One Touch Cooking: This feature simplifies cooking or reheating for specific food items (Pasta, Frozen Pizza, Dish Warmer) by pressing a single pad. Repeated presses increase the quantity. For example, pressing "Pasta" once for one serving or twice for two servings. Specific instructions are provided for each food type, including recommendations for covering food and standing times.
- Auto Cook: Similar to One Touch Cooking, Auto Cook offers predefined settings for various food categories like Bread, Soup, Baked Potato, Fresh Vegetable, and Frozen Vegetable. The user presses the "Auto Cook" pad repeatedly to cycle through the categories (AC-1 to AC-5) and then presses "START".
- LESS, MORE: These pads allow for adjusting the cooking or reheating time during operation. Pressing "LESS" or "MORE" decreases or increases the time in 10-second multiples for one-touch cooking, or 1-minute multiples for other cooking modes, up to a maximum of 59 minutes. This function is not applicable for defrosting.
- Child Safety Lock: To prevent unintended operation, especially by children, the safety lock can be activated by pressing and holding "STOP/CLEAR" for 3 seconds. A beep sounds, and the "LOCK" indicator lights up. To deactivate, repeat the process.
- Stopping the Oven: The oven can be stopped during operation by pressing "STOP/CLEAR". Pressing "START" will resume cooking. Pressing "STOP/CLEAR" twice will erase all instructions. Opening the door also stops the oven, and closing it followed by pressing "START" will resume operation.
Maintenance Features:
Proper care and cleaning are essential for the longevity and safe operation of the microwave oven.
- General Cleaning: The oven should be cleaned regularly, and any food deposits removed. Failure to do so can lead to deterioration of surfaces, affecting the appliance's life and potentially creating a hazardous situation.
- Waveguide Cover: The waveguide cover must be kept clean at all times. Wiping the oven interior with a soft damp cloth after each use is recommended. Grease or fat accumulation in the cavity can cause overheating, smoke, or fire.
- Door and Seals: It is crucial not to place any objects between the oven front face and the door, or allow residue to accumulate on the sealing surfaces. The sealing area should be wiped frequently with a mild detergent, rinsed, and dried. Abrasive powders or pads should never be used.
- Door Integrity: The door must not be subjected to strain when opened. If the door is damaged (bent), or if hinges and latches are broken or loosened, or if door seals and sealing surfaces are compromised, the oven should not be operated until repaired by a competent service technician.
- Utensil Guidelines: Only microwave-safe utensils should be used. Metal trim on dishes can cause sparking. Glass or ceramic heat-proof dishes are excellent for microwave cooking. China dishes without metal trim are acceptable. Wood or straw should only be used for short periods. Aluminum foil can be used in very small pieces for shielding, but must be at least 2.5cm away from oven walls. Most heat-resistant plastic dinnerware is suitable, but polyethylene, melamine, and phenol are not. Wax paper can be used as a cover to prevent spatters. Metal utensils, in general, should not be used.
The manual also includes a "Before You Call For Service" checklist to help users troubleshoot common issues before contacting a service station, and a "Questions and Answers" section addressing frequently asked queries about microwave oven operation. It emphasizes that users should not attempt to service the oven themselves.