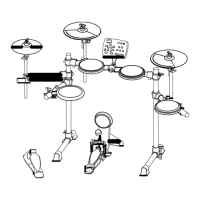
COMPONENTS
INSTALLATION
Hi-Hat Installation
Crash and Ride Installation
1
1.
Rem
ove the
win
g nut,
1
washer and felt pad
2. Put the Hi-Hat into the rod
along with parts removed in
step 1. Fasten the wing nut.
2
3.Adjust the angle and height
of
the rod before tightening
the
wing nut.
3
1. Remove the wing nut, washer
and felt pad
2
2. Put the cymbal pad into the
rod along with parts removed in
step 1. Fasten the wing nut
modertly to give the pad a little
bit wobbling like the real acous-
3 tic cymbal.
Note: Crash and Ride have dif-
ferent part numbers. Please re-
fer to indication on page 5.
3.Adjust the angle of the rod then tighten the wing nut.
Snare Installation
1. Insert the snare into the
L-Rod, then tighten the
wing nut.
2. Adjust the angle of the
L-Rod then tighten the
wing nut in the clamp.
Tom Installation
1. Insert the tom into the
L-Rod, then tighten the
wing nut.
Note: All the toms use the
same pad.
2. Adjust the angle of the L-Rod before
tightening the wing nut in the clamp.
Kick
Installation
1. Align holes in the kick stand
2
with
1
these in the bracket
with screws.
1
then fasten them
2. Insert tongue of the kick stand into slot
of the
pedal
3
. Tighten the wing nut on
2
the pedal level to fix it.
3
Sound module Installation
1.
Align holes in supporting
board
with these
in sound
module then fasten them with screws.
2. Insert rod of the
supporting
board into the clamp,
then tighten the wing nut.
Finalizing the Installation
Adjust arms, clamps and rods to the best position you like to finalize the installation.
Electronic Connection
Please refer to the SOUND MODULE Chapter for electronic connection.