EasyManua.ls Logo

Defiant 49808 - User Manual

Defiant 49808
2 pages
Print Icon
To Next Page IconTo Next Page
Loading...
Use and Care Guide
DAYLIGHT ADJUSTING INDOOR DIGITAL TIMER
IP07232014 HOMEDEPOT.com
Please contact 1-866-308-3976 for further assistance.
Item #457-864
Model #49808
UPC #043180498083
Before You Begin
Product Features
Pre-programmed sunrise and sunset times that adjust automatically throughout the year
based on your location.
Set one or more ON/OFF settings for each day of the week, daily cycles, or weekday -
weekend cycles
Stores up to 7 individual programs
A Random feature which turns the lights off and on between 30 minutes before and after the
programmed time, giving the appearance that somebody is currently home
2 grounded outlets
Product Speci cations
RATINGS
125 VAC, 60 Hz
15A General Purpose /
Resistive
1250 W(10A)
Tungsten
1/2 HP Motor
Safety Information
WARNING
RISK OF ELECTRIC SHOCK:
Plug directly into an electrical outlet
Do not use in wet locations
Use indoors only
Unplug the timer before cleaning
Keep children away
RISK OF FIRE:
Do not use to control appliances that contain heating elements
[cooking appliances, heatrs, irons, etc.]
Do not exceed electrical ratings
Do not use with extension cords
Programming Instructional Video
To view an instructional video on how to program this product:
1. Go to www.homedepot.com and enter either the Item or Model number found in the top right
corner of this instruction sheet in the search fi eld.
2. Click on your product from the list of search results and click on the video link in the Product
Overview section.
Initial Setup
PRODUCT DESCRIPTION
Timer display shown in standard Clock mode:
Part Description
A
RCL/RND: When programming press to clear the ON/OFF setting. When in Clock mode, push
to activate the random feature, which turns the lights off and on between 30 minutes before
and after the programmed time, giving the appearnce that somebody is currently home.
B
SET: Hold for 5 seconds to set the clock/date. Push to con rm a setting and move to the
next option.
C
PROGRAM: Hold 5 seconds to program ON/OFF timer settings. Push when programming is
complete to activate the timer.
D UP/DOWN: Scroll through the Settings options.
E RESET: Press and hold with a toothpick to clear all settings on the timer.
F ON/OFF: ON=Always ON, Auto=Timer is active, OFF=Always OFF
O
N
/
O
F
F
P
R
O
G
D
O
W
N
U
P
S
E
T
R
C
L
/
R
N
D
RESET
TU
AUTO
PM
A
C
D
E
F
B
1
SETTING UP THE TIMER FOR THE FIRST TIME
NOTE: Upon initial setup, you will be following Steps 1 through 2. The timer will automatically
return to clock mode (clock displayed on the timer display) if no buttons are pressed for 1
minute. If this happens, press and hold the SET button for 5 seconds and continue pressing
SET to scroll through the settings to return to where you last left off in the set up process.
If the LCD screen is displaying numbers, you are ready to program and can proceed with
these steps. If the screen is blank, plug in the timer and leave for two hours to charge the
internal battery before programing.
a. Use a toothpick or sharp pencil to push the RESET
button. The screen will go blank brie y and then
display 12:00 AM.
b. Press and hold SET for 5 seconds until the hour
begins to  ash. Release the button. See Figure 1.
Figure 1
AM
AUTO
TH
c. Press UP/DOWN to adjust the hour. Press SET to
con rm. The default is 12 AM. Take note of the AM/
PM on the upper left of the screen when setting the
hour.
d. Press UP/DOWN to adjust the minute. Press SET to
con rm.
e. Press UP/DOWN to adjust the year. Press SET to
con rm.
f. Press UP/DOWN to adjust the month. Press SET to
con rm. See Figure 2.
Figure 2
DAY
MONTH
YEAR
g. Press UP/DOWN to adjust the day. Press SET to
con rm.
h. Press UP/DOWN to select DST ON or DST OFF and
press SET to con rm. DST stands for Daylight
Savings Time. If DST is set to ON, this feature
automatically resets the times in the timer to match
the current time change. The default DST time
change is 2:00 am, the second Sunday of March,
and then the  rst Sunday in November. Press SET to
con rm. See Figure 3.
Figure 3
MONTH
YEAR
DST ON
i. When the timer display  ashes NOR, proceed to
Step 2 – SETTING THE DAWN/DUSK REGION.
2
SETTING THE DAWN/DUSK REGION
IMPORTANT: This step does not set your time zone. In this step you are identifying your location based
on this map to ensure an accurate sunup and sunset time for your area.
a. View the map below and determine which area best  ts your location (see Figure 4). Press
UP/DOWN to scroll through the available areas in the timer and press SET at the appropriate
area. The options are:
NOR: North
CENT: Central
SOU: South
HI: Hawaii
ALAS: Alaska
b. The timer display shows SUNUP and the timer’s pre-set SUNUP time with the HOUR blinking.
This SUNUP time should be close to the time the sun rises in your area. If this time is
acceptable, press SET twice to proceed to step d. To revise the SUNUP time, proceed to
stepc.
c. To revise the SUNUP setting, press UP and DOWN as needed to adjust the hour. Pay attention
to the AM and PM at the top of the timer display. Press SET to con rm the hour and then
press UP and DOWN as needed to set the minutes. Press SET to con rm the minutes.
d. When SUNSET  ashes on the timer display, repeat step b.
Figure 4
NORTH
ALASKA
HAWAII
NORTH
CENTRAL
CENTRAL
SOUTH
SOUTH
CONTINUE TO PAGE 2 TO COMPLETE SETUP AND PROGRAMMING
Question and Answer IconNeed help?

Do you have a question about the Defiant 49808 and is the answer not in the manual?

Summary

Before You Begin

Product Features

Lists key features of the digital timer, including automatic sunrise/sunset times and multiple outlets.

Product Specifications

Details the electrical ratings and motor capacity of the digital timer.

Safety Information

Provides essential safety warnings regarding electrical shock and fire risks when using the timer.

Programming Instructional Video

Guides users on how to find and watch an instructional video for programming the digital timer.

Initial Setup

Setting Up the Timer for the First Time

Step-by-step guide to set the clock, date, and day for the digital timer.

Setting the Dawn;Dusk Region

Selects geographical region to ensure accurate sunrise and sunset times for automatic programming.

Programming

Programming the ON;OFF Days

Explains how to assign specific ON/OFF times to different days or day combinations for the timer.

Programming the ON;OFF Times

Details how to set custom, sunrise, or sunset times for turning devices on and off.

Additional Programming Options

Reviewing Programs

Instructions on how to view previously configured ON/OFF programs on the timer display.

Deleting Programs

Procedure for removing or clearing existing ON/OFF programs from the digital timer.

Setting the Random (RND) Security Option

Enables a random feature that simulates occupancy by varying ON/OFF times by +/- 30 minutes.

Additional Features

Using the Manual Override Feature (Optional)

How to manually turn devices ON or OFF, bypassing the programmed schedule.

FCC Note

Provides important regulatory compliance information regarding FCC and Industry Canada standards.

Overview

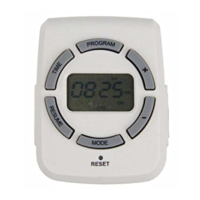
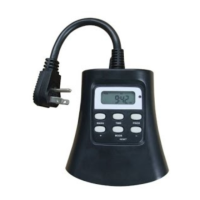
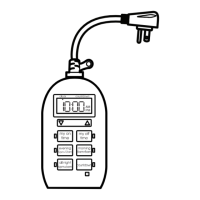
This document describes a Daylight Adjusting Indoor Digital Timer, designed to automate the control of indoor lighting and appliances.

Function Description

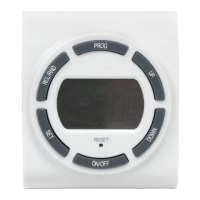
The primary function of this device is to automatically turn lights and appliances ON and OFF at pre-programmed times. A key feature is its daylight adjusting capability, which automatically adjusts sunrise and sunset times throughout the year based on your geographical location. This ensures that your lighting schedule remains consistent with natural daylight cycles without requiring manual adjustments for seasonal changes. The timer can store up to seven individual programs, allowing for flexible scheduling options such as daily cycles, weekday-weekend cycles, or specific days of the week.

Usage Features

Initial Setup and Clock Setting:

To begin using the timer, an initial setup process is required. First, if the screen is blank, the timer needs to be plugged in for two hours to charge its internal battery. Once charged, a toothpick or sharp pencil is used to push the RESET button, which clears all settings and displays 12:00 AM. The user then presses and holds the SET button for five seconds to enter the clock setting mode. From there, the hour, minute, year, month, and day can be adjusted using the UP/DOWN buttons and confirmed with the SET button. During hour adjustment, it's important to note the AM/PM indicator. The timer also includes a Daylight Savings Time (DST) feature, which can be set to ON or OFF. If set to ON, the timer automatically adjusts for DST changes, typically on the second Sunday of March and the first Sunday of November.

Dawn/Dusk Region Setting:

After setting the clock, the user must define their Dawn/Dusk region. This step is crucial for the timer's automatic daylight adjusting feature to function accurately. The manual provides a map with regions (North, Central, South, Hawaii, Alaska). The user selects the region that best fits their location using the UP/DOWN buttons and confirms with SET. The timer then displays a pre-set SUNUP time, which should be close to the actual sunrise time in the user's area. This time can be revised if necessary by adjusting the hour and minutes using the UP/DOWN buttons. The process is then repeated for the SUNSET time.

Programming ON/OFF Times:

The timer can store up to seven programmable ON/OFF times (PROG 1 - PROG 7). To program, the user presses and holds the PROG button for five seconds. A blank PROG 1 screen indicates readiness for programming. The SET button is pressed, and the days of the week begin to flash. The user can select individual days (Monday, Tuesday, etc.) or day combinations (Monday-Friday, Saturday-Sunday, etc.) using the UP/DOWN buttons, confirming with SET.

Next, the user chooses an ON time from three options:

  1. Custom Time: The user manually sets a specific hour and minute for the ON time using the UP/DOWN buttons, paying attention to AM/PM.
  2. SUNUP: The timer automatically sets the ON time to the pre-programmed SUNUP time for the selected region.
  3. SUNSET: The timer automatically sets the ON time to the pre-programmed SUNSET time for the selected region. Once the ON time is set, the process is repeated for the OFF time. This allows for flexible scheduling, such as turning lights on at sunset and off at a custom time. The user can continue configuring additional ON/OFF times (PROG 2 - PROG 7) by repeating these steps. Pressing PROG at any time returns the timer to clock mode. After programming, it's important to ensure the timer display shows "AUTO" to indicate that the timer is active and will cycle through the configured programs. The timer should then be plugged into an outlet, and the lights or devices plugged into the receptacles on either side of the timer.

Random (RND) Security Option:

For enhanced security, the timer includes a Random (RND) feature. When activated, this feature turns lights ON and OFF using the programmed times but with a random variation of +/- 30 minutes. This creates a more "lived-in" appearance, deterring potential intruders when the user is away. To activate this feature, the user presses the RCL/RND button while the timer is in Clock mode. "RND" will appear in the top right corner of the screen. Pressing RCL/RND again deactivates the feature.

Manual Override Feature:

The timer also offers a manual override option. If the user wishes to manually control the connected devices at any time, they can press the ON/OFF button. Pressing ON/OFF until "ON" is displayed will keep the lamps/devices continuously ON. Pressing ON/OFF until "OFF" is displayed will keep them continuously OFF. To disable the manual override and re-enable the programmed schedule, the user presses ON/OFF until "AUTO" is displayed.

Reviewing and Deleting Programs:

Users can review their programmed ON/OFF settings by pressing and holding the PROG button for five seconds, then using the UP/DOWN buttons to scroll through the configured programs. If an additional program needs to be added, the user can scroll to a blank program (displayed as "--:--") and follow the programming steps.

To delete an ON/OFF setting, the user presses PROG for five seconds, then scrolls with UP until the desired ON/OFF time is reached. Pressing RCL/RND removes the ON time (displaying "--:--"). The user then presses UP to reach the OFF screen and presses RCL/RND again to remove the OFF time. This process can be repeated for any other programs to be deleted.

Maintenance Features

Resetting the Timer:

In case of issues or to clear all settings, a RESET button is provided. This button should be pressed and held with a toothpick or sharp pencil. This action will clear all settings and return the timer to its initial blank screen, ready for a fresh setup.

Internal Battery Charging:

The timer contains an internal battery that needs to be charged for initial setup or if the screen is blank. Plugging the timer into an electrical outlet for two hours will charge this battery, allowing the user to proceed with programming.

Automatic Return to Clock Mode:

If no buttons are pressed for one minute during any setup or programming procedure, the timer will automatically return to clock mode. If this happens, the user can press and hold the SET button for five seconds and then continue pressing SET to scroll through the settings to return to where they left off in the setup process.

Defiant 49808 Specifications

General IconGeneral
ProgrammableYes
Number of Outlets1
Amperage15 A
Wattage1875 W
UseIndoor
Max Load15 Amps
Voltage125V
DisplayLCD

Related product manuals