Quick Start Guide
Use and Care Guide
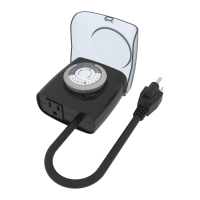
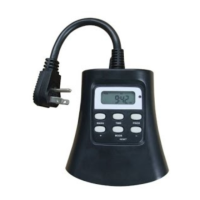
indoor basic timer
Read Before Using
RISK OF ELECTRIC SHOCK
□ PLUG DIRECTLY INTO AN ELECTRICAL OUTLET
□ DO NOT USE IN WET LOCATIONS
□ USE INDOORS ONLY
□ UNPLUG TIMER BEFORE CLEANING
□ KEEP CHILDREN AWAY
RISK OF ELECTRIC FIRE
□ DO NOT USE TO CONTROL APPLIANCES
THAT CONTAIN HEATING ELEMENTS SUCH AS
COOKING APPLIANCES, HEATERS AND IRONS
□ DO NOT EXCEED ELECTRICAL RATINGS
□ DO NOT USE WITH EXTENSION CORDS
CAUTION: DO NOT PLUG IN MORE THAN
THE RATED LOAD (SEE RATINGS).
Find the total watts being used: If watts
are not marked on the appliance, multiply
ampere rating (on nameplate) by 125 volts
to determine equivalent watts. For lamps
with multiple bulbs, add the wattage on
the bulbs.
Detailed Operating Instructions
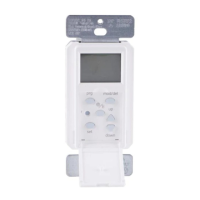
Part Description
1
TIMER SEGMENT BUTTONS: These segments, each
representing 30 minutes, can be pushed down from the
edge of the dial, and are used to program the timer ON/
OFF times. DOWN = ON UP=OFF
2
ROTATING TIMER DIAL: This dial can only be turned
clockwise. It points to the current time of day.
3
TIME READOUT: Displays each hour of the day (nighttime
hours are shown with a shaded background, while
daylight hours are shown with white).
4
MASTER SWITCH: TIMER ON=Activates timer control of
the device being used, OUTLET ON=Overrides the timer
and enables normal use of the outlet.
Problem Solution
The pins cannot be
pushed down.
Ensure the pins are not already
down or in the “TIME NOW”
range (shown on the rotating
timer dial).
The device does not turn ON. Ensure the device power switch
is in the ON position.
The device turns ON/OFF
during the day instead
of night (or night
instead of day).
Ensure the AM/PM time and
program settings are correct.
The device turns ON early
or late.
Manually turn the rotating timer
dial to cycle the timer ON or OFF
at the correct time.
NOTE: See operating section for more instructions.
NOTE: Ensure all segments are pulled up prior
to programming.
NOTE: Nighttime hours from 6:30PM to 6:30AM
are highlighted with a grey background.
NOTE: 30 minute programable pins.
DOWN = ON
UP = OFF
NOTE: Ensure all segments are pulled up prior
to programming.
NOTE: Nighttime hours from 6:30PM to 6:30AM
are highlighted with a grey background.
NOTE: To override the timer and use your device
normally, set the master switch to the OUTLET ON
position. This will deactivate timer control of the device.
To reactivate timer control, ensure the device is turned
ON, and set the timer master switch to TIMER ON.
In case of power failure, reset the time of day as
explained in step 1.
NOTE: This is a POLARIZED device.
It has a polarized plug (one blade is wider than the
other) and a polarized outlet (one slot is longer than
the other). The polarized plug is not intended to be
mated with non-polarized outlets (where both slots are
the same size). A polarized outlet is intended to mate
with a polarized plug in only one way — the longer slot
with the wider blade.
1
2
3
4
5
6
7
8
9
10
11
11
10
9
8
7
6
5
4
3
2
1
T
I
M
E
N
O
W
1
2
3
4
PRODUCT DESCIPTION
ITEM #544-068
SAFETY INFORMATION TROUBLESHOOTING
STEP: 1
STEP: 2
USING THE TIMER
a. Push down ALL the segments that fall
on or within the time period you would
like your device to be on. You may need
to turn the dial clockwise to access the
desired segments.
b. Turn the rotating timer dial clockwise
until the pointer on the face of the dial
points to the current time of day.
a. Plug a device into the outlet on the
side of the timer.
b. Set the master switch to the TIMER
ON position.
c. Plug the timer into an electrical outlet
nearest to the device to be controlled.
d. Turn the power of the device to
the ON position.
1 2 3
PROGRAMMING ON/OFF TIMES PREPARING THE TIMER FOR USE USING THE TIMER
a. Select a time period (or periods) you want the device
turned on.
b. Push down ALL the segments (1) that fall on or within that
time period. You may need to turn the dial clockwise to
access the desired segments.
c. Turn the rotating timer dial (2) clockwise until the pointer
on the face of the dial points to the current time of day.
a. Plug the device into the outlet on the side of the timer.
b. Ensure the device is switched ON for automatic control.
(The timer will not turn the device ON if the device is switched OFF.)
a. Set the master switch (4) to the TIMER ON position.
b. Plug the timer into an electrical outlet nearest to the device
to be controlled.
c. The device will now turn ON and OFF at the programmed times.
1
2
3
4
5
6
7
8
9
10
11
11
10
9
8
7
6
5
4
3
2
1
T
I
M
E
N
O
W
OUTLET
ON
TIMER
ON
4
CAPACIDADES NOMINALES
125 VAC,
60Hz
15A General
Purpose/ Resistive
1250 W (10A)
Tungsten
½ HP
WARNING
1
10
11
11
10
9
8
7
6
5
4
3
2
1
T
I
M
E
N
O
W
1
2
SETTING UP THE TIMER