EasyManua.ls Logo

Defiant 49814 - User Manual

Defiant 49814
4 pages
Print Icon
To Next Page IconTo Next Page
Loading...
Use and Care Guide
DAYLIGHT ADJUSTING INDOOR DIGITAL TIMER
1 HOMEDEPOT.com
Please contact 1-866-308-3976 for further assistance.
Item #469-637
Model #49814
UPC #043180498144
Before You Begin:
Product Features
Set one or more multiple ON/OFF settings for each day of the week, daily cycles, or weekday - weekend
cycles
Stores up to 7 individual programs
A Random feature which turns the lights off and on between 30 minutes before and after the programmed
time, giving the appearance that somebody is currently home
Pre-Installation Requirements
This timer requires that your switch box have a neutral wire in order for the timer to operate correctly. If
you open up your switch box and only see 2 wires, this indicates that your switch box does not have a
neutral wire and this timer will not work.
This timer will work in a single pole or 3-way installation. It will not work in a 4-way installation.
This timer will only work on loads up to 15 amps.
Safety Information
WARNING
RISK OF ELECTRIC SHOCK:
Shut off the power at the fuse box or circuit breaker
before installation
Do not use in wet locations
Use indoors only
RISK OF ELECTRIC FIRE:
Do not use to control appliances that contain heating
elements such as cooking appliances, heaters, and irons
Do not exceed electrical ratings
Do not use to control receptacles
Use only copper wire with this device
Product Speci cations
Single pole or 3-way installation
RATINGS
125 VAC,
60 Hz
15A
Resistive
15A
Tungsten
6A
Ballast
1 HP
Motor
1800 VA
Mechanical
Ballast
Hardware Included
AA - Face plates x2
(White & Light Almond)
BB - Wire Nut x5 CC - Screw x2 DD - Jumper Cable x1
Suggested Tools
Phillips screwdriver Wire strippers
Pre-Installation
CHANGING THE FACEPLATE
This device includes a light-almond faceplate. To switch faceplates, follow the steps below.
a. Gently remove the white faceplate using a  athead screwdriver. Starting at the top left corner,
gently pry the faceplate loose, working around the edge until it pops off.
b. Find the light-almond faceplate in the package. Place the new faceplate into position and
carefully push until it snaps into place.
REMOVING SIDE SECTIONS FOR MULTI-SWITCH INSTALLATIONS
When installing your timer into a wall box with multiple switches, remove all the inner side
sections prior to making the electrical connections. See Figure 1.
a. Use pliers to bend the side section up and down until it breaks off.
b. Repeat the process for each side section to be removed.
Figure 1 - Removing Side Sections Prior to Connection
Installation Terms and Options
WARNING: Shut off power at the fuse box or circuit breaker before performing any wiring or installation.
BASIC WIRING TERMINOLOGY
To better familiarize yourself with the wiring terminology and concepts referenced in this manual, please review the following information before you begin wiring this timer to your switch outlet.
If at any time during the wiring process you become uncertain, please contact a certi ed electrician.
Line: This is the 120 AC (hot) from breaker box.
Load: This is the 120V AC wire that controls the  xture (load out) which carries power to the light.
Neutral: 120 volt return connection.
Ground: 120 safety ground.
Traveler-1 and Traveler-2: Wires running between two 3-way switches for installations where a light is controlled by two switches.
INSTALLATION OPTIONS
To begin the installation process, you must  rst know what type of installation is needed. Below are the 3 different installation options. Please refer to the following descriptions for the installation
instructions that apply to you.
1 Single-Pole Installation (Go to install section 1 on page 2):
This installation option should be used when a switch only controls one outlet from a single location. A typical example of where you would  nd a single-pole switch is your bedroom or
bathroom light switch.
2 3-Way Installation, Load Side (Go to install section 2 on page 2):
This installation option replaces a switch which controls a light that can be controlled from two locations and in most installations has the common (hot) terminal tied to the lamp/load the
switch turns OFF and ON. Typically these types of installations are in stairwells, hallways, and large rooms with multiple accesses points.
3 3-Way Installation, Line Side (Go to install section 3 on page 2):
This installation option replaces a switch which controls a light that can be controlled from two locations and in most installations has the common (hot) terminal tied to 120VAC. Typically
these types of installations are in stairwells, hallways, and large rooms with multiple accesses points.
Question and Answer IconNeed help?

Do you have a question about the Defiant 49814 and is the answer not in the manual?

Summary

Before You Begin

Product Features

Lists key features like multiple ON/OFF settings, program storage, and random feature.

Product Specifications

Details electrical ratings (VAC, A, Hz, HP, VA) and installation types.

Pre-Installation Requirements

States the need for a neutral wire and compatibility with single/3-way installations.

Safety Information

Outlines critical safety warnings regarding electric shock and fire hazards.

Hardware Included

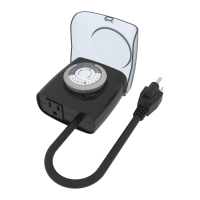
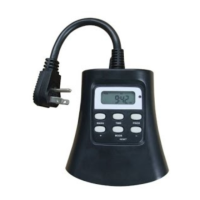
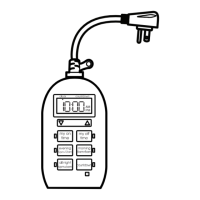
Lists the components provided with the timer.

Suggested Tools

Recommends necessary tools for installation.

Pre-Installation Steps

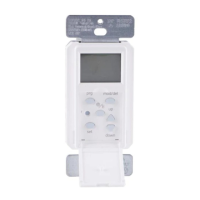
Guides for preparing the timer for installation.

Installation Terms and Options

Defines wiring terms and explains different installation types.

Single Pole Installation

Disconnect the power at the circuit breaker or fuse box

Instruction to shut off power before starting the single pole installation.

Connect the wires of the timer to the wall box

Details wiring connections for a single pole setup using provided diagrams.

Ensure that all wire nuts are secure

Steps for securing connections and preparing the box for mounting.

Reinstall your wall plate

Final steps for mounting the timer and wall plate.

Turn the main power ON at the circuit breaker

Instructions for restoring power and initial testing.

Load Side 3-Way Installation

Preparing the Switch on the Line Side

Steps to prepare the switch on the line side for a 3-way load installation.

Installing the Timer on the Load Side

Detailed instructions for connecting the timer when installed on the load side.

Line Side 3-Way Installation

Preparing the Switch on the Load Side

Steps to prepare the switch on the load side for a 3-way line installation.

Installing the Timer on the Line Side

Detailed instructions for connecting the timer when installed on the line side.

Programming Instructional Video

To view an instructional video on how to program this product

Guide on accessing the product's programming video online.

Initial Setup

Product Description

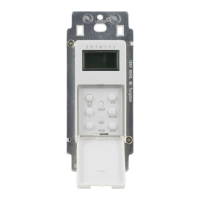
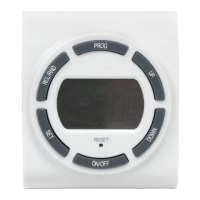
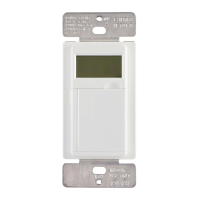
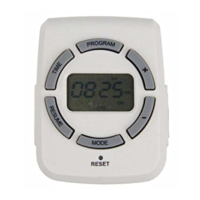
Labels and descriptions of the timer's buttons and parts.

Product Features

Reiterates key features like multiple ON/OFF settings and random function.

Setting the Timer Up for the First Time

Step-by-step guide to setting the initial date, time, and DST.

Setting the Dawn;Dusk Region (Zone)

Instructions for setting the geographical zone for accurate dawn/dusk times.

Programming

Programming the ON;OFF Days

How to select days for specific ON/OFF programs.

Programming the ON;OFF Time

Steps to set specific ON/OFF times using Dawn, Dusk, or manual time inputs.

Additional Programming Options

Reviewing Programs

How to view previously entered programs.

Deleting Programs

Instructions for removing existing ON/OFF programs.

Setting the Random (RND) Security Option

How to activate the random feature for added security.

Additional Features

Using the Manual Override Feature (Optional)

Explains how to manually control the timer's output.

Countdown Mode

Enables setting a timer for automatic shutoff after a specified duration.

Troubleshooting

Three way switch will not work

Addresses issues with 3-way switch functionality and jumper wiring.

Lights on all day controlled by timer

Solutions for timer keeping lights on constantly, checking time settings.

Lights come on and off at times different than programmed

Troubleshooting for incorrect timing due to conflicting programs or manual overrides.

FCC NOTE

FCC Compliance Statement

Details FCC and Industry Canada compliance and potential interference issues.

Overview

The DEFIANT Daylight Adjusting Indoor Digital Timer is designed to automate the control of indoor lighting, offering convenience and energy savings. It supports both single-pole and 3-way installations, making it versatile for various home wiring configurations.

Function Description:

This digital timer allows users to set multiple ON/OFF schedules for each day of the week, daily cycles, or weekday-weekend cycles. It can store up to 7 individual programs. A key feature is the "Random" mode, which turns lights off and on between 30 minutes before and after the programmed time, creating the appearance that someone is home, enhancing security. The timer also includes a "Dawn/Dusk" feature that automatically adjusts ON/OFF times based on regional sunrise and sunset, further enhancing its "lived-in" appearance. Manual override options are available to temporarily or permanently control the lights independently of the programmed schedule. A countdown mode allows for temporary ON/OFF cycles.

Important Technical Specifications:

  • Voltage: 125 VAC, 60 Hz
  • Current Ratings:
    • Resistive: 15A
    • Tungsten: 15A
    • Ballast: 6A
    • Motor: 1 HP
    • Mechanical: 1800 VA
  • Installation Type: Single pole or 3-way installation (not compatible with 4-way installations).
  • Load Compatibility: Works only on loads up to 15 amps.
  • Wiring Requirement: Requires a neutral wire in the switch box for proper operation.
  • Wire Type: Designed for use with copper wire only.

Usage Features:

  • Programming Flexibility: Users can set specific ON/OFF times for individual days, weekdays, weekends, or all days.
  • Daylight Savings Time (DST) Adjustment: The timer can be configured to automatically adjust for Daylight Savings Time (ON/OFF option).
  • Dawn/Dusk Region Setting: Users select their geographical region (North, Central, South, Hawaii, Alaska) to ensure accurate dawn and dusk times for automated lighting control.
  • Random Mode (RND): Activates a security feature that varies ON/OFF times by +/- 30 minutes around programmed schedules, simulating occupancy.
  • Manual Override:
    • Active Programming Override: Temporarily turns lights ON/OFF until the next scheduled program.
    • Inactive Programming Override: Converts the timer into a manual switch, requiring manual ON/OFF until returned to AUTO mode.
  • Countdown Mode: Allows for temporary ON/OFF cycles with preset durations (10, 20, 30, 40, 50 min., 1 HR, 1.5 HR, 2 HR, 3 HR).
  • Faceplate Options: Includes both white and light almond faceplates for aesthetic customization.
  • Multi-Switch Installation: Side sections of the timer can be removed to fit into wall boxes with multiple switches.
  • Display: Features an LCD screen for easy programming and status display.
  • Auto-Return to Clock Mode: If no buttons are pushed for 60 seconds during programming, the timer automatically returns to clock mode.

Maintenance Features:

  • Reset Function: A dedicated RESET button allows users to clear all settings and restart the setup process.
  • Program Review: Users can scroll through previously entered programs to verify or modify them.
  • Program Deletion: Individual programs can be easily deleted.

Safety Information:

  • Electrical Shock Hazard: Always shut off power at the fuse box or circuit breaker before installation.
  • Indoor Use Only: Not suitable for wet locations.
  • Fire Hazard: Do not use to control appliances with heating elements (e.g., cooking appliances, heaters, irons). Do not exceed electrical ratings. Not for use with receptacles.

Defiant 49814 Specifications

General IconGeneral
BrandDefiant
Model49814
CategoryTimer
LanguageEnglish

Related product manuals