Page 8
Installation Safety Precautions
Electrical Connection
This appliance should be properly
Ÿ
grounded for your safety. The power cord
of this appliance is equipped with a three-
prong plug which mates with standard
three prong wall outlets to minimise the
possibility of electrical shock.
Do not under any circumstances cut or
Ÿ
remove the third ground prong from the
power cord supplied. For personal safety,
this appliance must be properly
grounded.
This appliance requires a standard 240
Ÿ
Volt AC ~/50Hz electrical ground outlet
with three-prong. Have the wall outlet and
circuit checked by a qualified electrician
to make sure the outlet is properly
grounded. When a standard 2-prong wall
outlet is encountered, it is your
responsibility and obligation to have it
replaced with a properly grounded 3-
prong wall outlet.
The cord should be secured behind the
Ÿ
appliance and not left exposed or
dangling to prevent accidental injury.
The appliance should always be plugged
Ÿ
into its own individual electrical outlet
which has a voltage rating that matches
the rating label on the appliance. This
provides the best performance and also
prevent overloading house wiring circuits
that could cause a fire hazard from
overheated. Never unplug the appliance
by pulling the power cord. Always grip
the plug firmly and pull straight out from
the receptacle. Repair or replace
immediately all power cords that have
become frayed or otherwise damaged.
Do not use a cord that shows cracks or
abrasion damage along its length or at
either end. When moving the appliance,
be careful not to damage the power cord.
Extension Cord
Because of potential safety hazards under
Ÿ
certain conditions, it is strongly
recommended that you do not use an
extension cord with this appliance.
However, if you must use an extension
cord it must be checked and tested by a
qualified technician or service person.
The extension cord must be a VDE-
Listed, 3-wire grounding extension cord
that has a grounding plug and outlet and
that the electrical rating of the cord is 220-
240 Volts and at least 10 amperes.
WARNING
To prevent damaging the door gasket,
Ÿ
make sure to have the door fully open
when pulling shelves out of the rail
compartment.
The appliance must be positioned so that
Ÿ
the plug is accessible. Release the
electric cord. Move your cabinet to its
final location. Do not move your Cabinet
while loaded with wine. You might distort
the body. The wine cooler should be
installed in a suitable place in order to
avoid touching the compressor with the
hand.
If the supply cord is damaged, it must be
Ÿ
replaced by manufacturer of its Service
agent or a similarly qualified person in
order to avoid a hazard.
Page 13
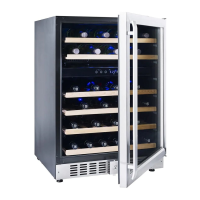
Using Your Inbuilt Wine Cabinet
The Inbuilt Wine Cabinet should be used
Ÿ
where there is an ambient temperature
above 60°F (16°C) and below 90°F
(32°C). If the ambient temperature is out of
this range, the performance of the unit
may be affected. For example, placing
your unit in extreme cold or hot conditions
may cause interior temperatures to
fluctuate and the operating range of 40-65
degrees Fahrenheit (5-18℃ ) may not be
reached.
ON/OFF Power
To turn the appliance ON or OFF, press
Ÿ
and hold the ON/OFF button for 3
seconds.
Setting the Temperature Control
You can set the temperature as you desire
Ÿ
by touching the UP or DOWN arrow
buttons. When you touch the two buttons
for the first time, the LED readout will show
the original temperature set at previous
time (the temperature preset at the factory
is 12ºC).
The temperature that you desire to set will
Ÿ
increase 1ºC if you touch the UP button
once, on the contrary the temperature will
decrease 1ºC if you touch the DOWN
button once.
When you store mostly red wines, the
Ÿ
temperature which you control by
touching the above two marks need to be
set at between 15-18°C and the LED
lamp under “RED” will be lit red.
• When you store mostly white wines, the
temperature needs to be set at between
9-14°C and the LED lamp under “WHITE”
will be lit green.
• When you store mostly sparkling wines,
the temperature needs to be set at
between 5-8°C and the LED lamp under
“SPARKL” will be lit amber.
Interior Light
You can turn the interior light ON or OFF by
Ÿ
touching the LIGHT button.
NOTE:
If the unit is unplugged, power lost, or
Ÿ
turned off, you must wait 3 to 5 minutes
before restarting the unit. If you attempt to
restart before this time delay, the Inbuilt
Wine Cabinet will not start.
When you use the Inbuilt Wine Cabinet for
Ÿ
the first time or restart the Inbuilt Wine
Cabinet after having been shut off for a
long time, there could be a few degrees
variance between the temperature you
select and the one indicated on the LED
readout. This is normal and it is due to the
length of the activation time. Once the
Inbuilt Wine Cabinet is running for a few
hours everything will be back to normal.
SPARKL
WHITE
RED
UP
LIGHT
°F
°C
DOWN
ON/OFF
 Loading...