6
Before using the appliance, always read the safety warnings.
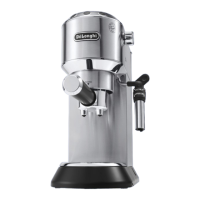
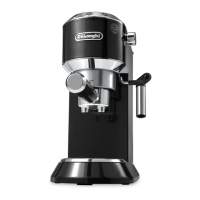
1. DESCRIPTION
1.1 Description of appliance - A
A1. Water tank lid
A2. Water tank extraction handle
A3. Water tank
A4. Cup warmer
A5. Coee spouts
A6. Main switch (ON/OFF)
A7. Cup grille
A8. Water level indicator in drip tray
A9. Drip tray
A10. Mug or glass tray (Only in certain models)
A11. Steam dial
A12. Hot water/steam dispenser
A13. Hot water/steam nozzle
A14. Frother dial
A15. Hot water/steam wand
1.2 Description of control panel - B
B1. 1 cup button
B2. “ON” light (white) in the button
B3. 2 cup button
B4. “ON” light (white) in the button
B5. Steam button
B6. “ON” light (white) in the button
B7. “Descale light” (orange)
1.3 Description of accessories - C
C1. Filter holder
C2. 1-cup lter ( symbol under lter
C3. 2-cup lter ( symbol under lter)
C4. Pod lter ( symbol under lter) (Only in certain
models)
C5. Scoop/Tamper (Only in certain models)
C6. Tamper (Only in certain models)
C7. Water softener lter (not included, available for purchase
at authorised service centres)
C8. Water hardness test
C9. Descaler (Only in certain models)
C10. Milk jug (Only in certain models)
Please note: to identify your model, see the nameplate
located on the bottom of the appliance.
1.4 Optional cleaning accessories recommended
by the manufacturer
For more information, visit www.delonghi.com.
Water softener lter
EAN: 8004399327252
2. PREPARING THE APPLIANCE
Wash all accessories with warm water and washing-up liquid,
then proceed as follows:
1. Extract the water tank (A3) (g. 1) and ll it with fresh
clean water, taking care not to exceed the MAX level (g. 2).
2. Reinsert the tank, pressing lightly to open the valves locat-
ed on the bottom of the tank itself.
Important: Never operate the appliance without water in the tank or without the
tank.
Please note: You should customise water hardness as soon as possible following the
instructions in section “9. Settings menu”.
3. SETTING UP THE APPLIANCE
When used for the rst time, the internal circuits of the appli-
ance must be rinsed as follows:
1. Plug into the mains socket. Press the main switch (A6) (g.
3).
2. The appliance runs a self-diagnosis cycle, indicated by the
sequential ashing of the three keys
3. The lights and ash, indicating that the ap-
pliance is heating up: when the lights are steadily lit, the
appliance is ready to perform a rinse cycle.
4. Attach the lter holder to the appliance; align the lter
holder handle with “INSERT”, then rotate to the right until
the handle is aligned with “CLOSE”
(g. 9).
5. Place a container with a capacity of at least 0.5 litres under
the coee spout (A5) and the hot water/steam dispenser
(g. 4).
6. Press the button . Repeat this procedure 5 times.
7. Turn the steam dial (A11) to position (g. 5) and
dispense hot water: the appliance automatically stops dis-
pensing and the lights and ash. Turn the
knob back to position ○. The purpose of this procedure is
to purge any water from the circuit before using steam to
prepare a beverage.
The appliance is ready for use.
Please note: It is normal for there to be water in
the space under the tank. This should therefore be dried regularly
with a clean sponge.
4. MAKING COFFEE
1. Place the ground coee lter (C2) or (C3) in the lter holder
(C1) (g. 6).
2. Fill the lter with ground coee (g. 7). Make sure to use
nely ground coee specically for espresso.
3. Distribute the ground coee evenly and press down gently
with the tamper (C5) or (C6) (g. 8). Make sure the coee is
at the right level after tamping. You may need to add more
coee.
 Loading...