Do you have a question about the Delta AC MAX Smart and is the answer not in the manual?
Provides official website addresses for accessing the latest documentation and product information.
Template for marking drill holes for unit mounting.
Bracket and hook for securing the charger and cable.
Various screws and fasteners, including Torx T30, for assembly.
Component for securing the power cable entry point.
Critical safety warning against using any damaged parts during installation.
Tools like a drill, pliers, and screwdrivers are needed for installation.
Specific Torx drivers required for securing various components.
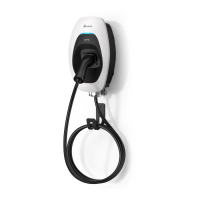
Visual examples of charger placement within a garage setting.
Specific distances required around the charger for safe and proper installation.
Detailed diagram showing the template for marking drill hole positions.
Precise measurements for drilling and mounting the charger unit.
Securing the drill hole template to the mounting surface.
Fastening the main mounting bracket to the wall with specified torque.
Fastening the charger unit to the installed bracket.
Procedure for accessing the internal components of the charger.
Steps for connecting internal electrical wires within the charger.
Configuring authorization modes using DIP switch 2.
Setting up grounding configurations with DIP switch 3.
Configuring the maximum current output using DIP switches 4, 5, and 6.
Emphasizes the necessity of grounding the charger through the PE connection.
Illustrates wiring diagrams for various grounding systems (TT, TN-C, TN-S, TN-C-S).
Details on the cable gland size and conductor compatibility.
Steps for connecting power cables to the charger terminals, with correct examples.
Attaching the charger cover using specified Torx screws.
Completing the closure of the charger unit with final screw tightening.
Explanation of indicator light colors and their operational meanings.
Details on charging modes, interfaces, input/output ratings, and electrical protection.
Information on operating conditions, dimensions, weight, and certifications.
| Charging Standard | SAE J1772 |
|---|---|
| Operating Temperature | -30°C to 50°C |
| Enclosure Rating | IP65 |
| Mounting | Wall or Pedestal |
| Output Voltage | 240VAC |
| Battery Type | Lithium-ion, Lead-acid |
| Output Current | 32 A |
| Connector Type | SAE J1772 (Type 1) |
| Connectivity | Wi-Fi, Bluetooth |
| Protection Features | Overcurrent, Overvoltage, Short Circuit |
| Display | LED |