27
Text
Trans
Installing Inside Door
With inside glass panel (D1) laid flat on a soft, padded
surface, and handle holes to the right, remove the tape
from the two bottom corner protectors, but leave the two
bottom corner protectors attached to the glass.
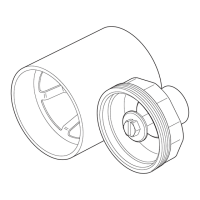
Carefully attach the water diverter sweep (N1) to the bottom
of the inside glass panel (D1). Install water diverter
sweep (N1) with the water diverter feature facing DOWN.
Ensure there is a 1/4" gap from the edge of the inside
glass panel (D1) to the edge of the U-channel of the water
diverter sweep (N1).
Proceed to Step 32.
Instalación de la puerta interna
Con el panel de vidrio interno (D1) apoyado sobre una
superficie mullida y los orificios del mango a la derecha,
retire dos protectores de esquinas del extremo inferior del
panel de vidrio interno (D1).
Fije cuidadosamente la escobilla para desvío de agua (N1)
en el extremo inferior del panel de vidrio interno (D1).
Instale la escobilla para desvío de agua (N1) con el desviador
de agua dirigido hacia ABAJO.
Asegúrese de dejar un espacio de 1/4 pulgada desde el borde
del panel de vidrio interno (D1) al borde del canal en U de la
escobilla para desvío de agua (N1).
Pase al paso 32.
Inner Door Glass Panel Assembly/Installation -- Ensamblaje/instalación del panel de vidrio de la puerta interior
30
If the shower head is on the right go to
step 31a.
Si el cabezal de la ducha está a la
derecha, vaya a paso 31a.
IMPORTANT
During installation
and use, the inner
panel should be
closest to the
shower head.
IMPORTANTE
Durante la
instalación y uso,
el panel
interno debe estar
más cerca del
mango ade
ducha.
If the shower head is on the left go to
step 31b.
Si el cabezal de la ducha está a la
izquierda, vaya a paso 31b.
Shower Head on the RightShower Head on the Right
Cabezal de ducha a la derecha
Cabezal de ducha a la derecha
Shower Head on the Left
Shower Head on the Left
Cabezal de ducha a la derecha
Cabezal de ducha a la derecha
2
2
3-3/8"3-3/8"
1
31a
D1
N1
Holes on right side
Orificios en el lado derecho
1
1/4"1/4"
CAUTION
Risk of injury or product damage. During installation,
tempered glass should not come in contact with metal parts or
hard surfaces (tile/concrete flooring) or it may shatter. Gaskets
or bushings must always be used
between glass and metal.
Riesgo de lesión o daño del producto. Durante la instalación
el vidrio templado no debe entrar en contacto con partes
metálicas ni superficies duras (como azulejos de cerámica o
pisos de hormigón) ya que podría romperse. Entre el vidrio y el
metal siempre deben utilizarse juntas y bujes.
PRECAUCIÓN
Risk of injury or product damage. During installation,
tempered glass should not come in contact with metal parts or
hard surfaces (tile/concrete flooring) or it may shatter. Gaskets
or bushings must always be used
between glass and metal.
Riesgo de lesión o daño del producto. Durante la instalación
el vidrio templado no debe entrar en contacto con partes
metálicas ni superficies duras (como azulejos de cerámica o
pisos de hormigón) ya que podría romperse. Entre el vidrio y el
metal siempre deben utilizarse juntas y bujes.