I
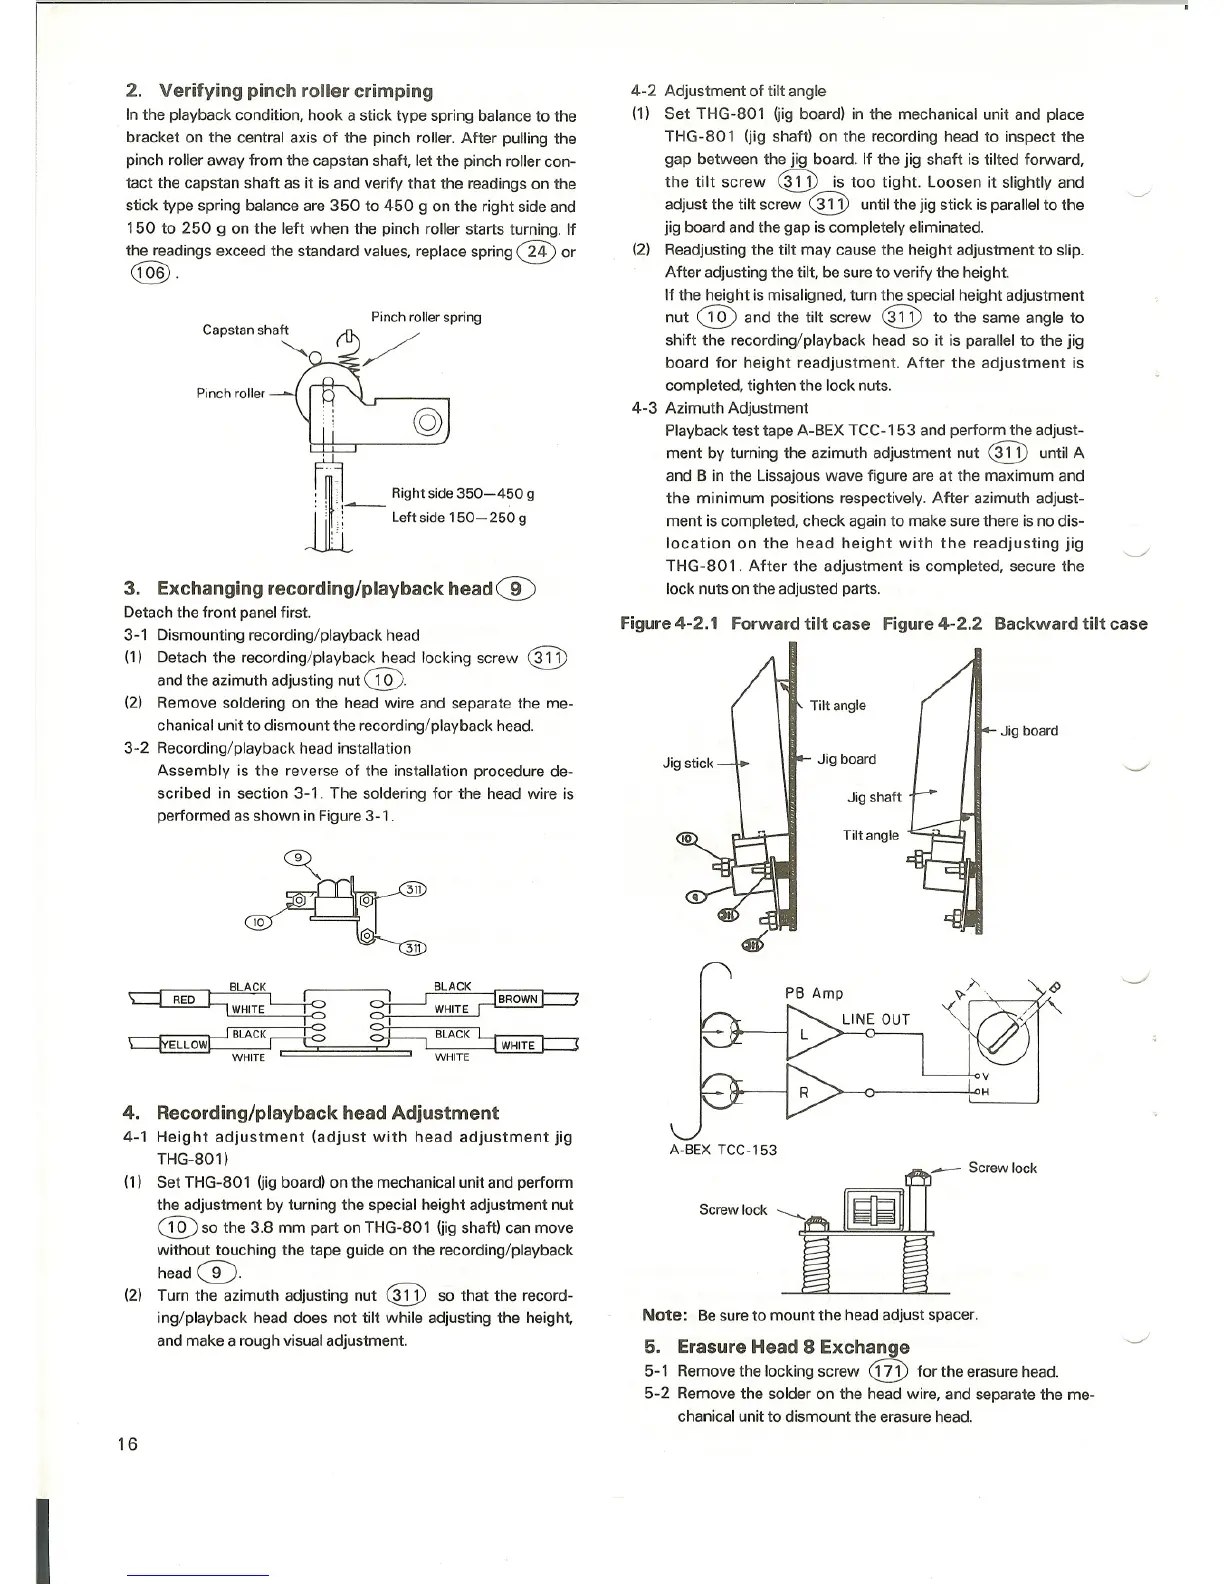
2. Verifying pinch roller crimping
In the playback condition, hook a stick type spring balance to the
bracket on the central axis of the pinch roller. After pulling the
pinch roller away from the capstan shaft, let the pinch roller con-
tact the capstan shaft as it is and verify that the readings on the
stick type spring balance are 350 to 450 g on the right side and
150 to 250 9 on the left when the pinch roller starts turning. If
the readings exceed the standard values, replace spring
®or
@.
Pinch roller spring
Pinch roller
ill:'q -,~ Right side 350-450 g
.. : Leftside150-250 g
,.
3. Exchanging recording/playback head ®
Detach the front panel first.
3-1 Dismounting recording/playback head
(1) Detach the recording/playback head locking screw
®
and the azimuth adjusting nut @.
(2) Remove soldering on the head wire and separate the me-
chanical unit to dismount the recording/playback head.
3-2 Recording/playback head installation
Assembly is the reverse of the installation procedure de-
scribed in section 3-1. The soldering for the head wire is
performed as shown in Figure 3-1 .
BLACK ~ BLACK
~ L-J-o o-!.---J ~, .IWHITE --t:? O-!-- WHITE ['
_-..----~~B-LA-C-K-~-~ ~ BLACK ~
~ ~[ ~_======~== IWHITF I \
WHITE '- WHITE
4. Recording/playback head Adjustment
4-1 Height adjustment (adjust with head adjustment jig
THG-801 )
(1) Set THG-801 (jig board) on the mechanical unit and perform
the adjustment by turning the special height adjustment nut
®so the 3.8 mm part on THG-801 (jig shaft) can move
without touching the tape guide on the recording/playback
head
0.
(2) Turn the azimuth adjusting nut ® so that the record-
ing/playback head does not tilt while adjusting the height,
and make a rough visual adjustment.
16
4-2 Adjustment of tilt angle
(1) Set THG-80 1 (jig board) in the mechanical unit and place
THG-80 1 (jig shaft) on the recording head to inspect the
gap between the jig board. If the jig shaft is tilted forward,
the tilt screw ® is too tight. Loosen it slightly and
adjust the tilt screw ® until the jig stick is parallel to the
jig board and the gap is completely eliminated.
(2) Readjusting the tilt may cause the height adjustment to slip.
After adjusting the tilt, be sure to verify the height.
If the height ismisaligned, turn the special height adjustment
nut ®and the tilt screw @ to the same angle to
shift the recording/playback head so it is parallel to the jig
board for height readjustment. After the adjustment is
completed, tighten the lock nuts.
4-3 Azimuth Adjustment
Playback test tape A-BEX TCC-1 53 and perform the adjust-
ment by turning the azimuth adjustment nut
® until A
and B in the Lissajous wave figure are at the maximum and
the minimum positions respectively. After azimuth adjust-
ment is completed, check again to make sure there is no dis-
location on the head height with the readjusting jig
THG-801. After the adjustment is completed, secure the
lock nuts on the adjusted parts.
Figure4-2.1 Forwardtilt case Figure4-2.2 Backward tilt case
Tilt angle
Jig board
Jig board
Jig shaft
Tilt angle
A-BEX TCC-153
Note: Be sure to mount the head adjust spacer.
5. Erasure Head 8 Exchange
5-1 Remove the locking screw @ for the erasure head.
5-2 Remove the solder on the head wire, and separate the me-
chanical unit to dismount the erasure head.