Do you have a question about the DENTSPLY Cavitron Plus and is the answer not in the manual?
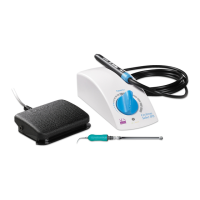
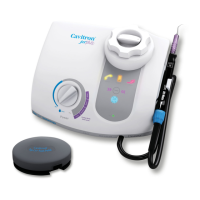
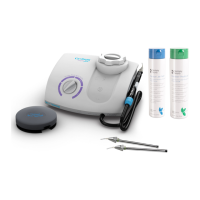
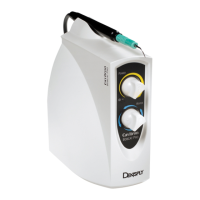
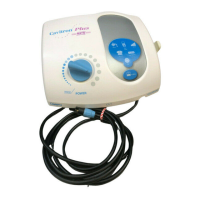
Provides a comprehensive overview of the Cavitron Plus Ultrasonic Scaler's design and features.
Contact information for obtaining technical assistance and repair services in the US and other areas.
Information on how to order necessary supplies and replacement parts for the system.
Lists the types of dental procedures for which the Cavitron Plus is indicated.
Lists procedures and conditions where the ultrasonic system should not be used.
Crucial safety warnings regarding pacemakers, environmental conditions, and aerosol reduction.
Precautions related to system placement, air circulation, handling, and water supply connections.
Precautions concerning the use of Cavitron inserts and understanding their operating limits.
Guidance on universal precautions, safety, and aerosol control during dental procedures.
Recommendations for dental water supply systems, CDC/ADA standards, and quality guidelines.
General instructions for setting up the Cavitron Plus system.
Details on water supply line pressure, filter requirements, and shut-off valve usage.
Specifies the required incoming power voltage, phase, frequency, and amperage for the system.
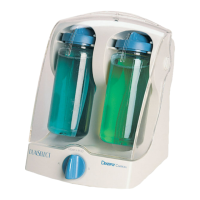
Lists all components and accessories included in the Cavitron Plus System package.
Instructions for placing the unit, managing multiple systems, and ensuring stable operation.
Steps for correctly connecting the detachable AC power cord to the system and wall outlet.
Procedure for connecting the water supply line to the system and the dental office water supply.
Step-by-step guide for installing or replacing the 'AA' batteries in the wireless foot control.
Detailed steps to synchronize the wireless foot control with the system's base unit.
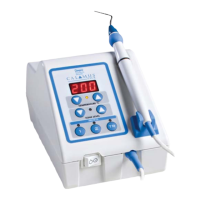
Explains the function of the Ultrasonic Power Level Control, Rinse, and Blue Zone settings.
Describes the Steri-Mate handpiece, its function, and connection to the system.
Introduces the diagnostic display and refers to Section 7.2 for detailed information.
Describes the function of the handpiece holder for storing the handpiece and cable.
Locates and explains the main power switch on the front underside of the system.
Indicates when Rinse mode is activated for lavage with minimal tip movement.
Explains the three modes of the service indicator for system malfunction or setup issues.
Lights up when the power control is in the Blue Zone for subgingival debridement.
Indicates when the Boost Mode has been activated for increased power.
Alerts when the foot control battery power is low and needs replacement.
Shows that the main power is ON, with a slight delay after switching.
Explains how to activate the Purge function for flushing and its use in synchronization.
Details the handpiece, lavage control, swivel feature, and optional grip accessory.
Overview of the interchangeable Cavitron and Cavitron Bellissima 30K Ultrasonic Inserts.
Explains the function of the O-ring for sealing coolant and when it should be replaced.
Describes how the shape and size of the insert tip determine access and adaptation.
Explains how the connecting body transfers motion from the stack to the insert tip.
Describes how the magnetostrictive stack converts energy into mechanical oscillations.
Details the two-position operation of the foot control, including Boost Mode activation.
Lists various accessories available for the Cavitron Plus system.
Provides part numbers for user-replaceable items like O-rings and filters.
Instructions for connecting the handpiece, bleeding air, and seating the insert.
Guidance on adjusting the dental chair for optimal patient comfort and clinician visibility.
Step-by-step instructions for performing ultrasonic scaling, including power and lavage adjustments.
Addresses reasons for patient sensitivity and provides techniques to mitigate it.
Detailed start-up procedures for the beginning of the day and between patients.
Procedures for cleaning and disinfecting the system components between patient use.
Steps for shutting down the system at the end of the working day, including water supply valve.
Recommendations for weekly disinfection by chemically flushing waterlines with a Sodium Hypochlorite solution.
Instructions on how to check and replace the water line filter when it becomes discolored.
Troubleshooting steps for when the system does not power up and the indicator light is off.
Troubleshooting steps for when the system has power but does not operate.
Steps to diagnose and resolve issues related to lack of water flow to the insert tip.
Troubleshooting steps when the system operates but there is no insert cavitation.
Steps to troubleshoot when the Purge Mode icon is flashing and the function is not working.
Guide for interpreting and resolving issues indicated by the blinking service indicator.
Troubleshooting steps for when the service indicator light is steadily illuminated.
Provides contact information for DENTSPLY Professional Cavitron CareS™ Factory Certified Service.
Details the warranty duration for the Cavitron Plus Ultrasonic Scaler and its components.
Lists the technical specifications of the Cavitron Plus Ultrasonic Scaler, including electrical, dimensions, and environment.
Classifies the device according to electrical shock protection, water ingress, and safety in flammable mixtures.
Provides guidance on the proper disposal of the unit in accordance with local and state laws.
Explains the meaning of the ON/OFF, BLUE ZONE, RINSE, BOOST, PURGE, SERVICE, and LOW BATTERY indicators.
Describes the function of the Power Level Control, Rinse mode, and Blue Zone settings.
Action steps for when the system does not power up and the indicator light is off.
Action steps for when the system has power but does not operate.
Action steps to diagnose and resolve issues related to lack of water flow to the insert tip.
Action steps when the system operates but there is no insert cavitation.
Action steps for slow and fast blinking service indicator, indicating factory spec issues or setup errors.
Action steps for when the service indicator light is steadily illuminated.
Troubleshooting steps for when the scaler does not power up and the pilot light remains off.
Troubleshooting steps for when fuses are good but there is no power to the circuitry.
Troubleshooting steps for when fuses F3 and/or F4 have failed.
Troubleshooting for low scaling power or vibration stopping upon tooth contact.
Troubleshooting steps for intermittent or complete loss of scaling power.
| Brand | DENTSPLY |
|---|---|
| Model | Cavitron Plus |
| Category | Media Converter |
| Language | English |