109891-01B
13
13
For more information, visit www.desatech.com
For more information, visit www.desatech.com
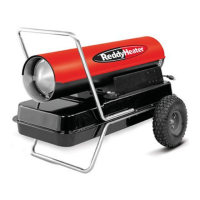
Model Size 125T 170T 200T
Output Rating (Btu/Hr) 125,000 170,000 200,000
Fuel Use only kerosene, #1/#2 diesel/fuel oil, JET A or JP-8 fuels*
Fuel Tank Capacity
(U.S. Gal./Liters) 13.5/51 13.5/51 13.5/51
Fuel Consumption
(Gal. Per Hr/Liters Per Hr) .90/3.41 1.25/4.73 1.4/5.3
Pump Pressure (psi) 6.0 6.0 6.2
Electric Requirements 120 V/60 HZ 120 V/60 HZ 120 V/60 HZ
Amperage (Normal Run) 3.6 3.6 3.6
Maximum Motor Speed (RPM) 3400 3400 3400
Hot Air Output (CFM) 520 580 600
Motor Horsepower 1/5 1/5 1/4
Shipping Weight 77/34.9 78/35.4 83/37.6
(Approximate Pounds/Kilograms)
Heater Weight without Fuel 69/31.3 70/31.8 75/34
(Approximate Pounds/Kilograms)
* Use of #2 diesel/fuel oil will result in noticeable odor and could require additional fuel filter maintenance. Use in extreme cold
temperatures may require nontoxic anti-icer additives.
SPECIFICATIONS
SERVICE PROCEDURES
SPECIFICATIONS
IGNITION CONTROL ASSEMBLY
WARNING: High voltage!
Fuse
Fuse Cover
Fuse Clips
1. Unplug heater.
2. Remove control cover screws (2) using phillips screwdriver to
expose ignition control assembly (see Figure 11, page 9).
3. Remove fuse cover.
4. Remove fuse from fuse clips.
5. Replace with new fuse (DESA part number 105880-02).
Do not substitute a fuse with a higher current rating. Use
Bussmann GMA-10 or equivalent.
6. Replace fuse cover.
7. Replace control cover (see Figure 11, page 9).
Sandpaper
Figure 22 - Sanding Rotor
Figure 23- Replacing Fuse
SERVICE PROCEDURES
Continued
11. Install blades, pump plate, air filters, and filter end cover.
12. Replace fan guard and upper shell (see Upper Shell Removal,
page 8).
13. Adjust pump pressure (see Pump Pressure Adjustment, page 9).
Note:
If rotor is still binding, proceed as follows.
14. Perform steps 1 through 6, page 12.
15. Place fine grade sandpaper (600 grit) on flat surface. Sand ro-
tor lightly in “figure 8” motion four times (see Figure 22).
16. Reinstall insert and rotor.
17. Perform steps 10 through 12, page 12.