SB-6-156-O Page 3
Part No. Description Qty. Supplied
DAD-1 Desiccant 1
HAF-6 Water Separater Filter
Element and O-Ring 1
DAD-8 In-Tank Filters Replacement Instruc-
tions (for filter between the coalescing filter
(stage 2) and the desiccant tank air inlet (stage
3). These filters keep the desiccant within the
tank: Replacing the air filter is not normally
needed. It is required only when the filter has
been damaged or plugged because the unit
was not properly maintained.
10. Be sure air supply to unit is shut off and
bleed off all air pressure from the DAD unit.
11. Make sure the desiccant material is drained
from unit per above instructions.
12. Remove the air supply line from the
water separator inlet (first stage).
13. Remove the filter bowls and filter elements
from both the first and second stage filters
of the unit.
14. Use an open end 7/8" wrench and remove
the hex nipple between the DAD tank and
the coalescing filter. The nipple should
unscrew out of the tank.
15. Using a large #3 Phillips screwdriver, un-
screw the filter.
16. Use a large #3 Phillips screwdriver and
reverse the above procedures to install a
new DAD-8 filter. Install about halfway into
the tank fitting.
17. Reverse procedure to reassemble. Refill
with desiccant.
DAD-8 In-Tank Filter Replacement Instruc-
tions (for the filter between the air regula-
tor and the desiccant tank).
18. Be sure air supply to unit is off and
bleed all air from the DAD unit.
19. Be sure all desiccant material is
drained from the unit.
20. Remove air regulator from tank by
placing a 7/8" wrench on tank bushing and
a 1-1/8" wrench on regulator.
21. Remove the brass bushing from the tank
using a 7/8" wrench. Using a large #3 Phillips
screwdriver, unscrew the filter.
22. Use a large #3 Phillips screwdriver and
reverse the above procedures to install a
new DAD-8. Install about halfway into the
tank fitting.
NOTE
The air regulator can be installed
back on the tank or additional pip-
ing can be installed to pipe the air to
a different location. Remember
that the volume of air flow can be
affected by the pipe and distance
to the new location. All fittings are
regular pipe fittings.
23. Reverse procedure to reassemble.
Refill with desiccant.
24. Before placing unit back into service, make
sure plastic bowl and metal
bowl guard are properly installed and se-
curely locked in place.
25. Confirm automatic drain operates
properly after unit is in operation. Replace
if necessary.
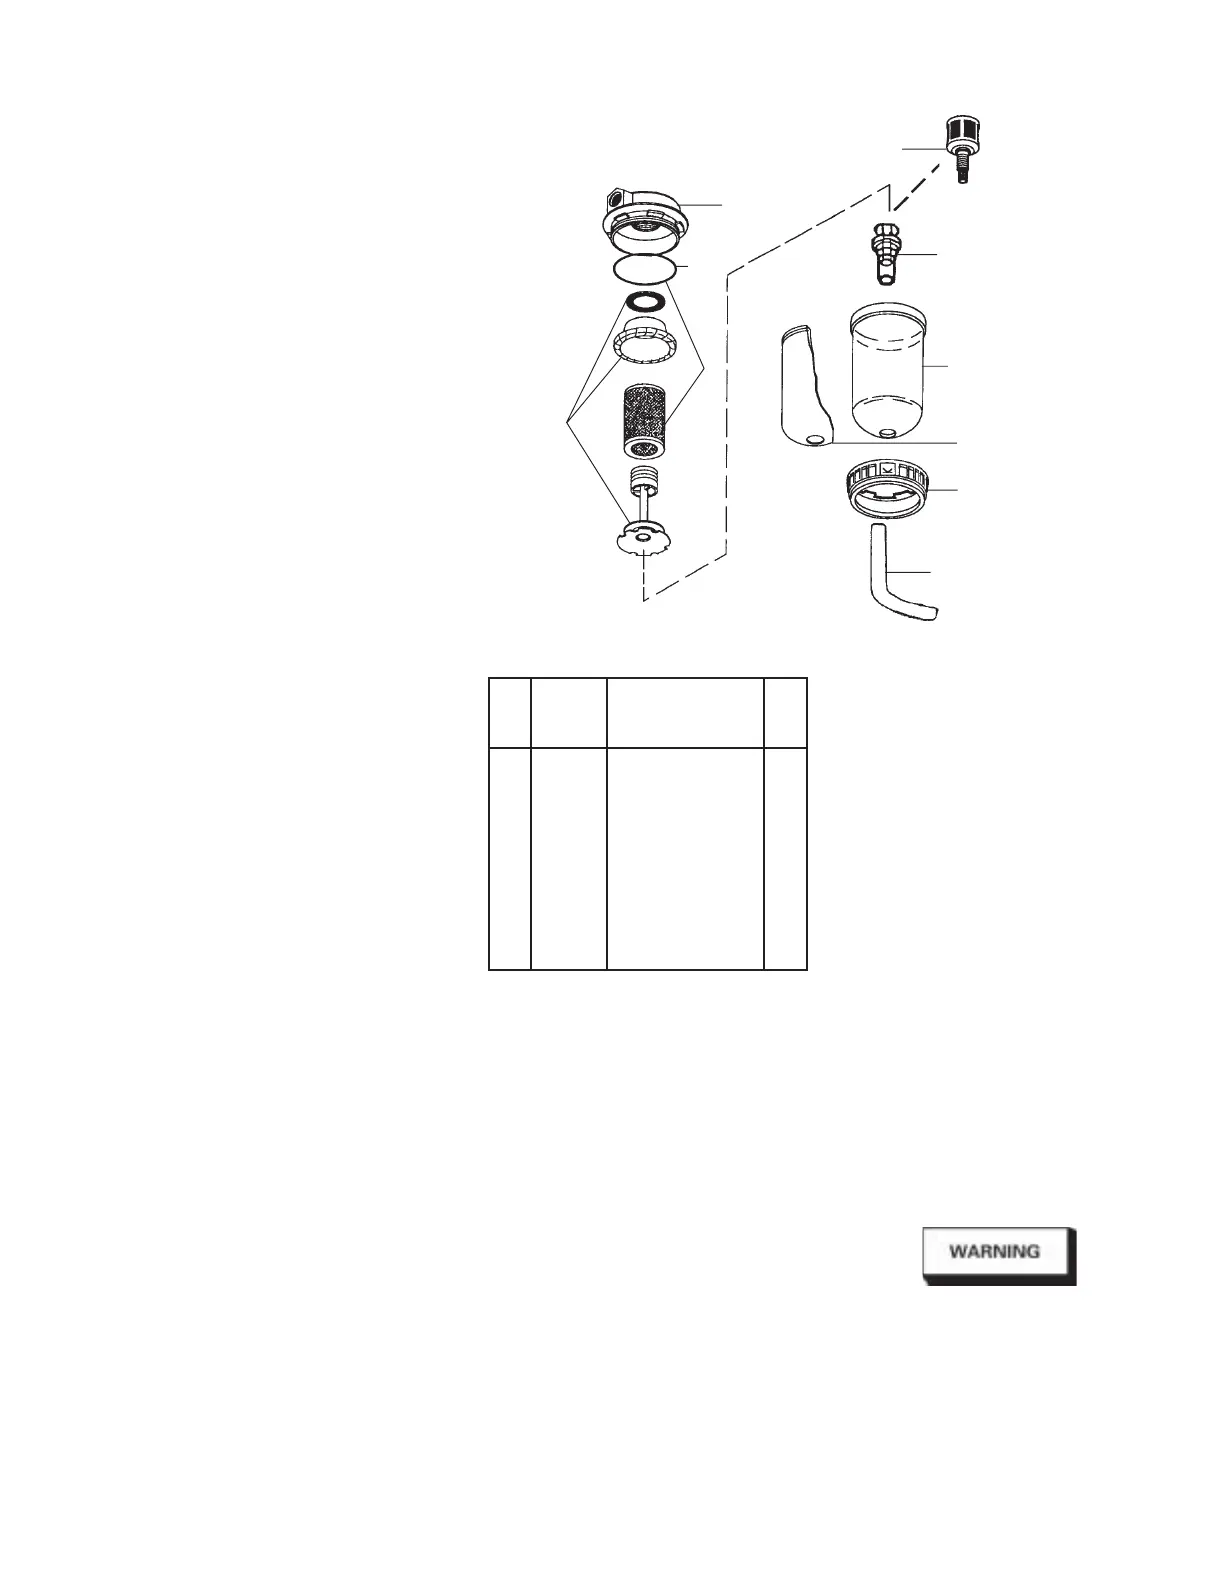
3. To open filter, press button located on
clamp ring and rotate ring either
clockwise or counterclockwise while
pulling down on ring. The metal bowl
guard and plastic bowl can then be
removed from the filter head.
4. Remove the water separator filter ele-
ment (HAF-6) by loosening the baffle
counterclockwise. Clean or replace the
filter element. The element can be
cleaned by blowing off with a duster
gun (clean from inside out). Frequency
of element cleaning/replacement will
depend upon air quality, air usage and
condition of the air piping. It is recom-
mended to check and clean/replace the
filter element every 3-6 months.
5. Remove the coalescing element (HAF-
28) by loosening counterclockwise.
Change the element when the filter
change indicator turns red or every 12
to 18 months of service.
6. Inspect o-ring (2) for damage. Replace
if necessary.
7. Inspect plastic bowl for signs of
damage such as cracks, crazing or
deterioration. Replace if necessary. See
“Caution” on page 2.
Risk of injury. Do not place unit in
service without metal bowl guard
installed.
8. Before placing unit back into service,
make sure plastic bowl and metal
bowl guard are properly installed and
securely locked in place.
9. Confirm automatic drain operates prop-
erly after unit is in operation. Replace if
necessary.
*DAD-500 is supplied with an automatic
drain. If a 13-0041 (HAF-502) filter is ordered
separately, it will include a manual drain
(automatic drain must be ordered separately
if desired).
DESCRIPTION
This 100 CFM water separator (Model
13-0041) (HAF-502) is designed to remove
dirt, pipe scale and most liquid aerosol.
It includes a 5 micron filter element.
MAINTENANCE 13-0041 (HAF-502) WATER
SEPARATOR and HAF-505 OIL COALESCING
FILTER
1. Check for water in discharge tube and
bowl at least once per shift to insure
proper drainage.
2. Before performing maintenance on unit,
close main shut-off valve located up-
stream of filter. Bleed off residual air in
unit.
PARTS LIST 13-0041
Ind.
Ref. Replacement Parts
No. Part No. Description Req.
1 --- Cover 1
2 --- O-Ring 1
3 HAF-26 Baffle Kit 1
4 HAF-6 Filter and O-Ring Kit 1
*5 HAF-18 Automatic Drain 1
6 HAF-8 Plastic Bowl 1
7 HAF-19 Metal Bowl Guard 1
8 HAF-409 Clamp Ring 1
*9 --- 1/2 x 3/8 Vinyl Tubing 1
6 ft.
*10 HAF-11 Manual Drain 1
Figure 2 13-0041 (HAF-502) 100 CFM Water Separator Filter
1
2
4
6
*5 Automatic Drain
*10 Manual
Flexible Drain
7
8
*9 Used with automatic
drain only
3
 Loading...