8
ENGLISH
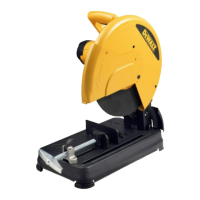
Trigger Switch (Fig. A)
To start the tool, depress the trigger switch
14
. To turn the tool
off, release the trigger switch. Keep hands and material from
wheel until it has coasted to astop.
To prevent unauthorized use of tool, install a standard padlock
(not included) into the padlock hole
15
located in thetrigger.
Material Clamping and Supporting (Fig. B, C)
• Angles are best clamped and cut with both legs resting
againstbase.
• A spacer block slightly narrower than the workpiece can be
used to increase wheel utilization (Fig.B).
• Long workpieces must be supported by a block so it will be
level with top of base (Fig.C). The cut off end should be free
to fall downward to avoid wheelbinding.
Vise Operation (Fig. D)
The vise
6
has a quick-travel feature. To release the vise when
it is clamped tightly, turn the crank
8
counterclockwise one or
two times to remove clamping pressure. Lift vise lever
9
up.
Pull crank assembly out as far as desired. Vise may be pushed
forward into work without cranking. Lower vise lever
9
then
tighten vise
6
on work by using crank
8
.
Fence Operation (Fig. A, E, F)
The fence
5
can be adjusted two ways: to change desired
cutting angle and to change spacing between the fence
andvise.
To Change the Desired Cutting Angle
1. Use the hex key
7
provided to loosen (do not remove) the
two fence bolts
13
. Align the desired angle indicator line
with the slot line
20
in the base
4
. Securely tighten both
fence bolts before use.
2. For more accurate square cuts, disconnect the power
supply, loosen the two fence bolts, push arm down until
wheel extends into base. Place a square against the wheel
and adjust fence against the square. Securely tighten both
fence bolts before use.
3. When making a miter cut, the vise
6
may not clamp
securely, depending on the thickness of the workpiece and
the miter angle. Other aids (such as spring, bar or C-clamps)
will be necessary to secure the workpiece to the fence when
making thesecuts.
To Change Spacing Between the Fence and
Vise
Using the hex key
7
provided, loosen (do not remove) the two
fence bolts
13
. Adjust the fence
5
to desired locations. Insert
both fence bolts in provided locations. Securely tighten both
fence bolts beforeuse.
Removal and Installation of Wheels
(Fig. A, G, H)
WARNING: Turn off and unplug the tool before
making any adjustments or removing or installing
attachments or accessories. Be sure the trigger
switch is in the OFF position. Do not make any
adjustment while the wheel is in motion. Do not make any
adjustment while chop saw is plugged into powersupply.
WARNING: Always keep the screw attached to the guard
and make sure the center guard is in the right position
after replacing wheel and before use, to protect user from
high speed rotatingwheel.
1. Push in spindle lock
12
and rotate wheel
10
by hand until
wheel lock lever engages slot in inside flange
24
to lock
wheel. Loosen the bolt
23
counterclockwise in the center
of the abrasive wheel with the included hex key
7
. Bolt has
right-handthread.
2. Remove the bolt
23
, washer
22
, outside flange
21
and
old wheel
10
.
3. Make sure flange surfaces are clean and flat. Install the new
abrasive wheel by reversing the abovesteps.
4. Do not overtightenbolt.
WARNING: Check the work surface that the chop saw
rests on when replacing with a new abrasive wheel. It
is possible that the wheel may contact ANY ITEMS OR
STRUCTURE THAT EXTENDS ABOVE work surface (under
the base) when the arm is fullylowered.
Operation Tips for More Accurate Cuts
• Allow the wheel to do the cutting. Excessive force will cause
the wheel to glaze reducing cutting efficiency and/or to
deflect causing inaccuratecuts.
• Properly adjust fenceangle.
• Make sure material is laying flat acrossbase.
• Properly clamp material to avoid movement andvibration.
MAINTENANCE
Your
power tool has been designed to operate
over a long period of time with a minimum of maintenance.
Continuous satisfactory operation depends upon proper tool
care and regularcleaning.
WARNING: To reduce the risk of serious personal
injury, turn tool off and disconnect tool from power
source before making any adjustments or removing/
installing attachments or accessories.. An accidental
start-up can causeinjury.
Motor Brush Inspection and Replacement
(Fig. I)
BE SURE TOOL IS UNPLUGGED BEFORE INSPECTING BRUSHES.
Brushes should be regularly inspected for wear. To inspect
brushes, unscrew the two end cap screws
27
and remove the
end cap
26
. To remove each brush
19
, first unplug the shunt
wire terminal connection. Then carefully back the brush spring
out of the brush box and remove brush. Brushes should slide
freely in brush box. If brushes are worn down to 8 mm as shown
in FigureI, they should be replaced.
To reinstall each brush, carefully back the spring out of the
brush box, insert the brush and return the spring making sure
it is pressing on the brush and not touching the brush box.

 Loading...