ENGLISH
10
ASSEMBLY AND ADJUSTMENTS
WARNING:
To reduce the risk of serious personal
injury, turn unit off and
remove the battery pack
before making any adjustments or removing/
installing attachments or accessories. An accidental
start‑up can causeinjury.
Wall Mounting
Some DeWALT chargers are designed to be wall mountable
or to sit upright on a table or work surface.If wall mounting,
locate the charger within reach of an electrical outlet, and
away from a corner or other obstructions which may impede
air flow. Use the back of the charger as a template for the
location of the mounting screws on the wall. Mount the
charger securely using drywall screws (purchased separately)
at least 1” (25.4mm) long, with a screw head diameter of
0.28–0.35” (7–9mm), screwed into wood to an optimal
depth leaving approximately 7/32” (5.5 mm) of the screw
exposed. Align the slots on the back of the charger with the
exposed screws and fully engage them in theslots.
SAVE THESE INSTRUCTIONS FOR
FUTURE USE
2. The charger and battery pack may become warm to the
touch while charging. This is a normal condition, and
does not indicate a problem. To facilitate the cooling of
the battery pack after use, avoid placing the charger or
battery pack in a warm environment such as in a metal
shed or an uninsulatedtrailer.
3. If the battery pack does not charge properly:
a. Check operation of receptacle by plugging in a lamp
or other appliance;
b. Check to see if receptacle is connected to a light
switch which turns power off when you turn out
thelights;
c. If charging problems persist, take the tool, battery
pack and charger to your local servicecenter.
4. You may charge a partially used pack whenever you
desire with no adverse effect on the batterypack.
Charger Cleaning Instructions
WARNING:Shock hazard. Disconnectthe charger
from the AC outlet before cleaning. Dirt and grease
may be removed from the exterior of the charger using
a cloth or soft non‑metallic brush. Do not use water or
any cleaningsolutions.
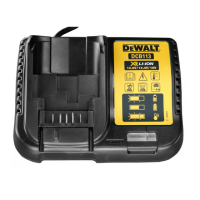
Charging a Battery (Fig. C, D)
NOTE: To ensure maximum performance and life of Li-Ion
battery packs, charge the battery pack fully before firstuse.
1. Plug the charger into an appropriate outlet before
inserting batterypack.
2. Insert and fully seat battery pack. The charging light(s)
will continuously blink indicating that the charging
process hasstarted.
For 2-Stage Chargers (DCB1102)
Stage 1Charging: Blink indicator represents the first charge
cycle that charges the majority of the battery's capacity.
Stage2Charging: Blink indicator represents the
remainder, or top off charge process, for the battery to
reach fullcapacity.
3. Charging is complete when the charging light(s)
remain(s) continuously ON. The battery pack is fully
charged and may be removed and used at this time or
left in thecharger.
NOTE: To remove the battery pack, some chargers require
the battery pack release button to bepressed.
WARNING: Only charge batteries in air temperature
over 40° F (4.5° C) and below 104° F (40°C).
Charger will not charge a faulty battery pack, which may be
indicated by the charging light(s) staying OFF. Take charger
and battery pack to an authorized service center if light(s)
stay(s)OFF.
NOTE: Refer to label near charging light(s) on charger
for blinkpatterns. Older chargers may have additional
information and/or may not have a yellow indicatorlight.
Hot/Cold Pack Delay
When the charger detects a battery pack that is too hot
or too cold, it automatically starts a Hot/Cold Pack Delay,
suspending charging until the battery pack has reached an
appropriate temperature. The charger then automatically
switches to the pack charging mode. This feature ensures
maximum battery packlife.
A cold battery pack may charge at a slower rate than a warm
batterypack.
The hot/cold pack delay will be indicated by the red light(s)
continuing to blink but with the yellow light continuously
ON. Once the battery pack has reached an appropriate
temperature, the yellow light will turn OFF and the charger
will resume the chargingprocedure.
Electronic Protection System
Li-ion tools are designed with an Electronic Protection
System that will protect the battery pack against overloading,
overheating or deep discharge. The tool will automatically
turn off and the battery pack will need to berecharged.
Important Charging Notes
1. Longest life and best performance can be obtained if
the battery pack is charged when the air temperature is
between 65° F – 75° F (18° C– 24° C). DO NOT charge
when the battery pack is below 40° F (4.5° C), or above
104° F (40° C). This is important and will prevent serious
damage to the batterypack.
Installing and Removing the Sun Shade (Fig. E)
The sun shade
17
can be installed to cover the LEDscreen
6
.
To Install
1. Align the two mounting studs
23
on the sun shade
17
with the two mounting holes
24
just above the LED
screen
6
on the motor housing
3
.
2. Firmly press the two mounting studs
23
into the
mounting holes
24
until the sun shade
17
sits flush
against the motor housing
3
.





 To Next Page