13
ENGLISH
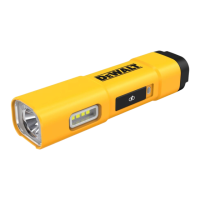
Over Temperature Protection (Fig.A)
When over temperature protection is activated, the charge
indicator LED
12
will flash red and green. The unit cannot be
used during the over temperature protection cycle.
State of Charge Indicator (Fig. A)
The DCL183 is equipped with a state of charge indicator. The
charge indicator LED
12
is used to display the current level of
charge in the battery during use and during charging. It does
not indicate tool functionality and is subject to variation based
on product components, temperature and end‑userapplication.
Checking State of Charge (Fig. C)
• When the LED light is ON, the charge indicator LED
12
will
illuminate green, yellow or red indicating the percent of
charge in the battery:
GREEN: ≥50%
YELLOW: >25% to >50%
RED: ≤25%
• If less than 3%, light and indicator will flash two times every
45 seconds until out of power.
• If the color of the charge indicator LED
12
is red or does not
illuminate, charge thebattery.
Important Charging Notes
1. The light may become warm to the touch while charging.
This is a normal condition, and does not indicate a problem.
To facilitate the cooling of the light after use, avoid placing
the light in a warm environment such as in a metal shed or
an uninsulatedtrailer.
2. If the light does not charge properly, take the light and
charging cable to your local servicecenter.
3. You may charge a partially used battery whenever you
desire with no adverse effect on thelight
.
Charging Procedure (Fig.A, B)
1. Pull the USB charging port cover
8
away from thelight.
2. Insert the USB charging plug
11
into the charging port
13
.
3. Plug the USB charger plug
10
into any USB charging port
(such as on a computer or wall adapter).
NOTE: Charging takes 1 to 4 hours depending on power
supply rating.
4. The color of the charge indicator LED
12
will be either red,
yellow or green and remain continuously ON whilecharging.
5. Charging is complete when the color of the charge indicator
LED
12
is green or turns off.
6. The battery can be left charging or the charging cable can
bedisconnnected.
Hot/Cold Delay
When the light detects that the battery is too hot or too cold,
it automatically starts a hot/cold delay, suspending charging
until the battery has reached an appropriate temperature. The
light then automatically switches to charging mode. This feature
ensures maximum batterylife.
1. A cold battery may charge at a slower rate than a
warmbattery.
2. The hot/cold delay will be indicated by the charge indicator
LED
12
flashing red and yellow.
3. Once the battery has reached an appropriate temperature,
the charge indicator LED
12
will show the color of the
current battery capacity, indicating that the light has
resumed the chargingprocedure.
5Vdc, 3A maximum) that is compliant with applicable
country regulations and international/regional
safety standards. Using adapters that do not meet
applicable safety standards could result in injury.
• Only use the charging cable supplied by the manufacturer
for charging.
• The provided charging cable is not intended for any uses
other than charging
DeWALT rechargeable tools with
charging
ports. Charging other types of tools may cause
their batteries to overheat and burst, resulting in personal
injury, property damage, fire, electric shock orelectrocution.
• DO NOT expose charging cable to water, rain orsnow.
• Pull by the plugs rather than the cord when
disconnecting the charging cable. This will reduce the risk
of damage to the plugs andcord.
• Make sure that the cord is located so that it will not
be stepped on, tripped over or otherwise subjected to
damage orstress.
• DO NOT use a charging cable with a damaged cord
orplugs. Have them replacedimmediately.
• Foreign materials of a conductive nature, such as, but
not limited to, grinding dust, metal chips, steel wool,
aluminum foil or any buildup of metallic particles should
be kept away from the charging plugs and port.
• Always unplug the charging cable from the power
supply when there is no tool attached toit.
OPERATION
CAUTION: Do not stare into the LEDs. Serious eye
injury couldresult.
Multi Function Button (Fig.A)
The spot light LED
6
two brightness settings, low and high. The
sideLED
5
has one brightness setting.
Low battery indication. If less than 3%, the activated LED and
charge indicator LED will flash two times every 45 seconds until
out of power.
NOTE: If the light remains on for more than five seconds,
pressing the multi function button
1
again will result in turning
off off the selected LED.
NOTE: With the light activated, a long press of the multi
function button
1
will result in turning off the selected LED.
1. Press the multi function button
1
once to activate the spot
light LED
6
high setting.
2. Press the multi function button
1
a second time to activate
the spot light LED
6
low setting.
3. Press the multi function button
1
a third time to activate
the side LED
5
.
 Loading...