13
ENGLISH
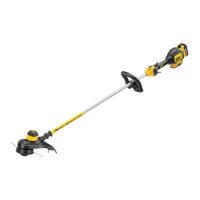
Reloading the Cutting Line (Fig. G, H)
WARNING: To reduce the risk of serious
personal injury, turn tool off and disconnect battery
pack before making any adjustments or removing/
installing attachments or accessories. An accidental
start-up can causeinjury.
CAUTION: Use only
replacement
spools and line. Using any other manufacturer's line
can reduce performance, damage the trimmer or cause
personalinjury.
Your trimmer uses 2.032 mm diameter line, however a
2.413 mm line may be used as long as it is spiral-shaped
with smooth, round edges, but may reduce runtime of
thetrimmer.
CAUTION: To avoid appliance damage, if the
cutting line protrudes beyond the trimming blade, cut it off
so that it just reaches theblade.
Use only
replacementline.
1. Removebattery.
2. Cut a max of 8 m length of trimmerline.
3. Align spool housing eyelets
21
with the arrow
22
on the
spool head
23
as shown in FigureG.
4. Thread one end of the trimmer line through an eyelet. Guide
the line through to the second eyelet and continue to pull
the line through until there are equal lengths of string on
each side of the spool housing as shown in FigureG.
5. Secure the spool cap
24
from moving with one hand.
Using your other hand, wind the string onto the spool by
rotating the spool head
23
counter clockwise as shown in
Figure H. Continue winding until 127mm of string remain
on each side of the spoolhousing.
MAINTENANCE
Your
power tool has been designed to operate
over a long period of time with a minimum of maintenance.
Continuous satisfactory operation depends upon proper tool
care and regularcleaning.
WARNING: To reduce the risk of serious
personal injury, turn tool off and disconnect battery
pack before making any adjustments or removing/
installing attachments or accessories. An accidental
start-up can causeinjury.
1. Keep the air intake slots
25
, shown in Figure I, clean to
avoidoverheating.
2. Your trimmer line can dry out over time. To keep your line in
top condition, store spare line in a plastic, sealable bag with
a tablespoon ofwater.
3. Plastic parts may be cleaned by using a mild soap and a
damprag.
4. The line cutter on the edge of the guard can dull over time.
It is recommended you periodically touch-up the sharpness
of the blade with afile.
The charger and battery pack are notserviceable.
Replacing Spool Assembly (Fig. A, J, K, L)
1. Rotate the spool housing
11
until the hole
26
in the
spindle plate aligns with notch
27
in the guard. Insert a
screwdriver through the notch and into the hole, to prevent
the spindle fromturning.
2. Unscrew and remove the spool housing by turning the
spool head clockwise (Fig.J).
NOTE: Do not try to remove the spool housing by turning
the spool cap
24
.
3. Align the spindle plate hole and notch
27
, insert a
screwdriver back into the hole and thread the new spool
housing counterclockwise. Securely tighten the new spool
onto the bolt
28
protruding from thetrimmer.
Replacing Guard (Fig. L, M)
WARNING: Never operate appliance
without guard firmly in place. Damage or personal injury
couldresult.
1. Remove the spool housing as described in the Replacing
the Spool Housingsection.
2. Remove the 4 guard screws
29
shown in FigureL.
3. Lift the guard off at an angle as shown in FigureM.
4. To attached a new guard, slide the tab
30
of the new guard
under the lip
31
of the motor housing
6
, then lower the
back of the guard into place as shown in FigureM.
5. Replace and securely tighten the 4 guard screws
29
.
6. Replace the spool housing as described in the Replacing
the Spool Housingsection.
WARNING: Never operate appliance without
guard firmly inplace.
Lubrication
Your power tool requires no additionallubrication.
Cleaning
WARNING: Blow dirt and dust out of the
main housing with dry air as often as dirt is seen collecting
in and around the air vents. Wear approved eye protection
and approved dust mask when performing thisprocedure.