10
ENGLISH
NOTE: The fuel gauge is only an indication of the charge left on
the battery pack. It does not indicate tool functionality and is
subject to variation based on product components, temperature
and end-userapplication.
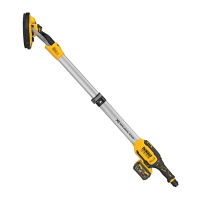
Auxiliary Handle (Fig.A)
WARNING: Before using the tool, check that the handle is
tightenedsecurely.
An auxiliary handle
5
is supplied with your tool and can be
installed on either side of the gearcase.
Wool Ingestion Shields (Fig.A)
The wool ingestion shields
7
are designed to reduce the
amount of wool, dust, and debris that gets ingested by the
motor during normaluse.
Clean the shields as soon as you start to see buildup on the
outside. To clean the wool ingestion shields:
Each ingestion shield can be easily removed for cleaning by
slipping a finger or coin underneath the removal recess and
pulling to release thecover.
Attaching and Removing Polishing Pads
(Fig.C)
WARNING: To reduce the risk of serious personal injury,
do not allow any loose portion of the polishing bonnet
or its attachment strings to spin freely. Tuck away or
trim any loose attachment strings. Loose and spinning
attachment strings can entangle your fingers or snag on
theworkpiece.
Polishing pads with a diameter of 125mm may be used with
the DCM848.
To Attach Polishing Pad With Hook And Loop
Backing Pad (Fig. D)
1. Attach hook and loop foam or wool pad
12
to hook and
loop backing pad
13
, being careful to center the backing
pad with the foam or woolpad.
Prior to Operation
1. Be sure the polishing pad is mountedcorrectly.
2. Make sure the pad rotates in the direction of the arrows on
the accessory and thetool.
3. Make sure any dirt is washed off the workpiecesurface.
OPERATION
Instructions for Use
WARNING: Always observe the safety instructions and
applicableregulations.
WARNING: To reduce the risk of serious personal
injury, turn tool off and disconnect battery pack
before making any adjustments or removing/
installing attachments or accessories. An accidental
start-up can cause injury.
9
Date code
Intended Use
The DCM848 heavy-duty polisher is designed for polishing
painted or unfinished metal, fiberglass, and composite surfaces
in professional applications. Common examples of use include
but are not limited to: auto/marine/RV/motorcycle detailing
and finish correction, boat construction and repair, and metal or
concretefinishing.
DO NOT use under wet conditions or in the presence of
flammable liquids orgases.
This heavy-duty polisher is a professional powertool.
DO NOT let children come into contact with the tool.
Supervision is required when inexperienced operators use
thistool.
• Young children and the infirm. This appliance is not
intended for use by young children or infirm persons
withoutsupervision.
• This product is not intended for use by persons (including
children) suffering from diminished physical, sensory or
mental abilities; lack of experience, knowledge or skills
unless they are supervised by a person responsible for their
safety. Children should never be left alone with thisproduct.
ASSEMBLY AND ADJUSTMENTS
WARNING: To reduce the risk of serious personal
injury, turn tool off and disconnect battery pack
before making any adjustments or removing/
installing attachments or accessories. An accidental
start-up can causeinjury.
WARNING: Use only DeWALT battery packs andchargers.
Inserting and Removing the Battery Pack
from the Tool (Fig. B)
NOTE: Make sure your battery pack
1
is fullycharged.
To Install the Battery Pack into the Tool Handle
1. Align the battery pack
1
with the rails inside the tool’s
handle (Fig. B).
2. Slide it into the handle until the battery pack is firmly seated
in the tool and ensure that you hear the lock snap intoplace.
To Remove the Battery Pack from the Tool
1. Press the release button
2
and firmly pull the battery pack
out of the toolhandle.
2. Insert battery pack into the charger as described in the
charger section of thismanual.
Fuel Gauge Battery Packs (Fig. B)
Some DeWALT battery packs include a fuel gauge which
consists of three green LED lights that indicate the level of
charge remaining in the batterypack.
To actuate the fuel gauge, press and hold the fuel gauge
button
15
. A combination of the three green LED lights will
illuminate designating the level of charge left. When the level
of charge in the battery is below the usable limit, the fuel gauge
will not illuminate and the battery will need to berecharged.

 Loading...