11
ENGLISH
Electronic Speed Control
The electronic speed control feature functions whenever the
trigger switch is fully depressed and the tool is running at the
selected speed determined by the setting of the controlwheel.
As you load the tool by pushing it down on the work surface,
the tool will compensate for the loading and maintain the
selected speed. If the speed selected by the control wheel is
2200 RPM, the tool will maintain 2200 RPM, as it isloaded.
• The electronic speed control operates only when the trigger
switch
4
is fullydepressed.
• The effect of electronic speed control is much easier to
observe at lower speed settings (2600 RPM and below), than
at highspeeds.
A conventional polisher running at a typical no-load speed of
2400 RPM slows down to about 2000 RPM under a polishing
load. Your DCM848 will continue to run at 2400 RPM (or any
speed you select with the control wheel) as a load is applied.
If the speed is too great, slow the tool down with either the
trigger switch or the controlwheel.
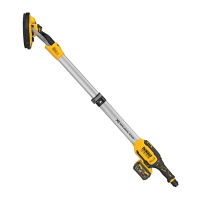
Polishing (Fig.E)
1. Without turning the tool on, grasp the handles of the tool
and pick itup.
2. Keep the tool away from your body and depress the
triggerswitch.
3. Make sure you have a firm grip on thehandles.
4. Move the tool evenly over the surface of the workpiece,
without applyingpressure.
5. Switch off the machine before taking the tool from
thesurface.
6. Check your work at shortintervals.
The auxiliary handle
5
can be easily changed to either side of
the tool for left-handed or right-handedoperation.
Use utmost care when power polishing around or over sharp
objects and contours. It is very important to use the correct
pressure while polishing various sections of an automobile
body. For example, light pressure should be applied when
polishing over sharp edges of body panels, or over edges of the
rain gutter along thetop.
WARNING: High-speed rubbing action of the polishing
bonnet upon the workpiece surface can build a static
charge on the metal portions of this tool resulting in a
static shock whentouched.
MAINTENANCE
Your power tool has been designed to operate over a long
period of time with a minimum of maintenance. Continuous
satisfactory operation depends upon proper tool care and
regularcleaning.
WARNING:To reduce the risk of serious personal
injury, turn tool off and disconnect battery pack
before making any adjustments or removing/
installing attachments or accessories. An accidental
start-up can cause injury.
The charger and battery pack are notserviceable.
WARNING:
• Apply only a gentle pressure to the tool. Do not exert
side pressure on the backingpad.
• Avoid overloading. Should the tool become hot, let it
run a few minutes under no loadcondition.
Proper Hand Position (Fig. A, D)
WARNING: To reduce the risk of serious personal injury,
ALWAYS use proper hand position asshown.
WARNING: To reduce the risk of serious personal
injury, ALWAYS hold securely in anticipation of a
suddenreaction.
Proper hand position requires one hand on the auxiliary
handle
5
or the soft rubber gear case cover
6
, with the other
hand on the main handle
14
.
Variable Speed Trigger Switch (Fig.A)
The variable speed trigger switch permits speed control from 0
to 5500RPM.
To turn the tool on, squeeze the trigger switch
4
. The farther
you depress the trigger, the faster it will operate. Releasing the
trigger turns the tooloff.
Use lower speeds for applying liquid waxes and polishes and
higher speeds for removing driedliquid.
Trigger Locking Button
The tool can be locked on for continuous use by squeezing the
trigger switch
4
fully and depressing the lock button
8
shown
in FigureA. Hold the lock button in as you gently release the
triggerswitch.
To turn the tool off from a locked-on position, squeeze and
release the trigger switchonce.
NOTE: The trigger switch can only be locked on with the tool
running at the maximum RPM designated by the speed control
wheel
3
.
No-volt release
The variable speed trigger switch
4
has a no-volt release
function. In the event of a power outage or other unexpected
shut down, the trigger switch needs to be cycled (depress the
trigger switch, release, then depress again) to restart thetool.
Speed Control Wheel (Fig.A)
The maximum speed of your tool can be changed by rotating
the speed control wheel
3
to the desired setting. For added
versatility, the trigger switch
4
may be locked in its full on
position and tool speed changed by means of the speed control
wheelalone.
The speed control wheel can be set for any speed between
2000 and 5500 RPM and the variable speed trigger switch
will then control tool speed from zero to the wheel setting.
For example: A control wheel setting of 2200 RPM will allow
the variable speed trigger switch to operate the tool between
zero and 2200RPM, depending on how far the trigger switch
isdepressed.

 Loading...