15
ENGLISH
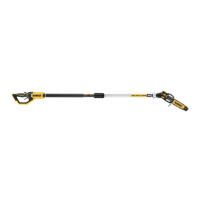
Replacement chain and bar are available from your
nearest authorized servicecenter.
The DCMPS520 requires replacement 8"(203mm) chain
DT20693
.
Replacement 8" (203mm) barDT20694.
1. Place the saw on a flat, firmsurface.
2. Remove chain assembly cover
7
as described in Installing
the Guide Bar and Saw Chainsection.
3. To remove the saw chain
5
, rotate the chain tensioning
screw
9
in the front of the housing using the flat
screwdriver end of the wrench. Turning the screw
counterclockwise allows the guide bar
4
to recede and
reduces the tension on the chain so that it may beremoved.
4. Wearing protective gloves, grasp the saw chain and lift the
worn saw chain out of the groove in the guidebar.
5. Ensure guide bar is installed with the bar tip guard
6
positioned as shown in Fig.E.
6. Place the new chain in the slot of the guide bar, making sure
the saw teeth are facing the correct direction by matching
the arrow and graphic of the saw chain on the chain
assembly cover
7
shown in Fig.G.
7. Follow instructions for Installing the Guide Bar and
SawChain.
Saw Chain and Guide Bar Oiling (Fig.A)
Auto Oiling System
This pruner is equipped with an auto oiling system that keeps
the saw chain and guide bar constantly lubricated.
1. The oil level indicator
10
shows the level of the oil in the
pruner. If the oil level is less than a quarter full, remove
the battery from the pruner and refill the oil tank with the
correct type of oil.
2. Always empty oil tank when finishedcutting.
3. Always empty oil tank before storing this unit.
NOTE: Do not operate this pruner without oil.
NOTE: Always use a high-quality, biodegradable bar and chain
oil for proper saw chain and bar lubrication. When pruning
trees, vegetable-based bar and chain oil is recommended, as
mineral-based oils may harm living trees. Never use dirty, used,
or contaminated oil. Doing so may damage the tool.
Filling the Oil Reservoir
1. Unscrew counterclockwise and then remove the oil cap
11
.
Fill the reservoir with the recommended bar and chain
oil until the oil level has reached the top of the oil level
indicator
10
.
2. Refit the oil cap and tightenclockwise.
3. Periodically switch the pruner off and check the oil
level indicator to ensure the bar and chain are being
properlyoiled.
Guide Bar Cover
1. To open the guide bar cover
12
, lift up on the latch
25
and
pull the two halves apart.
2. Fit the guide bar cover
12
onto the guide bar
4
as shown
in Fig. A, H–J. Ensure that the retaining pin
29
on the guide
bar cover
12
aligns with the retaining hole
30
on the
guide bar
4
.
3. To close the guide bar cover
12
, close the two halves and
ensure the latch
25
is secured to the notch
26
.
Wrench
1. Open the guide bar cover
12
to gain access to the
wrench
13
.
2. Remove the wrench
13
by lifting the wrench end up and
away from the guide bar cover.
3. Store the wrench in the guide bar cover when finished. First
install flat screwdriver end of the wrench into the retaining
slot
27
and then press the wrench end down until the
retaining clips
28
firmly secure the wrench
13
in place.
Guide Bar Cover and Wrench Storage
(Fig.A, H–J)
The guide bar cover
12
has two functions, to cover the guide
bar
4
when the tool is not in use and to store the wrench
13
.
Bar Tip Guard (Fig.A)
WARNING: Never operate the pruner without the
bar tip guard properly mounted on the guide bar to
prevent rotational kickback.
The bar tip guard
6
reduces the chance of the saw chain
5
at the end of the guide bar
4
from coming into contact with
objects which may cause the bar and saw chain to kickback
towards the operator. In addition to reducing the chance of
kickback, the bar tip guard
6
will reduce the chance of the
chain from touching the ground.
Transporting Pruner (Fig.A, I)
• Always turn unit off, remove the battery and cover the guide
bar
4
with the guide bar cover
12
when transporting
thepruner.
OPERATION
Instructions for Use
WARNING: Always observe the safety instructions and
applicableregulations.
WARNING: To reduce the risk of serious personal
injury, turn tool off and disconnect battery pack
before making any adjustments or removing/
installing attachments or accessories. An accidental
start‑up can causeinjury.
Proper Hand Position (Fig.A, K)
WARNING: To reduce the risk of serious personal injury,
ALWAYS use proper hand position asshown.
WARNING: To reduce the risk of serious personal
injury, ALWAYS hold securely in anticipation of a
suddenreaction.
Proper hand position requires the left hand on the front
handle
15
, under the front hand guard
3
, with the right hand
on the rear handle
14
.
NOTE: DO NOT hold the saw by the front hand guard
3
.