ENGLISH
11
4. Release the trigger and raise the nailer from the
worksurface.
NOTE: The tool motor returns to full speed
automatically without the contact trip
6
beingdepressed.
5. Repeat steps 2–4 to actuate the nextnail.
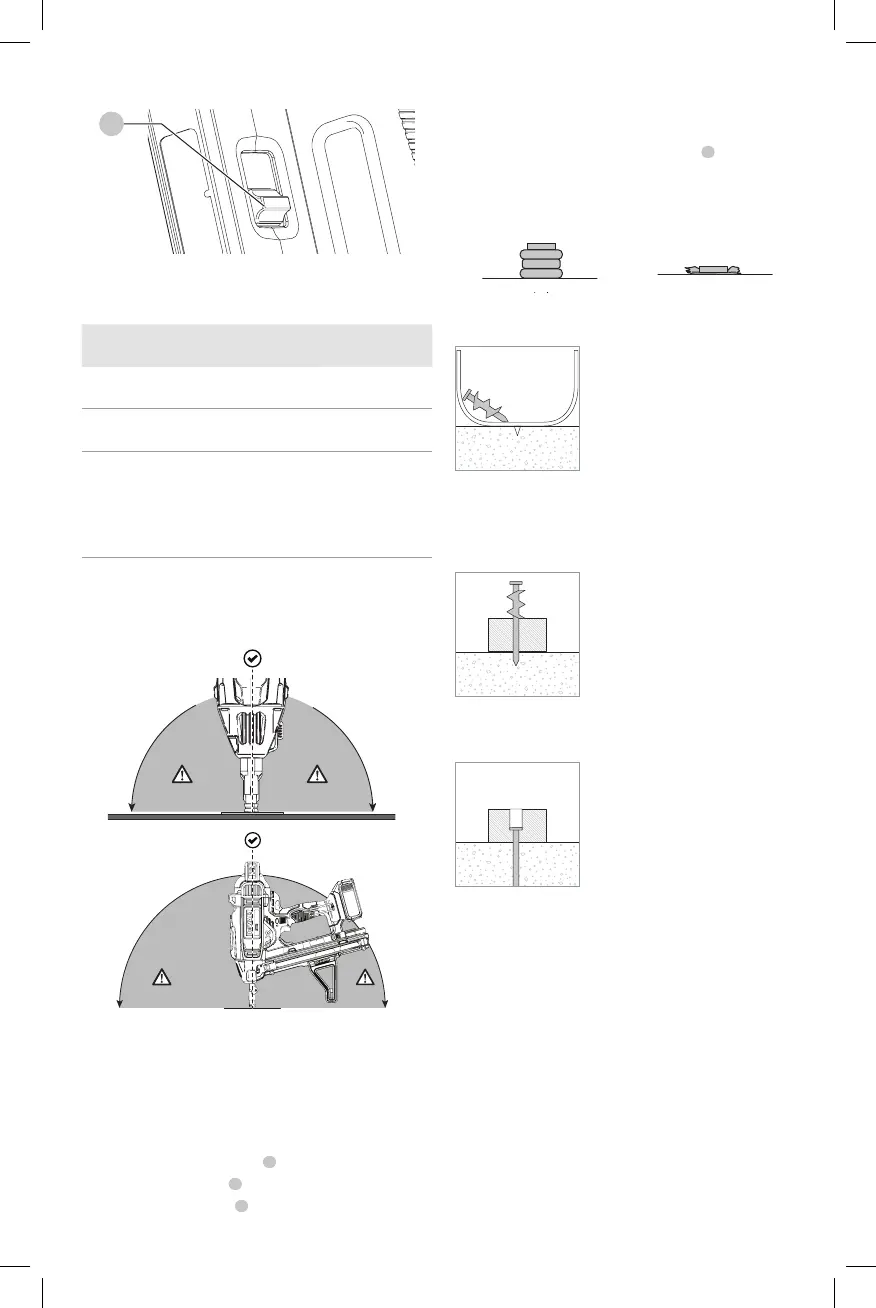
Pin/Fastener Troubleshooting
Properly driven pin Over driven pin
CONCRETE
Pin does not hold in the concrete.
Cause:
- Too hard/high
strengthconcrete.
- Hard or large aggregate
inconcrete.
Action:
- Use shorter pin.
- Switch to higher
powersetting.
Pin does not drive deep enough.
Cause:
- Pin too long.
- Power setting too low.
Action:
- Use shorter pin.
- Switch to higher
powersetting.
Pin drives too deep.
Cause:
- Pin too short for application.
- Power setting too high.
Action:
- Use longer pin.
- Switch to lower
powersetting.
Fig. H
3
NOTICE: Driving pins into soft materials at high
power settings will cause excessive wear to your
tool and may result in early failures.
Power
Setting
Application Typical Pin Length
1
Fastening to Low Strength Concrete/
Masonry (<4000 psi)
3/4" to 1-1/4" typ.
2
Fastening to High Strength Concrete
(>4000 psi)
3/4" to 1" typ.
3
Fastening to High Strength Concrete
(>4000 psi)
Fastening to structural steel;
Fastening through plywood, insulation,
or fixture
1/2" to 2-1/4" typ.
WARNING: Pins must be driven straight into the
material. Do not tilt nailer while driving fasteners.
Refer to Fig.I. Pin retention values improve when the
tool is fired perpendicular to the material.
Fig. I
Actuating the Tool (Fig. A)
WARNING: Always wear proper eye [ANSI Z87.1
(CAN/CSA Z94.3)] and ANSI S12.6 (S3.19) hearing
protection when operatingtool.
The motor rotation speed is automatically restored after
driving a pin to allow fast consecutive nailing.
1. Release the trigger lock-off
2
.
2. Push the contact trip
6
against the worksurface.
3. Pull the trigger switch
1
to actuate thetool.